• Thank you for visiting HeavyEquipmentForums.com! Our objective is to provide industry professionals a place to gather to exchange questions, answers and ideas. We welcome you to register using the "Register" icon at the top of the page. We'd appreciate any help you can offer in spreading the word of our new site. The more members that join, the bigger resource for all to enjoy. Thank you!

60 CAT D6B steering issues

Homer Dokes

Member
Joined
Nov 3, 2013
Messages
21
Location
Midwest
Occupation
Jack of all trades... pretty damn good at some.
Ok.... we are off to the races.

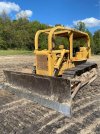
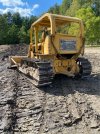
My recently (last Thursday) acquired D6b CAT has revealed it's first cause for concern post purchase. Shame on me for not seeing this before the purchase however it is what it is and I will deal with it. Generally speaking, the dozer is in great shape and I watched the unit in action prior to the purchase.

What I failed to consider is while the owner showed me how well it can push material... he really hadn't done much turning left or right. I know that I should have asked for this but spaced it at the time. After purchase I loaded it on the low boy to transport it to it's new home and found that right turns were ever so slight regardless of how hard I pushed on the brake, which did not stop the track, or how far back I pulled the steering lever. When I brought this to the owners attention he indicated that it was cold and would get better as it warmed up. I accepted this notion as the temps had plummeted to their lowest level of the season this day and believe(d) it was just a matter of an adjustment. At the moment I am hopeful that it still is just that. The left steering works like a champ and has no issues.

I am no stranger to steering systems on heavy equipment as I also own a JD 350b and am in the middle of a steering clutch replacement and brake assembly replacement on both sides. In a previous life I also spent countless hours on a JD2010 crawler with clam shell bucket and rear backhoe who's track would get thrown off about every 15 hours of use. I was just a young buck at the time and while putting a 3/4 mile road in the forest I had the stamina over a 4 hour period and nothing but a pry bar to get the track back on after which I would collapse in complete exhaustion. Ahhhhh... those were the good ol days. I however am not intimately familiar with the D6b (yet) and would like to ask if I am on the right track (no pun intended) given this is considerably larger than the 350. As I indicated, at the moment it does inch to the right.... but ever so slight and usually requiring a release of the brake and lever and reapplication for the next inch. I would have additional information to provide here however today and tomorrow are in the single digits (much worse than Thursday) with an added -20 degree windchill and am all but certain my phalanges will refuse to function as well as any articulating movement on the D6b.

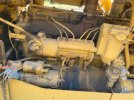
The dozer as a whole seems to be in fine shape and was currently being used for creating ponds so it hasn't been sitting by any means. I would consider my purchasing it to be for medium duty use. I have purchased 25 acres and am gearing up to put in a 75 to 80 home subdivision. My first rodeo doing such. 18 acres is all previous farm land the remainder heavily vegetated (like our current president) at this point. I will be using it to clear this vegetation of 50' and smaller trees (predominately deciduous) and brush along with landscaping for the civil infrastructure side of it... roads and the like as well as retention pond(s) once the platting engineers tell me what those will be. I believe this machine will do the job well and provide all the power necessary to achieve the ends. Engine and transmission along with hydraulics seem to be in very good order. Very little seal leaking.

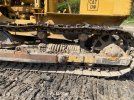
On a side note... it is missing the protection plates for the track adjusters/rails and the adjusting springs are broke on both sides. This does not hinder it's use and thankfully I was aware of this before purchase and determined I could work with this as no one had actually attempted any 'welding fixes' to the adjusters to overcome the broken springs. Would like to inquire as to desirable sources for used parts to address the plates and springs. I do intend to produce video content for all the work I do on this and load them up for others to review and learn from. Ironically I can find little out there for steering related issues on this particular machine.

Thank you again for any assistance provided.
 

Dave Neubert

Senior Member
Joined
Jul 18, 2018
Messages
1,688
Location
Monroe NC
there is inspection plates at the rear of machine you can try going in and adjusting the clutches if no adjustment can be made then you will have to replace clutches
 

OzDozer

Senior Member
Joined
Jan 18, 2007
Messages
2,207
Location
Perth, Western Australia.
Occupation
Semi-Retired ..
Start with the simple things first. The steering clutch levers and brakes require regular adjustment that is specified in the Operations and Maintenance manual. If you haven't got one, acquire one now.

Essentially, the steering levers must have a certain level of freeplay before they commence disengagement of the clutches.
This is done via adjustment of the linkages to provide the specified free play. The linkage adjustment nut is accessed by the removal of access plates on top of the steering clutch case.

The specified free play is 3-3/4" free travel at the top of the levers before engagement commences.
Ensure there is no debris or sticks or trash on top of the steering clutch housing that could interfere with steering lever operation.

The brakes and clutches are dry (not running in oil), so they incur more wear than oil-cooled brakes and clutches.
The brakes need regular adjustment to be able to operate satisfactorily, as designed.

You access the brake adjusters through the same openings as for the steering clutch adjustment.
Tighten the brake adjuster bolt until the brake lining is tight against the drum.

Get under the tractor and you will find another brake lining adjuster bolt in the bottom of the steering clutch case - this is called the brake lining support adjuster. Loosen the locknut on this adjuster bolt.

Then tighten this adjusting support bolt until it stops, which pushes the brake band against the bottom of the brake drum. Get someone to press hard on the brake pedal, this tightens the band fully against the drum.
Then unscrew the bottom adjuster bolt 1-1/2 turns and tighten the locknut. Then go back to the top brake band adjuster and unscrew it until the pedal has approximately 3-1/2 to 4-1/2 inches of travel when the brake is applied.
The brake lining must be fully clear from touching the brake drum when the brake pedal is released.

The springs in the track frame are not "adjusting" springs, they're called "recoil springs" as they are under tension when they're installed in the track frame (via a large bolt through the centre of them), and they compress when the track fills with dirt to prevent fracturing of major components such as final drive housings.

When the recoil springs compress, they will stay compressed until the excessive amount of dirt falls out of the track chain, and they will then release with a BANG, that will probably make you soil your underwear. This is quite normal operation.

If the recoil springs are broken they will still work to a certain degree, but not properly - so they really do need to be replaced.
Replacing recoil springs must be undertaken with great care as they're more dangerous than a black snake, with all their retained tension.
Naturally, recoil springs are expensive, and you must split the track to access and replace them.

One can live without track cover guards, but they are desirable, as they stop excessive amounts of dirt from falling into the track mechanism.
 

D5Dan

Well-Known Member
Joined
Sep 29, 2021
Messages
120
Location
Oxford, Maine
As Dave mentioned once you remove the inspection covers you can also inspect the brake bands…also will want to pull the lower compartment plugs to make sure they’re there and useable…and while checking the plugs verify you have the brake band adjusting bolts (mine were snapped off which allows top of brake band to drag)…

Looking forward to seeing some pics of this old machine (and in action)
 

OzDozer

Senior Member
Joined
Jan 18, 2007
Messages
2,207
Location
Perth, Western Australia.
Occupation
Semi-Retired ..
The military O&M manual for the narrow-gauge (37A S/No prefix) is available online, and you can use this manual for your operation and maintenance guidance if you can't acquire a paper copy quickly.

The steering clutch adjustment instructions starts at page 41 (original page numbering - or page 65 for the online document) and it's followed by the brake adjustment instructions.


Homer Dokes

Member
Joined
Nov 3, 2013
Messages
21
Location
Midwest
Occupation
Jack of all trades... pretty damn good at some.
Hey guys,

Thanks a bunch for the information. I do have an Operation and Maintenance manual (Form 33514-2), a D333 Engine operation and maintenance manual (Form 33511) and a service manual now. My page numbers don't quite match up. Trying to retrieve the manual from the link you provide OzDozer.

OzDozer, I have acquired new recoil springs. Would sure love to see a video of a like assembly being removed and replaced but haven't had any luck on YT. Thus far what I have been able to find are the guys that where no shoes when gas cutting the springs... don't think I want to go there. I have had a work in progress replacing steering clutches and brakes on a JD350b. Have split the track on one side and have the assembly ready to put back together. The D6B is a bit more formidable than the JD350. I intend to fully video the all the work I do on the D6B and will post them on YT and our own public servers as well.

Regarding pics, I swear I posted them here somewhere buy I can't seem to find them. Here is the 'ol girl.
 

Attachments

  • 376257145_6640928982653714_6452115716789184504_n.jpg
    376257145_6640928982653714_6452115716789184504_n.jpg
    129.3 KB · Views: 25
  • 376258376_6640929049320374_2754277020410012520_n.jpg
    376258376_6640929049320374_2754277020410012520_n.jpg
    199.9 KB · Views: 25
  • 376260100_6640928709320408_5838151322520359939_n.jpg
    376260100_6640928709320408_5838151322520359939_n.jpg
    238.2 KB · Views: 25
  • 378115764_6640929079320371_2704911146461315270_n.jpg
    378115764_6640929079320371_2704911146461315270_n.jpg
    200.7 KB · Views: 25

Homer Dokes

Member
Joined
Nov 3, 2013
Messages
21
Location
Midwest
Occupation
Jack of all trades... pretty damn good at some.
Greetings all,

I have overcome my right steering issues with the D6B which might turn out to be a love/hate thing. Pulled the access covers off the back and top of the differential case and found about 3" of what I could only characterize as gear oil in the bottom of the cavity partially submerging the right drum and brake band. The fluid was thick and battleship gray in color which has me a bit puzzled. I do not know where it's origins are from yet so that is the 'hate' concern. All fluids are at proper levels so I don't know how long this has been in the cavity or what is actually leaking. Upon draining the fluid out and spraying the heck out of the drum and brake band with brake cleaner and then adjusting the brake band nut the 'ol gal turns on a dime to the right now. It did have a substantial amount of clearance between the band and the drum.

I opened up the left steering access ports as well and while there was a bit in there to it was not enough to reach the drum or brake band. The walls of both cavities are 'wet' with a coating of oil but not heavy and it is clear. Will report more as I search for leaking seals.
 

D5Dan

Well-Known Member
Joined
Sep 29, 2021
Messages
120
Location
Oxford, Maine
Good job on getting in there and making something happen!!

Cat does have the gaskets for those access covers to help keep dirt/water out…I still need to replace my top ones, but got the rear access ones…

Certainly will have to drain that on a frequent basis (monthly? Weekly?) my guess is that’s from your final with a hint of water to give it color (plus some clutch/brake material too).

I’ll need to search/find who to give “credit” (thanks) to; but the suggestion I plan to implement is to drill the drain plug and add a cotter pin drain (can’t remember exact name for the pin- my old Kubota tractor has one on bottom of clutch/bell housing)…then at least you’ll keep your clutches/brakes from sitting in fluid again. Plus as you understand how much final drive fluid you lose you’ll know when bad becomes “don’t use until repaired” (should say, might be bevel/trans fluid too).

Just curious during your brake adjustment were you able to tighten up the square headed bolt (designed to hold brake band up off drum) on the underside of the machine?

Keep up the wrenchin’!!!
 

Homer Dokes

Member
Joined
Nov 3, 2013
Messages
21
Location
Midwest
Occupation
Jack of all trades... pretty damn good at some.
D5Dan, I pulled the bottom brake adjust bolt to perform the initial drain and then adjusted it as I put it back in. Really happy how the right side adjusted and cleaned up after the draining. As I stated... turning on a dime to the right now. Have attempted the same thing on the left but haven't quite got it dialed in yet. Machine does turn left but does not brake enough to stop left track entirely for turning on a dime. Haven't had a chance to revisit after initial testing.
 

D5Dan

Well-Known Member
Joined
Sep 29, 2021
Messages
120
Location
Oxford, Maine
That’s a good feeling when you get a system/component working as should…definitely makes the effort all worthwhile!!

I’m not near my manuals(or machine), but there’s a procedure listed to partially fill the clutch/brake cavity with cleaner, then move forward/backward to further clean the clutches/brake…might be next steps for the left-side…assuming it doesn’t get better as you use it.

I take it you plan to run the drain plugs going forward…which given the ridiculous amount of mud/clay found in mine…I’d recommend you do (unless like the guys say, you’ll be in dry/good soil)
 

Homer Dokes

Member
Joined
Nov 3, 2013
Messages
21
Location
Midwest
Occupation
Jack of all trades... pretty damn good at some.
That’s a good feeling when you get a system/component working as should…definitely makes the effort all worthwhile!!

I’m not near my manuals(or machine), but there’s a procedure listed to partially fill the clutch/brake cavity with cleaner, then move forward/backward to further clean the clutches/brake…might be next steps for the left-side…assuming it doesn’t get better as you use it.

I take it you plan to run the drain plugs going forward…which given the ridiculous amount of mud/clay found in mine…I’d recommend you do (unless like the guys say, you’ll be in dry/good soil)
Would be desirable to have that procedure.

Yes regarding the drain plugs... I can't see running the dozer without the bolts in place. Even tho the project I am working on which will go on for at least 18 months is quite dry I have seen how open threaded holes become unusable over time. I will continue to inspect to see how bad the leaks are if coming from the differential which I assume they are.
 

D5Dan

Well-Known Member
Joined
Sep 29, 2021
Messages
120
Location
Oxford, Maine
Yes regarding the drain plugs... I can't see running the dozer without the bolts in place.
…I “think” we’re saying the same thing when discussing drain plugs. Wish I were near my machine to get a better/accurate pic for you…but what I was able to find is this picture from when I was cleaning my steering/brake compartments.

In this shot you can see the temporary (silver) plug I had in place during cleaning/flushing the compartment (stock CAT plugs are recessed/flush)…and if you look further up you can see the (broken) brake bolt (shielded with have moon piece of metal)…

Since you have ur brakes adjusted/working, just want to make sure you know NOT to use those bolts to drain/check that compartment…you certainly can; but then you gotta go thru resetting them to spec…verse removing the compartment plug and ur done

Was hesitant to say anything, since I bet you have it under control, but on the slight chance we’re not eye-to-eye, would hate to see you have to go thru the brake adjustment procedure again…especially since you have it working so well…

Just like the age ole expression (I like to flip) “work harder not smarter”!?! ; )

…was also hoping I woulda run across the cat procedure for flushing the compartments…I did not, and I’m not near my manuals…

1708182784443.jpeg
 

Homer Dokes

Member
Joined
Nov 3, 2013
Messages
21
Location
Midwest
Occupation
Jack of all trades... pretty damn good at some.
…I “think” we’re saying the same thing when discussing drain plugs. Wish I were near my machine to get a better/accurate pic for you…but what I was able to find is this picture from when I was cleaning my steering/brake compartments.

In this shot you can see the temporary (silver) plug I had in place during cleaning/flushing the compartment (stock CAT plugs are recessed/flush)…and if you look further up you can see the (broken) brake bolt (shielded with have moon piece of metal)…

Since you have ur brakes adjusted/working, just want to make sure you know NOT to use those bolts to drain/check that compartment…you certainly can; but then you gotta go thru resetting them to spec…verse removing the compartment plug and ur done

Was hesitant to say anything, since I bet you have it under control, but on the slight chance we’re not eye-to-eye, would hate to see you have to go thru the brake adjustment procedure again…especially since you have it working so well…

Just like the age ole expression (I like to flip) “work harder not smarter”!?! ; )

…was also hoping I woulda run across the cat procedure for flushing the compartments…I did not, and I’m not near my manuals…

View attachment 305783
I never object to critical thinking. Thank you D5Dan for expressing it. It is quite possible that that may be my issue on the left hand side. Even tho I hadn't had a need to remove that adjustment bolt it's quite possible it was never adjusted correctly to begin with. As the weather begins to warm up again I will check it thoroughly.
 
Top