• Thank you for visiting HeavyEquipmentForums.com! Our objective is to provide industry professionals a place to gather to exchange questions, answers and ideas. We welcome you to register using the "Register" icon at the top of the page. We'd appreciate any help you can offer in spreading the word of our new site. The more members that join, the bigger resource for all to enjoy. Thank you!

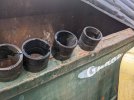
How would you remove these bushings? Komatsu pc35mr

John V

Well-Known Member
Joined
Jun 25, 2019
Messages
219
Location
North Carolina
Doesn’t look like there’s a stop shoulder in the bore, so they could likely be pounded down but that does seem like a lotta work. I’m not confident enough with a torch to cut them out with gas. Any other cutting tool you’d recommend? ID on the bore is 100mm.
 

Attachments

  • IMG_8468.jpeg
    5 MB · Views: 37

funwithfuel

Senior Member
Joined
Mar 7, 2017
Messages
5,637
Location
Will county Illinois
Occupation
Mechanic
I'd chase em out with the new. Long strong threaded rod with coupling nuts and a hollow ram line up your grease fittings draw them through from the bottom up. Use the top bushing to chase both originals up and out the top into a receiver tube or T-bar or what have you. Then draw the bottom in by itself, again make sure to align the grease hole. Good luck
 

skyking1

Senior Member
Joined
Nov 3, 2020
Messages
7,792
Location
washington
I know it seems scary, but you don't need to cut them all the way out with a torch. You just scarf some grooves about 80% of the way through in few places. It just takes all the fight out of them.
They heat up and then shrink into that relief space you just created.
Be sure to clean up all the grease and have a hose and a fire extinguisher handy.
Those would be really easy torching down on them. The bottom one is a bit of a reach, you may do better with a spiral groove.
Examples of the JD120 bushings.
PXL_20220510_220054049.jpg

Those just tapped out with a drift and a 4 lb hammer after that scarfing.
 
Joined
Aug 28, 2022
Messages
15
Location
Kissimmee Florida
I have done all the above but which is best depends on your torch skills, You can cut all the way down through the bushing and not cut the bore but even if you nicked it, it really doesnt hurt anything. I lean towards the welding 4-6 hot passes with a stick welder, throw a bolt or some piece of scrap steel sideways and weld that in there also for something to hit against, let it cool and drive out with old pin etc.
 

John V

Well-Known Member
Joined
Jun 25, 2019
Messages
219
Location
North Carolina
I liked the welding idea, so I tried that first. Couldn’t get a strong bond, so I took out a file and found out the bushings are bronze! Also, there is a machined shoulder for each of the bushings, so you couldn’t be pushed all the way through. I ended up cutting the top bushing with a carbide tipped sawzall blade. The bottom bushing came out no problem with an 8lbs sledge and a steel puck I cut out of 1/4”, with the old pin as a drift. I did cut the parent bore a little with the sawzall, but it’s insignificant.

Curiously, the new aftermarket bushings I got are hardened steel. Should I be concerned about that vs the oem bronze?
 

John V

Well-Known Member
Joined
Jun 25, 2019
Messages
219
Location
North Carolina
NO.

Put your new bushings in your freezer next to the meatloaf for 12-24 hours. Do your prep work of cleaning the bores.........most of the time they will tap in place with little effort.
Got the top one in no problem. Worked on the bottom one with the 20 min I had last night and it’s a struggle to keep it aligned and have the umf to get it in there. I’m thinking today I’ll raise the mini ex on one side with the push blade, then use a hydraulic jack to preload the bushing in the bore, then strike the top of the frame with the 8lbs sledge. Hopefully that’ll get it to go. Just using a hydraulic jack isn’t working, it just raises the whole machine.
 

John V

Well-Known Member
Joined
Jun 25, 2019
Messages
219
Location
North Carolina
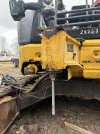
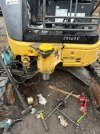
Biggest threaded rod I could find today was 3/4". It was a lotta work, but it did the trick. The rod acted as a preload and held the drifts in place. Whacked it with a sledge a handful of times, cranked down on the rod, rinse n repeat. 1.5 hours later and it's in there! The new pin slides in *like a glove*.
 

Attachments

  • IMG_8475.JPG
    IMG_8475.JPG
    605.7 KB · Views: 17
  • IMG_8476.JPG
    IMG_8476.JPG
    906.5 KB · Views: 17

BluewaterLa

Well-Known Member
Joined
Nov 17, 2022
Messages
47
Location
Louisiana
Occupation
Field Service Tech / Semi retired
I was able to replace mine, first removing by stick welding a few passes and tapped them out fairly easy.
Cleaned up the bore good and found my 30T center hole ram had blown seals.
So I rented one the next day. Used One inch threaded rod, 3/8'' plate and used the porta power to press them into position.
Make sure you get your shims in place and snug how you want it, using a hoist or engine hoist to help hold the articulation bracket makes this part much easier on your back.
 
Top