• Thank you for visiting HeavyEquipmentForums.com! Our objective is to provide industry professionals a place to gather to exchange questions, answers and ideas. We welcome you to register using the "Register" icon at the top of the page. We'd appreciate any help you can offer in spreading the word of our new site. The more members that join, the bigger resource for all to enjoy. Thank you!

D4H C Frame Pivot hole repair

Nige

Senior Member
Joined
Jun 22, 2011
Messages
29,780
Location
G..G..G..Granville.........!! Fetch your cloth.
Extract from a Service document from the early 1990s.........

"A new plated hinge pin is now used in the "C" frame group. The old hinge pin was difficult to grease, due to dirt and debris that plugged the grease fitting. The new plated hinge pin does not require greasing."
The new 8E9213 Pin is a direct replacement for the former 6Y4913 Pin on D4H Tractors"
 

Nige

Senior Member
Joined
Jun 22, 2011
Messages
29,780
Location
G..G..G..Granville.........!! Fetch your cloth.
It's hard to interpret your photos because I get the impression that the C-frame is still installed in between the mounts on the tractor frame. Have you got any measuring equipment at all that you can start getting some numbers regarding bore diameters.?
 

Mquinista

Senior Member
Joined
Jul 25, 2022
Messages
271
Location
Europe
From the pics it looks like the bushing bed is distorted... if that is the case u´re really unlucky, anyway a new pin and bushing in a fixed C frame will last long time if not abused.
in case the bushing fits too loose , let us know and we find u a fild repair to avoid line welding and boring of the bed´s.
 

Cliffy

Well-Known Member
Joined
Oct 14, 2023
Messages
59
Location
Qld
Has anyone ever had luck with non greaseable coated pins? Ive never seen them last more then a couple of thousand hours before they start to squeak and rapidly wear soon after.
 

DavePat

Active Member
Joined
Aug 18, 2017
Messages
37
Location
Sanger CA
Extract from a Service document from the early 1990s.........

"A new plated hinge pin is now used in the "C" frame group. The old hinge pin was difficult to grease, due to dirt and debris that plugged the grease fitting. The new plated hinge pin does not require greasing."
The new 8E9213 Pin is a direct replacement for the former 6Y4913 Pin on D4H Tractors"
Hmmm this link https://parts.cat.com/en/macallister/8E-9213 says
"

REPLACEMENT PARTS​

This item has been replaced by the following item(s):

Part NameRequired QuantityAvailabilityPrice (USD)
105-3016: Sleeve Bearing (Bushing)1
From Feb 27 to 28
$142.79 ea.
3B-8489: 1/8-27 PTF Hex Head Special Grease Fitting Adapter1
In Stock
$2.23 ea.
6Y-4913: LINKAGE PIN 76 MM x 150 MM (2.99 IN x 5.91 IN)1
By Feb 28
$152.25 ea.
9X-7392: SEAL LIP2
From Feb 27 to 28
$41.18 ea.
 

DavePat

Active Member
Joined
Aug 18, 2017
Messages
37
Location
Sanger CA
From the pics it looks like the bushing bed is distorted... if that is the case u´re really unlucky, anyway a new pin and bushing in a fixed C frame will last long time if not abused.
in case the bushing fits too loose , let us know and we find u a fild repair to avoid line welding and boring of the bed´s.
Yep the inside hole is distorted. The pin didn't stick all the way thru so it kind of wallowed out one side of the hole like a mortar and pestle.

Its still mounted on the tractor- The tractor frame and outside hole on the C Frame aren't that bad.

I think if I can die grind out the damaged hole to true it up that I can use an expander pin to take up the slop.
 

Nige

Senior Member
Joined
Jun 22, 2011
Messages
29,780
Location
G..G..G..Granville.........!! Fetch your cloth.
I think if I can die grind out the damaged hole to true it up that I can use an expander pin to take up the slop.
IMO an expander pin might last 5 minutes in that location, even if you could get one that big........ YMMV.
Its still mounted on the tractor- The tractor frame and outside hole on the C Frame aren't that bad.
As determined by measurement or Mk 1 eyeball.?

Your best bet is to bit the bullet and have it line bored.
 

Tugger2

Senior Member
Joined
Mar 22, 2018
Messages
1,409
Location
British Columbia
Looking at the drawing of the frame Nige has posted with the arrow pointing at hole its difficult to know whether that is a blind hole or a straight clear shot across to the hole on the other side. If its a straight shot across for the boring bar to be set up on both holes build up and line boring is a good option. If the holes are blind line boring will be more challenging but still manageable .Im not real familiar with this machine but theres some work to remove track frames for line boring .
 

DavePat

Active Member
Joined
Aug 18, 2017
Messages
37
Location
Sanger CA
The new pin 8E-9213 part number is chrome plated for just that reason. See post #21 above.
Do you have a link for this pin for sale? Cause what I found said it was not used any more
IMO an expander pin might last 5 minutes in that location, even if you could get one that big........ YMMV.

As determined by measurement or Mk 1 eyeball.?

Your best bet is to bit the bullet and have it line bored.
I definitely used the Mark 1 eyeball and the 1/2" finger feeler gauge. This is my ranch tractor so its not going out on jobs. Maybe 3 rough pads in harsh rocky terrain then just road maintenance.
I dont think line boring is an option unless I remove the C-frame. And that will only do the 2 holes on the c-frame and not the hole were the c-frame mounts to the tractor. The tracks are not in the way its the huge cylinder housing the track adjuster thing. I dont know the term.
I guess a trip to the CAT dealer is in order.
 

DavePat

Active Member
Joined
Aug 18, 2017
Messages
37
Location
Sanger CA
Better Pics. I have learned a lot since I first started the thread. I appreciate everyone's help. I know I am probably overthinking this but I dont have a lot of experience doing this kind of work. I was a helicopter (UH-1H) crewchief for 14 years. I try to get as much input as I can so I dont mess anything up. But Dozing isn't the same as flying.
Im frustrated because I don't know if I should grind off the white marked original metal and try an expander pin, or should I just fill the gap with my welder and grind it to the original size and slip a new pin in? I would think I need to slip something in between the holes so I dont accidently weld them together... if I go that route. Or other ideas?
 

Attachments

  • IMG_20240227_155424404.jpg
    IMG_20240227_155424404.jpg
    2.7 MB · Views: 15
  • IMG_20240227_155402497.jpg
    IMG_20240227_155402497.jpg
    1.8 MB · Views: 14
  • IMG_20240227_155341187.jpg
    IMG_20240227_155341187.jpg
    3.5 MB · Views: 14
  • IMG_20240227_155015965.jpg
    IMG_20240227_155015965.jpg
    3.1 MB · Views: 14

DavePat

Active Member
Joined
Aug 18, 2017
Messages
37
Location
Sanger CA
Thinking out of the box here.... but maybe I could just put some beads of weld on the old pin to take up some of the slop? Try and true up the pin a bit with a grinder or something, And reinstall it? I figure my crappy welds would be softer than the OEM metal and not do more damage to the C-Frame?
 

terex herder

Senior Member
Joined
Nov 10, 2017
Messages
1,834
Location
Kansas
How tight is the pin in the tractor? I'm guessing less than 100 hours/year on this tractor? If it were mine for an occasional usage tractor I'd have a local machine shop make me some bushings out of "pre-hard" material. I'd tack weld the bushings in place, insert a new pin, and use as desired. If you put the factory hardened bushings into a hole where the bushing isn't properly supported, the bushing will break and fall out. A softer bushing out of "pre-hard" will flex a little and conform to the wallered out hole without breaking. This should be a several hundred hour repair.

Yes, its a hack repair. When the repair wears enough to be unacceptable, evaluate how many years its lasted, the overall condition of the machine, and how much more work you want to do with the machine.
 

Mquinista

Senior Member
Joined
Jul 25, 2022
Messages
271
Location
Europe
Thinking out of the box here.... but maybe I could just put some beads of weld on the old pin to take up some of the slop? Try and true up the pin a bit with a grinder or something, And reinstall it? I figure my crappy welds would be softer than the OEM metal and not do more damage to the C-Frame?
nanan that will get u head haches...

I´ll tell u of a possible and quite cheap field repair that will last a couple thousand hrs...

First u get the C frame to a shop for repair , line welding and line boring , this shall not take more that 2/3 hours labour ... so inexpensive i think,

Second u buy new pins from aftermarket suplier like "berco" or other alike.

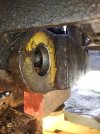
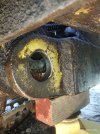
Third u take an inner micrometer and check the frame eye ovalization, if its less than ,2mm out of round u leave it.
If not u have to manually grind the hole close to this number. Then u take measure of the hole ID in X patern and find the average ID. Once u get this nr u have a machine shop to machine a bushing made out of Cromolibdenumnickel stell , known as 4337 , at least in my planet. (this material is common in any machine shop due to machine and hardening properties)
This material has very good hadning properties, it can harden to close to 57 just by hammering on it.

The inner ID of this bushing shall have a clearence of .2mm from the pin OD. And bushing OD the average hole ID plus a interference fit margin, 0,05mm.

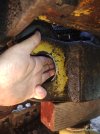
This material is hardness 40 when anealed, so u can hammer it in place, to get a good interference fit, lube it , heat up the frame eyes, hamerit cold , up to u when u finish the hammering in it will harden to 50 something at least , but is still possible to gind it manually.

Then u just need to manually round it to fit the pin. once the machine start to be used and the pin start to beat up, the bushing will harden much more, so much that it will last a long time, it will get no less hard than a factory hardened bush.

Of course u can also harden the bushing before installation, but that for pro´s...

thare are many more ways to get the same result, i have been successefull this way...
 
Top