• Thank you for visiting HeavyEquipmentForums.com! Our objective is to provide industry professionals a place to gather to exchange questions, answers and ideas. We welcome you to register using the "Register" icon at the top of the page. We'd appreciate any help you can offer in spreading the word of our new site. The more members that join, the bigger resource for all to enjoy. Thank you!

580C Loader Lift Cylinder ID - 1 pc or 2 pc?

KevinK2

Well-Known Member
Joined
Jan 30, 2012
Messages
48
Location
Scotland, CT
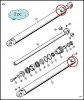
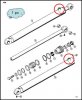
Hey folks - I need to order the seal kits of the 2 bucket lift cylinders that are (now) leaking profusely. The manuals show diagrams for 1 piece and 2 piece piston construction but the graphics for either of them look nearly identical. The only difference that I'm able to see from the outside is that the hyd return port on the 1 piece looks like a straight "T" off the cylinder where the 2 pc appears to have a cast 90 deg return along the axial length of the cylinder. Any insight out there?

The cylinders on my machine have had a few "Earl Schieb's New Jersey overhauls" (paint) on them - If anyone might know where to find a marking on these cylinders that would help too....
 

Attachments

  • 2pc.jpg
    2pc.jpg
    25.1 KB · Views: 798
  • 1pc.jpg
    1pc.jpg
    24 KB · Views: 707
Last edited:

the74longbox

New Member
Joined
Mar 30, 2012
Messages
1
Location
red river valley
If you take the cylinder apart and the piston will come apart it is a multi-piece piston. If you can find a number on the gland and it starts with a g3 it is a multi piece piston and a one piece should be stamped g10.
 

KevinK2

Well-Known Member
Joined
Jan 30, 2012
Messages
48
Location
Scotland, CT
Thx '74...

Those "G" markings... Are they going to be on the outside of the gland nut or internal? I was sort of hoping to be able to have the replacement seals on hand when it came time to breaking the assy's apart. I still have a little time to poke at them, I had to order the spanner (gland nut) wrench.
 

bowen

Senior Member
Joined
Nov 13, 2011
Messages
540
Location
N. GA USA
Occupation
Electrical Panel Builder
On mine these numbers were on the end of each cylinder under thick grease & dirt.
The 1st group numbers on the front end are the ones you need to find in the parts list for your machine.
This photo is NOT from your model.

SN_Boom_Cylinders_10-15-11 002.jpg
 

packratc

Senior Member
Joined
Jan 25, 2011
Messages
405
Location
tennnessee
I took my stabilizer piston to the dealer the other day & they took it apart to tell me it was a two piece. In the case of my 580Ck the mechanic said all the 580CK's were two piece and the 580B's could be either one. The two piece knowledge still left the parts guy about four diferent kits it could be. They want to measure the piston rod too. Take it with you or order all the numbers & return the ones you don't use. I know the dealer will love you. You can also take it apart & take it to an indusrial seal & bearing place & they can match it all up if they have a mind to. I would think you'd need a pretty good-sized city nearby to get that kind of service. Good luck, Packratc
 

KevinK2

Well-Known Member
Joined
Jan 30, 2012
Messages
48
Location
Scotland, CT
Thanks to all - '74, Bowen & PackRat - Well....I guess we'll see soon enough. I was able to get at the ends of the cylinders to clean them, and of course all the stamped info was on the inside between the cylinder & the engine. The numbers are a G1011XXXXX series stamped on the gland nut so I'm going with the info that this is a one piece assembly, which jives with the one difference in the graphics showing the difference in hyd port fittings that I noted in my orig post. Mine has the simple "T" port in the front and is plumbed back along the cylinder using an added 90 deg fittting ....I'm still not sure what actually constitutes the 2-piece unit - every diagram that I can dig up shows the piston as a single, solid, rod and the seal assemblies (although different) show nothing discernably in "2" parts....But, considering there's this guy named "Murphy" that follows me along in life telling me I'm the basis for all of his laws, I can probably be pretty certain that the unit will be a two-piece once I am able to tear them apart.
 

dwloop

Well-Known Member
Joined
Jul 14, 2011
Messages
197
Location
St. Louis, MO & Wayne Co, MO
Kevin,

Not that it matters to you, but others may have a better understanding with this. I would say that the multi piece piston is actually three pieces, but they call it two piece because the two outside pieces are name the piston, the center piece is called a center bearing, with seals in between. My 580B unit has cylinders made like this, one tell tale sign can be a ring around the outside of the end gland, with NO numbers. Some others have the number to look up and identify...

Cropped_Piston.gif

Items 13 and 14 are called "PISTON, Split", item 17 is called "Ring - Center Bearing" Items 16 are the seal glands...

Of course the single piece piston is just that, all one piece...

Single_Cropped.gif

Item 12 is the single piece piston. Items 13, 14, and 15 are seals and wear rings...

HTH
Dave
 
Last edited:

dwloop

Well-Known Member
Joined
Jul 14, 2011
Messages
197
Location
St. Louis, MO & Wayne Co, MO
Kevin, if you look in the parts book online for the 580C, there is only one loader lift cylinder listed that starts with G1011... I bet thats it...;)

You need seal kit #G102405...

EDIT: And if you do one lift cylinder, I would both. Just me...

Dave
 
Last edited:

KevinK2

Well-Known Member
Joined
Jan 30, 2012
Messages
48
Location
Scotland, CT
Yep - Shortly after i posted the last comment I noticed the lift cyl part number and went forward based on that - I came to the same conclusion - G1011XXX was the single piece assy G101184 so I ordered 2 seal kits from RAP Inc in MI. I agree about doing both sides. They're both leaking pretty heavy anyway, but the same logic will apply when I do the swing cylinders sometime in the near future, do them both...
 

KevinK2

Well-Known Member
Joined
Jan 30, 2012
Messages
48
Location
Scotland, CT
I wish that I had the time to take some pics....I was in such unfamiliar territory that I stayed focued on the job of rebuilding those loader lift cylinders. In all honesty, it was much more simple than I had anticipated. The gland came out with ease, and so did the piston/rod assy....and so did the residual oil...If there was a part of the job that made me nervous, it was breaking the bolt that attaches the piston to the rod. the manual calls for 200 to 1200 ft lbs of torque....it was all of 1200 lbs I think. It took my 3/4 drive breaker and a 4 ft section of black pipe with all of my 210 lbs dangling from it to break it loose. Bent the breaker bar significantly. I would have used the 3/4 impact wrench but didn't know if that would hurt anything. Next time it'll be the air tool. The challenge came when trying to sort out which seal went where. The old seals were so degraded that they weren't identifiable. I ended up figuring out most based on their diameter and width. The other thing that I learned is that 580C clamshells take the same kit, and if you don't read throught the entire rebuild process in the manual before getting started, you miss things like the extra 2 seals in the kit that are for the clamshell application only, so I scratched my head for an extra 45 miniutes trying to figure out how to assemble the extras that just weren't going to fit....Needless to say, the first one took me four hours, the second one took me 45 minutes. But all went well and I've cut the leaking down by 90% over the whole machine (Those old seals were completely wrecked - I'm really surprised that they didn't leak a lot more than they did)

Thanks again to everyone that help me get through this first set of seals - the swing pistons are next.....
 

Deon

Senior Member
Joined
Jul 25, 2010
Messages
768
Location
Nova Scotia, Canada
If you bent your 3/4" breaker bar with a 4 ft. pipe the 3/4"
impact wrench won't remove that nut. I have a 3/4" commercial
grade impact wrench and it can't begin to compete against a 4' pipe.
 

packratc

Senior Member
Joined
Jan 25, 2011
Messages
405
Location
tennnessee
KevinK2, I just built my two first cylinders and will mount them in the next few days. Won't know if I was successful until then. I too have a pretty good 3/4" impact but it made no impact on the piston nut of my 2-piece stabilizer cylinder. When I went to the dealer to pick up the rebuild kit they put it on their bench and their 1" impact did the deed. The shop guy says he has no trouble in the field with them. He just heats the bolt with the flame wrench and it usually comes right off. I put it back together with two drops of red loctite and my impact. I'm on the lookout to purchase a 3 or 4 ft pipe wrench and a good quality 3/4" breaker bar. Don't think my cheap 3/4" socket set one will hold up. I've considered making one out of 1" square stock. Also need to make a glans wrench. Congrats on your sucess. Packratc
 

alrman

Senior Member
Joined
Jun 20, 2009
Messages
3,332
Location
QLD Australia
Occupation
Diesel Fitter;Small Business Owner;Cleaner
I probably have said this before, but a 1" drive tbar is the tool of choice to undo piston retaining bolts. Anything else will bend, IF it actually does the job.
On an older Case hoe (till E) you will only need a couple of sockets - 1 1/2" ; 1 7/8". Using a 1" to 3/4" dr adaptor will only give you a shear point on the bigger jobs - get 1" dr sockets.
There are 1 1/8" size bolts on smaller rods - 3/4" dr usually can handle them.
 

KevinK2

Well-Known Member
Joined
Jan 30, 2012
Messages
48
Location
Scotland, CT
Deon - I was thinking that a lot of the breaking force that I'm actually imparting using the breaker and pipe was getting soaked up in the spring/bend - I guess I stepped on a rake there, I would have voted for the impact wrench having more nut to break that bolt, but there you have my inexperience with heavy machines ~!!

Packrat - I have a cheap chinese set from a cheezy discount tool warehouse (Harbor Freight) but it took the abuse, but that also may have been why it bent. I don't know how many times it would take that abuse either, but it's got 2 under it's belt so far.

I'd agree with Alrman - Until I had to get on my feet quick with some tools to DIY the issues on this machine, I always bought my tools with the "buy it once for life" attitude. But the $500 dollars invested up front got me moving for now - However, if I had to go buy the tools again (and I might have to before long...), I'd go to 1" drives.
 

KevinK2

Well-Known Member
Joined
Jan 30, 2012
Messages
48
Location
Scotland, CT
Piston.jpg

Oh yeah...and now I understand why Case went to a 2-piece piston assy. With the one-piece piston, the seal (which is rubber and not a problem) and the plastic retaining ring that seat inside (key word) the center groove have to be stretched over the OD of the piston without damaging the plastic retainer. I had to make a wooden wedge to stretch the ring over the piston O.D. but I was nervous about doing that.

The picture in the manuals suck, but then, it wasn't meant to be a set of blue prints either.
 

dwloop

Well-Known Member
Joined
Jul 14, 2011
Messages
197
Location
St. Louis, MO & Wayne Co, MO
KevinK2, I believe you'll find Case actually went in the opposite direction. They had two piece pistons on the older stuff like my 'B, and went to single piece pistons on the newer machines. :D I don't think the two piece pistons were used after the 'C series, but could be wrong....

Dave
 

KevinK2

Well-Known Member
Joined
Jan 30, 2012
Messages
48
Location
Scotland, CT
That's interesting. They changed the design to require the mechanics to stretch the hard plastic seal retainer in order to install it?....but why would I be surprised. My gal owns a Hyundai Santa Fe - they designed that so that you have to remove the intake manifold to change the 3 rear-ward spark plugs....dopes....Sometimes I think companies don't let their mechanical designers out in the sunlight enough....:Banghead
 
Top