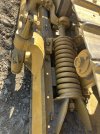
CaptainB - The center bolt is there to hold the recoil spring at the correct length when the spring is being installed. It's backed off, and the nut secured with a lock, once the spring is installed. The bolt also ensures the spring doesn't pop out of its seat at the rear.
Cat give a dimension for the new spring and new bolt for installation. In the factory, the spring would be compressed in a press, and the center bolt tightened to set the spring installation length.
The center bolt is also used to remove the recoil spring. The track is compressed using a pin sat in the top teeth of the sprocket, while the tractor is reversed. This compresses the recoil spring off its stops.
The nut on the center bolt is then tightened up snug to hold the spring compressed, the stops are unbolted, and the track adjuster removed, and the recoil spring can then be lifted out.
From there, the compressed recoil spring is installed in a press with specific adaptors to hold it, and pressure applied so the nut on the center bolt can be fully unscrewed. The pressure in the press is then relieved until the spring is fully extended and relaxed.
With a broken center bolt, you have a dilemma in that;
A. It needs to be replaced. Working with the bolt missing, there's a real risk the spring may dislodge at the rear, under adverse conditions. There's a thick pilot tube inside the spring at the rear that helps hold and guide the center bolt.
B. There are no new center bolts available, so you'll need to have one fabricated from high tensile steel.
C. It's quite unlikely any shop will fabricate a center bolt for you, as they won't want to wear the risk of a liability claim if it fails sometime, and someone gets injured (or even killed - those springs are very dangerous if they're let loose).
I've seen other owners advise the solution is to purchase a whole new recoil spring and bolt assembly.
Either way, you're looking at recoil spring removal, and this requires the spring to be compressed.
Without a center bolt, you will have to devise a safe way of compressing the recoil spring for removal.
Many people simply prefer to cut the spring in several places to remove the compression tension.
DO NOT, UNDER ANY CIRCUMSTANCES, ATTEMPT COMPRESSED RECOIL SPRING REMOVAL WITH A BROKEN CENTER BOLT, ON YOUR OWN, WITHOUT PROFESSIONAL ADVICE, AND PROFESSIONAL TOOLING.
The pressure in compressed recoil springs is multiple tons, and they need to be handled with great care and thought, in steps being taken, until the spring pressure is relieved.
The track tension is important - too tight a track, and track wear increases substantially. The same goes for too loose a track. Ideally, a sag of around 1" to 1.5" between idler and carrier roller is the recommended slack for the track.


")