Hey guys new member here. I recently picked up a 2016 SVL75-2 last month. My plan is in a few yrs retire and work for myself doing a little tractor work. Over all im very happy with the machine I got a smoking deal on it. However when back up I cant really see too well. I have a habit of getting out of the seat which has a safety feature that engages the parking brake and cuts the hydros. Its kinda annoying. So to reduce the chances of me running / backing over something I didnt intend to. I started looking on the internet. The first one I found was made by coleman Camera . For 700 bucks I figured its gonna hold up pretty well but I didnt wanna spend 700 bucks on a camera. Which leads me to amazon Camera for 45 bucks. Two day shipping it showed up and I went to work installing it.
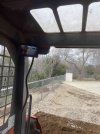
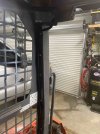
Where to mount it? My options were on the engine compartment door or on the top of the engine compartment. I took some painters tape and placed it at both locations. On the Engine compartment I couldn't see the tracks. So theres no reference for me when im backing up on ramps. Same thing with it mounted on the cab. But on the cab I could see these two big arms that are on both sides * the boom*. Right under the boom are my tracks. Welp i think i found my spot. ON the cab its sorta out of the way. its less likely to get bumped but Theres a risk of material hitting the camera. eh oh well. On the engine compartment Im more likely to back into something and hitting it.
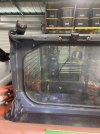
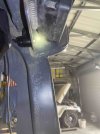
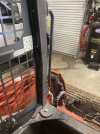
On the engine cab there were a few holes that were already drilled. Only one hole lined up with the bracket in the center of the cab. So I had to drill one hole. I cant remember what size drill bit i used. I also drilled a hole under the bracket for the camera wire. There a over hang on the top so I was able to run the wire underneath. You cant really see it. I took the left rear flood light off. behind the light theres a hole going into the cab. It was the perfect size to feed the wire through. I ran the wire down one of the post to the arm rest. I took the arm rest off and ran the wire to the front of the joystick. Below the joystick is a cigarette lighter that I use to power the LCD screen.
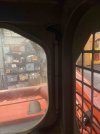
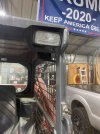
Next part is trying to find a place to mount the LCD screen. I thought about putting it on the bottom of the cab but it would be exposed. Decided the best spot is in the top left corner. Its out of the way and sorta protected. The mount that cam with the camera was junk. I tired to modify it but it was made out of plastic. I purchased this mount. I was able to take the base apart. The end had a screw attached to the plastic mount. Added one nut and was able to secure it in the corner. Now thats done I added some conduit to protect the camera wire.
Where to mount it? My options were on the engine compartment door or on the top of the engine compartment. I took some painters tape and placed it at both locations. On the Engine compartment I couldn't see the tracks. So theres no reference for me when im backing up on ramps. Same thing with it mounted on the cab. But on the cab I could see these two big arms that are on both sides * the boom*. Right under the boom are my tracks. Welp i think i found my spot. ON the cab its sorta out of the way. its less likely to get bumped but Theres a risk of material hitting the camera. eh oh well. On the engine compartment Im more likely to back into something and hitting it.
On the engine cab there were a few holes that were already drilled. Only one hole lined up with the bracket in the center of the cab. So I had to drill one hole. I cant remember what size drill bit i used. I also drilled a hole under the bracket for the camera wire. There a over hang on the top so I was able to run the wire underneath. You cant really see it. I took the left rear flood light off. behind the light theres a hole going into the cab. It was the perfect size to feed the wire through. I ran the wire down one of the post to the arm rest. I took the arm rest off and ran the wire to the front of the joystick. Below the joystick is a cigarette lighter that I use to power the LCD screen.
Next part is trying to find a place to mount the LCD screen. I thought about putting it on the bottom of the cab but it would be exposed. Decided the best spot is in the top left corner. Its out of the way and sorta protected. The mount that cam with the camera was junk. I tired to modify it but it was made out of plastic. I purchased this mount. I was able to take the base apart. The end had a screw attached to the plastic mount. Added one nut and was able to secure it in the corner. Now thats done I added some conduit to protect the camera wire.