
-
Thank you for visiting HeavyEquipmentForums.com! Our objective is to provide industry professionals a place to gather to exchange questions, answers and ideas. We welcome you to register using the "Register" icon at the top of the page. We'd appreciate any help you can offer in spreading the word of our new site. The more members that join, the bigger resource for all to enjoy. Thank you!
You are using an out of date browser. It may not display this or other websites correctly.
You should upgrade or use an alternative browser.
You should upgrade or use an alternative browser.
Cat 216 skid steer parking brake issues ECM?
- Thread starter Nerbflong
- Start date
-
- Tags
- ecm repair
Simon C
Senior Member
- Joined
- Jul 1, 2015
- Messages
- 3,080
- Location
- Rocky Mountain House , AB., Canada
- Occupation
- Heavy Equipment Mechanic
Just had one the other day, No Start, body ground hiding under a frame ground broken off. Those flat braided straps can be clean on the outside, but the braid hiding inside can be green and unseen.This is a bit winded but worth mentioning.
Have you carefully inspected the machine chassis to frame and chassis to cab ground points? Including straps, lugs and landing studs? Nige or someone with machine specific knowledge will need jump in here for clarification.
But on my 2000 226, there are two significant ground points. On one end you have a large braided strap sinched down on a ground stud. On the other end of these straps; it also has a number of smaller lugged conductor grounds sinched with the braided strap lug.
Granted your symptoms are somewhat different, grounds could be a contributing factor. My machine would sometimes start and operate perfectly. Then suddenly, it would start and not move. Or suddenly it would stop moving. Then other times it wouldn’t do anything. Not even console lights would illuminate.
It turned out that these ground attachments were significantly rusted and oxidized. In my case, the upper braided ground strap itself was also deteriorated. And the lug connections on each end were compromised by oxidation.
If your 2003 is similar to my 2000; among other things, each of the ECM interlock safety components on my machine are individually grounded in these two locations.
I initially called myself inspecting these grounds. But it wasn’t until I actually removed the nut and washers on the 4 ground studs, that I was able to identify the issue.
Thick paint was hiding the rust and oxidation. BTW, if either of the large ground straps are brownish gray and kind of powdery brittle, it is bad.
Clean the connections thoroughly and apply a no-ox grease to ‘all’ surfaces. Clean stud threads, sinch nuts & washers and apply no-ox. And as HarleyHappy suggested, star washers work well in this application.
I could not fix the one in place for the guy, but putting in a new cable resolved it all.
Rust hiding under bright paint is another good reminder.
Simon C
Jointery
Active Member
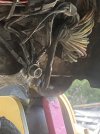
Attached are pictures of the two locations where these grounds are located on the 226. Sitting the machine- Top side cab to chassis ground over your left shoulder. You may or may not need to raise the cab to gain adequate access for cleaning and inspection. (This
where I found a bad braided strap).
The lower ground is located inside the engine compartment. Open the back door and look down to your left near the frame. You will see two studs and a short braided strap. On one stud you will see the smaller grounds along with the braided ground. (these connections were rusted/oxidized on my machine)
Attachments


Thank you all for the great advice. I just need to find someone near Rockford MI with a 216 to test with! I'm assuming the module doesn't need to be coded to the machine then if I can test that way.
I will check the grounding straps again. Thats a really good point about the visual check not good enough.
In the pinball world, we always tell people to check fuses with a meter, not visually. Shame on me!
I will check the grounding straps again. Thats a really good point about the visual check not good enough.
In the pinball world, we always tell people to check fuses with a meter, not visually. Shame on me!
Nige
Senior Member
The list of machines that use the 154-4233 Interlock Control is much longer than just a 216. Below is the list of early "A-Series" machines.I just need to find someone near Rockford MI with a 216 to test with! I'm assuming the module doesn't need to be coded to the machine then if I can test that way.


Nige
Senior Member
And here are the B & B2-Series machines. All use the same P/N of Interlock Control.
Any one of this humungous list will do as a test mule,


Any one of this humungous list will do as a test mule,
Nige,
Thanks for the list. I hadnt realized so many machines used that same part, wow!
I am on the hunt for a machine to test in, thank you.
I did retest the module I got from amazon and it acts almost identically to the current one I have.
Grounding points were checked, cleaned and redone. I metered everything before and after and had/have good grounds everywhere. Grounding straps are all in good condition.
While testing I experienced a situation where the boom wouldn't work but I had movement. That was odd.
Nige
Senior Member
The possibility still exists that it could be bad.I did retest the module I got from amazon and it acts almost identically to the current one I have.
There is a reason that OEM controls cost what they do and knock-offs are available at 20% of OEM price. Anecdotal evidence suggests that well over 50% of aftermarket controls are bad right out of the box.
Remember - "New" only means never tested in operation, not "guaranteed to work."
If you study the electrical schematic carefully and the names on the various pins you will find that the Interlock Control interfaces with both the drive system and the implement system. e.g. Pin 13 is for the parking brake solenoid and Pin 29 for the Transmission solenoid.While testing I experienced a situation where the boom wouldn't work but I had movement. That was odd.
That being the case and your "on again, off again" symptoms that screams wiring to me. Instead of testing the continuity or resistance of a particular wire with a multimeter (as per the requirements or RENR2864) try testing it with a fused 5A test light connected to one end of the wire and whatever is the other end of wherever you are testing hooked to machine frame ground. Often a wire or wires (especially on an older machine) can behave very differently when they are asked to pass 5A of current instead of a few milliamps which is all the multimeter puts through them to test for continuity.
You can manufacture your own test light quite with a regular automotive lamp holder with a 60W lamp installed in it and an inline fuse spliced into one of the pigtails.
Last edited:
Simon C
Senior Member
- Joined
- Jul 1, 2015
- Messages
- 3,080
- Location
- Rocky Mountain House , AB., Canada
- Occupation
- Heavy Equipment Mechanic
I was waiting for you to bring out the intermittent problem finder in a harness. ( 5 Amp Test Light ) . Worth mentioning that I have run mine through my meter and watch the amps. If you suddenly are more in current, then you have something stealing from the wire being tested, or if it is running low on amps it points to a wire that has degraded internally which after enough years all wires start to turn blackish in coulour and don't conduct like when they were bright copper.The possibility still exists that it could be bad.
There is a reason that OEM controls cost what they do and knock-offs are available at 20% of OEM price. Anecdotal evidence suggests that well over 50% of aftermarket controls are bad right out of the box.
Remember - "New" only means never tested in operation, not "guaranteed to work."
If you study the electrical schematic carefully and the names on the various pins you will find that the Interlock Control interfaces with both the drive system and the implement system. e.g. Pin 13 is for the parking brake solenoid and Pin 29 for the Transmission solenoid.
That being the case and your "on again, off again" symptoms that screams wiring to me. Instead of testing the continuity or resistance of a particular wire with a multimeter (as per the requirements or RENR2864) try testing it with a fused 5A test light connected to one end of the wire and whatever is the other end of wherever you are testing hooked to machine frame ground. Often a wire or wires (especially on an older machine) can behave very differently when they are asked to pass 5A of current instead of a few milliamps which is all the multimeter puts through them to test for continuity.
You can manufacture your own test light quite with a regular automotive lamp holder with a 60W lamp installed in it and an inline fuse spliced into one of the pigtails.
Have seen some other Cat Skid steers that have the tiniest flat braided ground strap that goes if I recall correctly under one of the mounting studs. How would a guy know if one of them is not corroded or the section that goes into the controller is oxidized inside. By stabbing the case of the controller and stabbing the center of battery ground with the multimeter leads a person could see if that little strap is no good. ( too much voltage loss on ground side )
Have to agree with what you said about faulty out of the box aftermarket controllers. Have read enough about them on this site.
Simon C
HarleyHappy
Senior Member
If you had a moment, while testing, where boom didn’t work but did, then that leads me to believe it a wiring integrity problem. Either current or ground or both. I am skeptical if this module is the problem now.
Thanks all. I really, really appreciate it. I will rig up a tester with a decent load on it and monitor the amps when testing pins 13 and 29
And thanks for the great pics Jointery!!
So using the lamp probe, the wires all check out fine.
For fun I started testing points in the fuse box and noticed some of the circuits that turn on with the key were lighting the bulb pretty dimly. I found that odd because I had tested the voltages before. Even with the voltmeter I was only seeing 5 volts with the engine off, 6.7 with the engine running.
I had tested the voltages earlier when starting this but that was with a meter, no load. So the lamp probe helps.
Checking the Direct Current Magnetic Switch I see 12.8 volts going in and only 5.2 coming out when the engine is off. 6.7 when the engine is running.
What an expensive part! lol. Cat!! Sheesh
The low voltage would explain the interlocks erratic behavior and the erratic locking/unlocking of the boom/drive. The poor solenoids aren't getting full voltage.
Any thoughts? Is that part fixable? it looks pretty well sealed in its can.
Nige
Senior Member
It appears as though you have two alternatives. Genuine new OEM replacement part or aftermarket. Even aftermarket it comes up at $265.Any thoughts? Is that part fixable? it looks pretty well sealed in its can.
Apparently these switches are prone to failure if the terminals are side-loaded with either large diameter cables (I imagine 4-8 SWG) or large numbers of smaller diameter wires.
Simon C
Senior Member
- Joined
- Jul 1, 2015
- Messages
- 3,080
- Location
- Rocky Mountain House , AB., Canada
- Occupation
- Heavy Equipment Mechanic
What a switch will do under load versus just measured without load reminds me of a hard lesson I learned in a fuse box years ago. Tested all the fuses with a Fluke meter and all good. No power down stream of 1 fuse. Decided to use test light to recheck the fuses, and look and learn came into play, 1 fuse had only power on 1 side. It had blown and poorly re-welded itself enough that the low impedance multimeter read full voltage. It would not light the test light. 3 hours and 1 fuse later problem was fixed.Thanks all. I really, really appreciate it. I will rig up a tester with a decent load on it and monitor the amps when testing pins 13 and 29
And thanks for the great pics Jointery!!
So using the lamp probe, the wires all check out fine.
For fun I started testing points in the fuse box and noticed some of the circuits that turn on with the key were lighting the bulb pretty dimly. I found that odd because I had tested the voltages before. Even with the voltmeter I was only seeing 5 volts with the engine off, 6.7 with the engine running.
I had tested the voltages earlier when starting this but that was with a meter, no load. So the lamp probe helps.
Checking the Direct Current Magnetic Switch I see 12.8 volts going in and only 5.2 coming out when the engine is off. 6.7 when the engine is running.
What an expensive part! lol. Cat!! Sheesh
The low voltage would explain the interlocks erratic behavior and the erratic locking/unlocking of the boom/drive. The poor solenoids aren't getting full voltage.
Any thoughts? Is that part fixable? it looks pretty well sealed in its can.
Simon C
Jointery
Active Member
Compliments on your progress!
Have you by chance inspected the back side of the fuse/relay panel? (And the ground) you are looking for charred and/or green living things. Nige mentioned this to me early on in my adventure.
It sounds like that you are definitely hot on the trail of your problem. When my machine went flaky, initially it threw a low voltage code on the headlight circuit. I was able read low voltage across the power and ground pins of the light circuit while turned on… but 12 volts turned off.
Replaced ‘all’ fuses and relays in the fuse box, and the light switch as well. All without doing a formal load test... But the switch was charred on the back and it was sticking. (Overheated) Money not wasted, but the problem was not resolved. It wasn’t until I heard a relay chattering that I realized low volt/current was at play.
Had a Kioti tractor do this to me last year. Relay chattered lime crazy! That machine was in pieces for two weeks… It turned out to be crystalized copper ring lugs on the battery hot and ground cables. Never seen that before until then…
Interlock/ECM’s no like low voltage…neither do the relays that connect the circuits to the ecm pins…
Jointery
Active Member
like crazy
HarleyHappy
Senior Member
My Kubota spends half its life outside. The damn fuse box has a terrible habit of corroding in the back where you can’t see it.
Every couple of years, I have to remove it and sandblast the back connections and slather then in NoOx.
Every couple of years, I have to remove it and sandblast the back connections and slather then in NoOx.
So I installed the catepillar part for the great price of $340 and the skid steer is working great so far! I was only able to run it 1/2 hour as I didn't have any more time, but before that I could only get 1 minute at most.
I'm considering this solved.
As a side note, the lockout module I got from amazon worked flawlessly as well.
thanks so much for the help everyone. This forum is amazing!!
I'm considering this solved.
As a side note, the lockout module I got from amazon worked flawlessly as well.
thanks so much for the help everyone. This forum is amazing!!
Nige
Senior Member
Excellent news. Now you can put it up for sale on eBay for the same as you paid for it with the bonus that it has been "tested on a machine and proved to function as intended", which is more than can be said for most aftermarket controls.As a side note, the lockout module I got from amazon worked flawlessly as well.
Simon C
Senior Member
- Joined
- Jul 1, 2015
- Messages
- 3,080
- Location
- Rocky Mountain House , AB., Canada
- Occupation
- Heavy Equipment Mechanic
Flowed current through a switch or wire can reveal all kinds of things. Glad you got it figured out and big thanks for posting it for others to learn from.
Simon C
Simon C