Jointery
Active Member
With some helpful guidance from Nige, I'll lay this one out for you. It's unique, so stay tuned as I update you on my phantom electrical/Interlock problem.
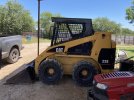
CAT 226 Model Year 2000 SN# 5FZ03535
Troubleshooting Interlock issue with a twist (flashing arm rest & park brake lights) similar to other threads for this machine.
History-
Bought this machine about 4 months ago (April 2025), that makes it about 25 years old- brand new to us. At the time of purchase, the machine started and operated generally well for its age. Like my dad always said- "bought experience is the best experience..."
Known Issues at The Time of Purchase-
1. Nonfunctional work lights
2. Fuel gauge nonfunctional
3. Hour meter nonfunctional
4. Float/detent switch nonfunctional
5. Dim console ignition lights when you turn the key to the on position
6. Leaking fuel filter/separator
New Issues Appear After Heavy Rains (the machine was drenched...)-
1. No ignition lights in the on position
2. No start
3. No Arm Rest light or Park Brake light
Initial Troubleshooting & Repair (After Dry Out)-
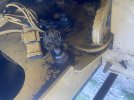
1. Identified and cleaned rusty lower chassis to frame ground strap connections
2. After the ground repair, ignition lights would come on but no start
3. Changed all fuses and relays for good measure
4. Using SIS2GO test instructions and an aftermarket scan tool, identified and replaced a bad Park Brake switch
5. Machine started and moved a few times and then returned to no ignition lights condition
6. While tinkering, I discovered a loose wire (w/a brass spade of sorts) located behind the fuel gauge). When I touched this spade to a post on the fuel gauge, the ignition lights came on. And you guessed it- the machine started and moved
7. After a few starts, it returned to its no lights condition
8. After tinkering around more behind the upper right operator console, I turned on a light switch. Mysteriously the ignition lights came on again and, you guessed it, the machine started and moved a few times
9. This time the Arm Rest/Park Brake relay was chattering..., so that was replaced a second time. The machine started and flashing Arm Rest and Park Brake starts when pressing Park Brake Switch. No propel...
Current Status-
1. The machine will start if I turn on the light switch but will not move because the Arm Rest & Park Brake lights flash when the PB switch is pressed
2. With the help of a lift, raised the cab a couple days ago. In the process, identified a severed upper chassis to cab ground strap. Later today this strap will be replaced and connections cleaned and dialectric grease applied.
3. While the primary ECM is located behind the seat back. With initial visual inspection, I do not see external corrosion. On this model however, I think the auxiliary ECM is located below the plate in the floorboard area. I'll inspect this space in the coming days
Questions for the forum-
Thank you, Nige, for helping me confirm that I am using the correct wiring diagram for this vintage machine. The diagram shows four ground points/lugs (2 upper and two lower) and I have found only three of them.
1. Where is the second upper chassis to cab ground located?
2. On this year model, could the Aux ECM be impacting Interlock signaling/power and ground?
3. Has anyone had fuse panel connector issues with the 226 machine?
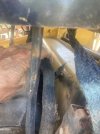
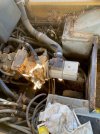
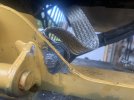
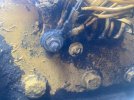
A few photos attached for information's sake.
And BTW, like my failed marriages; after we solve these phantom problems... , we can 'confidently and lovingly' hand this darling off to someone who will love and cherish her...
CAT 226 Model Year 2000 SN# 5FZ03535
Troubleshooting Interlock issue with a twist (flashing arm rest & park brake lights) similar to other threads for this machine.
History-
Bought this machine about 4 months ago (April 2025), that makes it about 25 years old- brand new to us. At the time of purchase, the machine started and operated generally well for its age. Like my dad always said- "bought experience is the best experience..."
Known Issues at The Time of Purchase-
1. Nonfunctional work lights
2. Fuel gauge nonfunctional
3. Hour meter nonfunctional
4. Float/detent switch nonfunctional
5. Dim console ignition lights when you turn the key to the on position
6. Leaking fuel filter/separator
New Issues Appear After Heavy Rains (the machine was drenched...)-
1. No ignition lights in the on position
2. No start
3. No Arm Rest light or Park Brake light
Initial Troubleshooting & Repair (After Dry Out)-
1. Identified and cleaned rusty lower chassis to frame ground strap connections
2. After the ground repair, ignition lights would come on but no start
3. Changed all fuses and relays for good measure
4. Using SIS2GO test instructions and an aftermarket scan tool, identified and replaced a bad Park Brake switch
5. Machine started and moved a few times and then returned to no ignition lights condition
6. While tinkering, I discovered a loose wire (w/a brass spade of sorts) located behind the fuel gauge). When I touched this spade to a post on the fuel gauge, the ignition lights came on. And you guessed it- the machine started and moved
7. After a few starts, it returned to its no lights condition
8. After tinkering around more behind the upper right operator console, I turned on a light switch. Mysteriously the ignition lights came on again and, you guessed it, the machine started and moved a few times
9. This time the Arm Rest/Park Brake relay was chattering..., so that was replaced a second time. The machine started and flashing Arm Rest and Park Brake starts when pressing Park Brake Switch. No propel...
Current Status-
1. The machine will start if I turn on the light switch but will not move because the Arm Rest & Park Brake lights flash when the PB switch is pressed
2. With the help of a lift, raised the cab a couple days ago. In the process, identified a severed upper chassis to cab ground strap. Later today this strap will be replaced and connections cleaned and dialectric grease applied.
3. While the primary ECM is located behind the seat back. With initial visual inspection, I do not see external corrosion. On this model however, I think the auxiliary ECM is located below the plate in the floorboard area. I'll inspect this space in the coming days
Questions for the forum-
Thank you, Nige, for helping me confirm that I am using the correct wiring diagram for this vintage machine. The diagram shows four ground points/lugs (2 upper and two lower) and I have found only three of them.
1. Where is the second upper chassis to cab ground located?
2. On this year model, could the Aux ECM be impacting Interlock signaling/power and ground?
3. Has anyone had fuse panel connector issues with the 226 machine?
A few photos attached for information's sake.
And BTW, like my failed marriages; after we solve these phantom problems...
, we can 'confidently and lovingly' hand this darling off to someone who will love and cherish her...