• Thank you for visiting HeavyEquipmentForums.com! Our objective is to provide industry professionals a place to gather to exchange questions, answers and ideas. We welcome you to register using the "Register" icon at the top of the page. We'd appreciate any help you can offer in spreading the word of our new site. The more members that join, the bigger resource for all to enjoy. Thank you!

Cat excavator bucket questions

Columbo

Senior Member
Joined
Dec 31, 2021
Messages
302
Location
New Hampshire
Hi all, two questions regarding the bucket (and thumb) on my Cat 311b excavator (s/n 08GR00401). First, there is about 10mm of space between the bucket ears and the side of the stick. Is this normal and permissible or should I get a stack of shims to center the stick between the ears?

Second, the previous owner added a mechanical thumb. Since it’s a generic thumb it does not mesh with the bucket teeth. The thumb tines hit the middle tooth and if you’re not careful the thumb has enough play to shift slightly to allow the teeth to slide alongside the tines. The makes it difficult to pick up small rocks, brush, etc and probably isn’t the best on the thumb mounts. I’ve tried to come up with a solution for this but short of cutting the tines off the thumb and re-welding them in a different spacing I could not come up with much. Possibly a bar welded across the end of all the tines for the bucket to close against? Or just learn to live with it, lol? Any opinions or ideas are appreciated!

upload_2023-2-13_13-42-46.jpeg
upload_2023-2-13_13-43-50.jpeg
 

Nige

Senior Member
Joined
Jun 22, 2011
Messages
29,552
Location
G..G..G..Granville.........!! Fetch your cloth.
Hi all, two questions regarding the bucket (and thumb) on my Cat 311b excavator (s/n 08GR00401). First, there is about 10mm of space between the bucket ears and the side of the stick. Is this normal and permissible or should I get a stack of shims to center the stick between the ears?
Bucket must be slopping a fair bit side to side with that much space between the adjuster and the stick. Are there any shims still remaining behind the adjuster cover plate (red arrow).? If there are you could remove them for a start. If that's not enough then any additional shims really ought to go behind the adjuster (blue arrow). IMO the play between the bucket and the stick really needs to be brought under control before you start messing with the contact between the thumb and the bucket.

Are the thrust faces on the end of the stick worn.? With that much play it's amazing the grease seals will stay in it if it has worn significantly.

upload_2023-2-13_18-54-35.png
 
Last edited:

Columbo

Senior Member
Joined
Dec 31, 2021
Messages
302
Location
New Hampshire
Thanks, Nige. So under the red plate are shims that I can remove and which should decrease the distance between the blue arrow and the stick? I’ll check and see what is left for shims there if I understood correctly.
 

Nige

Senior Member
Joined
Jun 22, 2011
Messages
29,552
Location
G..G..G..Granville.........!! Fetch your cloth.
Thanks, Nige. So under the red plate are shims that I can remove and which should decrease the distance between the blue arrow and the stick? I’ll check and see what is left for shims there if I understood correctly.
That is correct, but they may have already all been removed. See illustration below. Shims are Ref #1.

EDIT: Don't go mad on shims on the inside where I illustrated before because if you do there is a chance that the dowels #3 would fail to engage between the adjuster #2 and the plate #4. The idea is that #2, 3, & 4 are fixed together as a unit and the bolts #5 stop it all from rotating.

upload_2023-2-13_19-10-53.png
 
Last edited:

Columbo

Senior Member
Joined
Dec 31, 2021
Messages
302
Location
New Hampshire
So I finally got a chance to look into the bucket shim arrangement that @Nige posted about above. Unfortunately it looks like all the shims have been taken out already. It also appears that the outer plate was installed misaligned at some point as the locator dowel looks pretty damaged and has left some scoring on the back of the cover.

Based on what was posted before I should remove the bucket from the stick and the add the appropriate amount of shims behind the bucket adjuster? Any other approach? Thanks!

1678655922825.jpeg
1678655954577.jpeg
 

Columbo

Senior Member
Joined
Dec 31, 2021
Messages
302
Location
New Hampshire
So I decided to remove the bucket so I can check the grease seals and I will add shims to both sides of the stick to center the bucket. I was concerned that given the gap I would create a misalignment that could improperly load the bucket cylinder if I shines one side only. After some reading of past threads I ordered poly shims since those were recommended.

Since I’m taking the bucket off, I’m now trying to figure out what to do with the thumb tine interference with the bucket teeth. I’ll post a picture this weekend hoping for suggestions.
 

Columbo

Senior Member
Joined
Dec 31, 2021
Messages
302
Location
New Hampshire
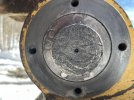
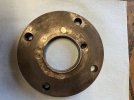
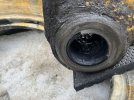
I took the bucket off today, I’m guessing that what remains of the grease seals are what I see on the faces of the stick? Sorry for the poor pictures, I was in a hurry to miss the incoming rain. I’ll clean the grease off and examine it better in the next few days.

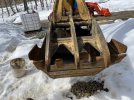
Before removing the bucket I lowered the thumb and took a couple pics showing the contact between the teeth and thumb tines. It seems to me that the possible fixes are to modify the tines (widen the spacing at the end?), cut off and reweld the tooth shanks to alter the spacing or just ignore it. Any other ideas I’m missing? Which route would you all recommend?
1680294505535.jpeg

1680294526430.jpeg

1680294443529.jpeg

1680294474143.jpeg
 

Zewnten

Senior Member
Joined
Apr 2, 2018
Messages
568
Location
Earth
Yes those are dust/grease seals. Pay attention to which direction you install them.

That is an awkward thumb/bucket pattern. Not sure how much you need the grab of the thumb tines but could you put a butter bar across them to make an even surface for the bucket teeth? Teeth shanks aren't exactly cheap and easy to cut off and re-weld.
 

Columbo

Senior Member
Joined
Dec 31, 2021
Messages
302
Location
New Hampshire
I had thought of that as an option, not sure why I forgot to list it out in my first post. It might be worth a try, at least it would stop the teeth bypassing the tines and twisting the thumb like happens now.

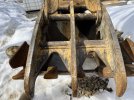
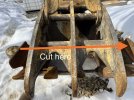
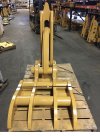
The other idea I’m considering would be cutting the thumb tines off flush with the horizontal gusset and making up a new set of tines that are wider and spaced properly (like you see many modern thumbs, see second pic below). My brother has a large welder but I’m not sure it would be able to handle this type of job which means I’d have to farm it out. I’m also concerned I would lose a lot of strength in the thumb tines if I cut them and welded on a new end arrangement. Thoughts on this?

1680436394909.jpeg

1680436421489.jpeg
 

materthegreater

Senior Member
Joined
Jul 25, 2012
Messages
683
Location
VT
I think your idea of cutting off the tines is a good one. On the 315C I've been renting, the thumb has a flat plate about where your horizontal bar is. That allows different tooth patterns to be welded to the same thumb when it is fitted to machines with different bucket tooth patterns. It's hard to see in this picture because it was taken from so far away. I can go take better pictures of it if you want. But I think you could do the same thing with yours. Cut it where you are planning, weld a piece of flat plate to the thumb where the tines were, and then you have a nice flat surface to attach your properly spaced tines to, and also it would strengthen it nicely. What thickness is the steel in that thumb?

PXL_20230116_151427426~2.jpg
 

skyking1

Senior Member
Joined
Nov 3, 2020
Messages
7,722
Location
washington
Yes cut it if you have a lot of fine grubbing to do. I have worked with worse.
When you weld it back, make those tines so they are the length of new teeth. That way you can grab little stuff without gouging so much.
 

materthegreater

Senior Member
Joined
Jul 25, 2012
Messages
683
Location
VT
I think you will want to get your bucket reinstalled in the proper alignment before you modify the thumb so you are sure that it will mesh properly. Once that is done, cut the thumb completely off straight across, and weld a 3/4" or 1" plate across the exposed end of the thumb. Then you can fabricate new or reuse the existing tines and get them properly spaced. That's how I would do it anyway. Sounds like a fun project!
 

Columbo

Senior Member
Joined
Dec 31, 2021
Messages
302
Location
New Hampshire
Thank you for the photos! What you described seems like the best way to address this issue. I’ll keep this thread updated as I work through it and with the final results.
 

coastlogger

Well-Known Member
Joined
Sep 26, 2013
Messages
150
Location
vancouver island canada
I have a 4 tooth bucket and love it. Way better penetration of hard material imo.you could cut off three tooth adapters and reweld 2 on in new spacing. Just another idea. Also being without a centre tooth on thumb is ok,a bit harder to grab rocks but better for logging.
 

Columbo

Senior Member
Joined
Dec 31, 2021
Messages
302
Location
New Hampshire
I have a 4 tooth bucket and love it. Way better penetration of hard material imo.you could cut off three tooth adapters and reweld 2 on in new spacing. Just another idea. Also being without a centre tooth on thumb is ok,a bit harder to grab rocks but better for logging.
Thanks for the feedback, I’ll keep that in mind as I rework this setup.
 
Top