One Method Of Dam Sinking/Excavating/Construction.
Hi, Folks.
For those who are having difficulty accessing this article in MS Word .doc format, here it is direct onto an HEF page. The sketches didn't copy across from the Word document, so I have uploaded them as attachments. Happy reading and happy dam-sinking.
One Method Of Sinking Dams.
Here is the method that I have used for sinking (For ‘sinking’, read ‘constructing’.) excavated dams in a rectangular shape with a ‘dozer or track loader. This method adapts easily to sloping sites, with either cross-fall, fall from front to back, or both. It also adapts to different sized dozers or loaders. It also has the advantage of handling almost all of the material only ONCE and of compacting it in place as it placed.
In most of the areas where I have used this method, there has been sealing clay available at depths between 2 and 3 feet. This does make it far easier to seal a dam. For the purposes of this article, I will assume that good sealing clay is available within 3 feet of the surface. It also helps if the dam is around 20% wider from side to side than it is from front to back. See Sketches 1 and 2. This helps to balance the quantities of material going into the sides and the backs of each corner.
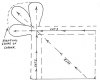
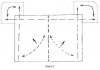
The method involves over-excavating the dam when removing the first ‘floor’. See Sketch 1. This over-excavation is then filled back in with sealing clay from the second floor, bringing the dam back to its planned size at existing ground level. See Sketch 2.
The outside broken line in Sketch 1 represents the over-excavation while the solid lines represent the dam set-out on the ground. The over-excavation line would normally be three times further out from the set-out line than the depth to sealing clay, assuming that sealing clay is found within or at the bottom of the first layer. In any event, the over-excavation should allow for at least a 2 foot thick layer of clay to be laid over the topsoil when claying up and sealing the dam.
The dam is divided into two halves for the purposes of excavating the first two floors. The double broken lines through the middle of the dam represent the dividing line between halves for the purposes of excavation of the first two floors. If one back corner is lower than the other, this dividing line would be adjusted further AWAY from the lower corner, usually by ‘educated guesswork’ calculation, to give more material to the lower corner, thus making them pretty much the same level at their tops when the first two floors have been completely removed. You will know if you have got this ‘educated guesswork’ calculation close to right after you have finished the first floor because the tops of the corners will be pretty close to level with each other, even though the base of one is lower than the other.
All bulk material from the first floor is placed into the corners, actually forming the shape of the corners in the process. This involves ‘fanning’ the material around each corner as it is pushed into the corner. To achieve this, I always put a cut along the back of the dam, down to at least the depth of the sealing clay and working each way from centre, into the respective sides of the dam. The outside of this cut is along the line of the over-excavation for the back of the dam and the excavated material is pushed up into a ramp at a slope of 1:3 with the toe of the ramp on the over-excavation line for the side of the dam.
The next cut is along the side of dam on each side, again with the outside of the cut along the over-excavation line, and again with all the material pushed into a ramp with its toe at the over-excavation line for the back of the dam. This should result in two ramps of material forming the sides of what will eventually be each corner.
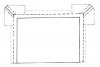
The next cut in each half of the dam bisects the remaining material in each half and the material is again pushed out in a ramp, partially filling the space between the existing two ramps. See Sketch 3. The broken lines paralleling Cuts 1 and 2 represent the sides of these cuts, the outside of each cut being on the over-excavation line. Cut 3 is only shown by its centreline. The remaining material in each half of the dam is then pushed into the spaces between these three ramps, forming the fan shape of the corner. Again, see Sketch 3.
The remaining scraps are cleaned up, first towards the back of the dam forming a batter with its toe on the over-excavation line along the back of the dam. The last of the scraps are then cleaned up from the middle of the dam towards each side, forming a batter on each side with the toe of each batter starting on the respective side’s over-excavation line.
As a rough guide, somewhere between 1/3 and ½ of all the material in a dam of this type is in the first two layers and all but the scraps of these two layers goes into building the corners.
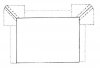
When you have all the topsoil pushed into the corners and the floor cleaned up, there is one more step before ripping for the next layer. You need to cut the inside of the corner that you have just pushed up so that it has a distinct ‘V’ in it, running upwards from the middle of the base of the corner to the middle of the top. This ‘V’ should be exactly in line with where the finished ‘V’ of the corner will be and in the shape of the finished corner, although starting at the over-excavation lines. This step is necessary so that you don’t cut through the clay sealing layer when cleaning up at the end of building the dam.
If you happen to be using a track loader or a dozer without a tilt blade, it is permissible to put a fillet up the corner. This makes it somewhat easier to clean the corners at the end. Of course, if you are a lazy type, you can also put this fillet in when using a dozer with a tilt blade, but then where is the challenge?
At this stage, the dam should look like Sketch 4, with the dotted lines representing the excavated material placed in the corners. The solid line up each corner represents the ‘V’ cut mentioned earlier and the broken lines up each corner represent the alternative fillet cut up the corner, also mentioned earlier. I have left the over-excavation lines shown as broken lines to illustrate where the toes of the batters should be at this stage. Sketch 4 also shows the short batter along the back between the corners where the first floor was cleaned up and pushed out and the similar batters along each side where the sides where also cleaned up and pushed out, indicated by the lighter dotted lines in these areas.
Once the top is cut off the bank all the way around, it is time to start the final clean-up inside the dam. If one corner is still a little lower or lighter than the other, side-cut the back bank toward that corner and push the accumulated material up the corner to where it can be spread around where it is needed. The front bank or ‘mouth’ of the dam may also be cut to that end and pushed up the side bank to the corner if needed.
If both corners are equal and all banks are equal, work the clean-up so that the material is spread evenly around the banks. Side cut the banks into whichever corners are most convenient and push the accumulated material up the corners to where it can be distributed evenly around the banks.
It is also possible to trim the banks by travelling diagonally up them parallel to the corner line and working your way along the batter. It is usually best to start these diagonal passes in the middle of each bank and work toward the corners, allowing any overflow from the blade to fall downhill onto the untrimmed areas of the bank, eventually finishing in the corner. The actual pattern worked may be varied from one dam to another to suit the needs of the individual dam.
I have always worked over all banks twice, a ‘clean-up’ pass where the heaviest cutting is done, and a lighter trimming and polishing cut to finish off. The extra track rolling and cutting always leaves the dam better sealed and looking neater than just a ‘once-over’ clean-up.
Silt ponds/traps – if applicable - and overflows are usually constructed last so that they don’t get in the way of the main construction. The material from these may be distributed along the banks.
Some people choose to totally remove all topsoil and grass from the site before the main excavation is started and replace it on the banks after the dam itself is completed to facilitate re-grassing. If this is required, I usually split the dam into three triangles by running lines from the middle of the front bank or mouth of the dam to each back corner. I them distribute the topsoil fairly evenly along the back and sides of the dam, outside where the banks will eventually be placed. Once the dam is completed, this topsoil may be spread evenly over the outsides and tops of the banks.
Measuring up:
Unless the site is dead flat, the actual water level area of the dam is almost always greater than the original set-out area of the dam. In the areas where I have worked at sinking dams, the measuring up has always been done based on water level dimensions, disregarding any overflow.
Measurements required:
Length and breadth of top at water level.
Length and breadth of the bottom
Depth from water level (mouth of dam) to the bottom.
1. Multiply length of top by breadth of top.
2. Multiply length of bottom by breadth of bottom.
3. Multiply length of top plus length of bottom by breadth of top plus breadth of bottom.
4. Add these three results together.
5. Multiply this result by the depth.
6. Divide product by 6 (six).
7. If working in feet, divide this result by 27 for cubic yards.
8. If gallons capacity is required, multiply the answer to 6 by 6.25 for imperial gallons and divide that figure by 0.833 for U.S gallons.
Happy dam-sinking.