• Thank you for visiting HeavyEquipmentForums.com! Our objective is to provide industry professionals a place to gather to exchange questions, answers and ideas. We welcome you to register using the "Register" icon at the top of the page. We'd appreciate any help you can offer in spreading the word of our new site. The more members that join, the bigger resource for all to enjoy. Thank you!

Ductile Iron

Electra_Glide

Senior Member
Joined
Aug 25, 2004
Messages
273
Location
Western Pennsylvania
Anybody have any experience with installing ductile iron pipe? Need to put in about 80' of 6" pipe for a sprinkler system. We're supposed to prep the trench, but the plumber is dragging his feet, and we're considering doing the entire job. The material is already on site and the municipal authority will be installing the tap tomorrow, but the plumber says it might be a few weeks until he can get to it.

From looking at the installation specs, everything looks pretty straightforward, but looks can be deceiving...:confused:

Joe
 

cat320

Charter Member
Joined
Nov 6, 2003
Messages
913
Location
Stoneham,MA
I have never done it so I'm only guessing from what I would do first you would want to bed the pipe in a soft sand like material no rock. Then when you connect them there is a rubber seal /gasget that the ends slip into propable have to ably some kind of luberncent to make it go in easier. but I know there is more hope that it helps not that I told you something you don't already know. good luck
 

digger242j

Administrator
Joined
Oct 31, 2003
Messages
6,648
Location
Southwestern PA
Occupation
Self employed excavator
I've probably put a couple thousand feet in over the years, (which really isn't much). It's not too hard to do though.

Cat 320 is correct about the gasket and lube. (For that type of joint anyway--some pipe joints slide together much like plastic sewer pipe, but for most of the valves and fitting you'll find the "mechanical joint" type.) Make sure you put the gaskets in facing the right direction. If the materials are already on site, I imagine the lube is there with it. It's pretty much the same stuff as is used with rubber gasketed sewer pipe. An old paint brush is real handy for applying it, but it can be done with your hands too.

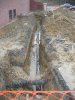
The easiest way to put two lengths of ductile together is with a wire rope choker and a good operator. Pick the pipe up at the center point, and have the pipelayer guide the spigot end into the bell of the previous piece. Lower the pipe so that's it's resting on the trench bottom, and then curl the bucket out gentley. The joint should slip right together. Otherwise, you can usually pry the joint together with a digging bar.

There's a certain amount of deflection (for gentle turns, or grade changes), that's possible in each joint, but it's easiest to have them lined up straight to put them together, and move them afterwards.

Mechanical joints are different. You'll have an iron ring, with bolt holes around it. That's called the gland. The valve or fitting will have a correpsonding series of bolt holes. You'll also have a different type of gasket. Slip the gland over the pipe, and then slide the gasket onto the pipe. Put the pipe and fitting together. There's a raised edge on the gland, on the side that faces the fitting. You can use that edge to push the gasket into the joint, It should go all the way in, and be even all the way around. Insert the bolts throught the holes, threaded end pointing towards the pipe. Tighten the bolts evenly, and take care not to overtighten.

Some authorities require a ployethelene plastic sleeve around the pipe. It's easiest to slide that onto the spigot end of the pipe before lowering it into the trench, and then slide it forward once the choker is unhooked.

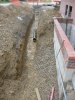
Some authorities require sand bedding, others don't. Ductile iron is pretty tough stuff. Certainly you wouldn't put any big rocks around it, and you'd try to be sure it's bedded well, but it's not going to sag or go egg shaped like plastic sewer pipe might.

Anywhere you put a fitting (a bend or tee), you'll need to back it up with a "thrust block". That's a clump of concrete you pour between the fitting and the undisturbed dirt behind it. If that's not there, the joint can push apart from the water pressure.

There's more, but that's the basics...

Good Luck!
 
Last edited:

RonG

Charter Member
Joined
Dec 2, 2003
Messages
1,833
Location
Meriden ct
Occupation
heavy equipment operator
All good advice but be especially concious of cleanliness as the system will have to pass a pressure test to be accepted and the test for fire lines etc are about twice as high as domestic service lines.You might want to leave all the joints exposed if you can until it passes. Ron
 

Electra_Glide

Senior Member
Joined
Aug 25, 2004
Messages
273
Location
Western Pennsylvania
Digger,

Thanks for the explanation. That's pretty much as I understood it. We have to run about 60' from the municipal tap and the put in a 90 and go another 20' into the building. I knew about having to put a thrust block around the 90. I'm not sure if there needs to be more thrust blocking where it enters the building or not. Other than the 90, everything is straight runs, no need for any bends.

Your technique for making the joints is different than the way I was thinking of doing it. Sounds like your technique assumes the machine is straddling the trench. I was thinking we would keep the machine off to the side of the tench, but then it would be a lot more moves to make the joint.

RonG,

The municipal authority requires the pressure test to pass before allowing us to backfill the trench, so leaving all the joints exposed should not be a problem.

Now I just need to talk to my helper and see if he's up for it or not. Thanks for all the info guys...I'll let you know how it turns out.


Joe
 

digger242j

Administrator
Joined
Oct 31, 2003
Messages
6,648
Location
Southwestern PA
Occupation
Self employed excavator
Your technique for making the joints is different than the way I was thinking of doing it. Sounds like your technique assumes the machine is straddling the trench.

Actually, the way I described it is how it would work if you only dug the trench far enough to put in one length at a time--not digging the whole trench and then going back to lay the pipe. Then, technically your not "straddling" the trench, because you haven't dug that part yet. But you would indeed be in line with the trench, not off to the side of it.

Thinking further about it, I've only ever done that with a full sized machine. I always had enough reach to set a length of pipe without moving back over the trench. If you're using a mini you may not have that luxery.

Reference the tap, you haven't said how they're going to do that. Are they going to shut the existing main and cut in a tee and a valve, or will they use a tapping machine? The reason I ask (and even if you're already aware of this, someone may read this thread at a later date and be unaware), is that the "tapping valve"--that is the valve that's installed between the tapping machine and the tapping tee--is simply abandoned in place. Once you've installed your gate valve, the tapping valve is left open and buried that way, never to be operated again. I always thought it was a shame to waste a brand new valve, but I've never seen it done differently.


Sometimes you'll be required to use a couple pieces of (usually stainless steel) allthread to tie your valve and the tee together. That would be used in place of the bolts at the sides of the pipe. (Say the 3 o'clock and 9 o'clock positions.) Another possibility is that you'll have "retaining glands". They're similar to the regular ones, with the excaeption that there are bolts threaded through the side of the gland. Those bolts tighten down and bite into the barrel of the pipe in order to keep it from pushing apart under water pressure.
 

PAYTON

Charter Member
Joined
Dec 5, 2003
Messages
85
Location
indy
Occupation
OPERATOR
mega-lugs suck..lol we did a tie in 24 inch water line. in one 15 foot area there was over 300 lugs in a tie in. they can be a pita backfilled after was given the ok. monday morring the area was flooded.. so after i had spent all friday doing clean up i went back and dug it all up again. thanks to a few mega lugs being too tight. there suppose to snap off at a pre set ft-lbs tourque. was later told that once they break off to back the nut back bout a 1/4-1/2 inch. its pretty simple to put it all together.just rember if you only have one helper that this will be a time consuming job. and that theres a lot of wrench to be turned! and you have to be able to get around it to tighten the lugs. the kicker(thrust block) is a must .
its pretty simple work just time consuming on the lugs. make sure you have the correct gaskets with the correct fittings good luck
payton
 

RonG

Charter Member
Joined
Dec 2, 2003
Messages
1,833
Location
Meriden ct
Occupation
heavy equipment operator
Electra-glide.......I would always put some material on the pipe before you pressurize as it could move on you and could actually pull apart at a joint in some conditions such making a gradual bend just using the small amount of play from joint to joint.Don't forget the chlorine tablets and the permatex to stick them inside of the pipe.
Payton........I have had inspectors in some towns require me to torque those megalugs after they break to insure an even pressure all the way around.I think he had us increase the torque about 15 pounds more than what they break at.......seems like we ended up at 75 pounds if memory serves me correctly.Not fun to put a nice torque wrench down in the sand underneath that damned pipe. Ron
 

Electra_Glide

Senior Member
Joined
Aug 25, 2004
Messages
273
Location
Western Pennsylvania
Well, we went ahead and put the pipe in. Finished the last of the mechanical joints today. Still need to do the thrust blocking, preliminary backfilling, and pressure testing.
 

Attachments

  • pipe1.jpg
    pipe1.jpg
    83 KB · Views: 967
Last edited:

Electra_Glide

Senior Member
Joined
Aug 25, 2004
Messages
273
Location
Western Pennsylvania
...dang, wasn't finished typing before that got posted...


We ran into a number of problems, but since it was the first time we ever did it, I guess I'm not surprised.

First the rental company hosed us by not getting the equipment here until half way through the afternoon. Then the section of pipe for getting from the building to the 90 was too short (the pipe enters the building just past the stairs in the first pictue), and the local plumbing supply house didn't have anything in stock that was long enough, and last but not least we had to run around for a cut-off saw (what's that saying about having the right tool for the job...:beatsme ).

The sprinkler company is sending somebody out tomorrow to do a preliminary inspection before we install the thrust blocking and initial backfill. Once we get that in place, they'll come back and do the pressure test. Only then will we really know how good of a job we did.

Thanks for all the advice and helpful hints guys. Biggest thing I learned from this job is I need to do a bit more up-front planning to save lots of running around (that's what I get for listening to the guy helping me who told me it was "no big deal"). Second biggest thing I learned is that I've got to stop doing these pro-bono jobs, and find some paying ones (this one was for the enw addition we putting on our church).

Take care...

Joe Kantz
 

Electra_Glide

Senior Member
Joined
Aug 25, 2004
Messages
273
Location
Western Pennsylvania
Reference the tap, you haven't said how they're going to do that. Are they going to shut the existing main and cut in a tee and a valve, or will they use a tapping machine?

Digger,

I assume they used a tapping machine, but I wasn't there the day they did it. They left us with a bell, and even installed the first gasket. All we had to do was take our first stick of pipe, lube everything, and install it. You can kind of see the bell in the bottom of the picture I posted. They had their stuff already partially backfilled, and given the rainy conditions of the last few days, I really didn't feel like digging around in the muck to see what they did.

Here's another picture looking at it from the other end...

Joe
 

Attachments

  • pipe2.jpg
    pipe2.jpg
    85.9 KB · Views: 697
Top