• Thank you for visiting HeavyEquipmentForums.com! Our objective is to provide industry professionals a place to gather to exchange questions, answers and ideas. We welcome you to register using the "Register" icon at the top of the page. We'd appreciate any help you can offer in spreading the word of our new site. The more members that join, the bigger resource for all to enjoy. Thank you!

John Deere 310D refurbish thread

Clubbs

Active Member
Joined
Sep 21, 2014
Messages
28
Location
NC
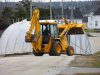
95 model JD 310D backhoe / loader, 2wd, orops, 54xx hours showing. I picked this up at an auction earlier this month from a private owner who had roughly 15 acres. In typical auction style you really don't know what you're buying, but I found the owner who was selling out and retireing and spent some time with him and operated the machine briefly. At first glance it had some farm boy pin replacement on the H-link and bucket (steel rod almost the right size), a leaking steering cylinder, and either the lights don't work or the bulbs are bad. Seemed like a good deal for my bid so I bought it, and now to make it right I'm sure I'll have lots of questions and will keep this thread up to date in hopes that it may be useful to others just like this forum has helped me.

In full discloser I buy and sell equipment on the side so I can afford to put my kids in better schools, and... because its fun... most of the time. While the machine is always for sale, I don't like to sell anything with issues so I keep working on it until its in very good used condition then actually try to sell it. I've recently re-done a bobcat 743, International 1486 tractor, gooseneck trailers, etc... So this is how I found this one:

0913141154.jpg

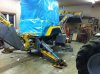
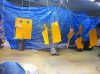
Had to load a bunch of other implements for my fellow auction goers then I drove it on the trailer and headed for home:

0913141430a.jpg

Next step was to rebuild the steering cylinder, and the great people here on HEF helped me out as there seems to be several rebuild kits and being the JD rookie that I am I made a few mistakes while ordering part; more on that here:
https://www.heavyequipmentforums.com/showthread.php?46272-JD-310D-steer-cylinder-rebuilt-kit

Then I took the sheet metal off around the motor to see what else I could find:
So far the number 1 injector line is leaking and the aluminum is mangled on the end of the line so I'm waiting on a new line to come in from my local deere dealer.

The muffler has a hole in it around the outlet and I've struggled trying to get that thing off to no avail. I really don't want to weld it while its still on the machine incase something rattles loose and falls into the manifold. So despite my best efforts I'm taking the manifold and muffler off as an assembly, (I have four manifold gaskets on the way from deere as well).

The bracket for the fuel filter is cracked so that's got to be fixed.

The tilt bucket cylinder and the right side boom cylinder are both wet at the gland so I've got seal kits for those that I need to put in.

I got enough of the lights working that I'm confident the light harness is good I just need more bulbs

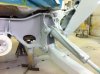
The outrigger pin holes are "wallored" pretty good at the tractor and so are the pin holes for the cylinders. Not sure how this happened really since the rest of the pins and bushings are really pretty tight (other than the H-link and bucket pin). But I'll have to pull the riggers and cylinders off, grind the mushroomed metal down flush then weld in new tubing, bore it, and then put pins and bushings in. This repair is going to be the biggest time consumer.

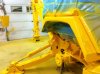
The bucket pins just need new bushings and the actual pins that fit in the holes. The front bucket pins and bushings are all tight, which I'm thankful for.

Plan is to start at the front and work my way back, Please offer any and all advise you may have as you're experience and knowledge will be greatly appreciated. I'll keep this thread up to date with pics and progress or lack there off due to unforseen... uh... opportunities (aka broken stuff).

Dave
 

Clubbs

Active Member
Joined
Sep 21, 2014
Messages
28
Location
NC
With all that work will the return be worth it?

It usually is or I haven't lost money yet. You can't start with just any machine and you have to get it at a good price too. This machine was in use when I bought it and is in good useable condition as is. But i'm going through it and fixing all the stuff that most of us if it was our machine would probably not fix until we had some down time. But once I'm done and its forsale, any perspetive buyer that comes to look at a used machine will (hopefully) be pleasantly surprised with this one in that it doesn't have any issues, drips, clunking, etc. As compared to the other used machines for sale I hope that mine stands out especially considering I'm usually asking for the average price on machinery trader for comparably equiped and machines with similar hours, expecting that mine is in better condition than most so far mine have sold within a couple weeks and everyone has been happy with them. On this particular one I'll likely have another $1,000 in parts mostly because I'm buying JD brand parts, but I'll do all the labor my self. Although I'll probably have my buddy with the bigger welder finish the welding on the egged out rigger pins.

I'm starting from the front to the back, and have nearly finished all the little stuff up there. But I pulled the exhaust manifold off last night (since I can't seam get the muffler off while its on the machine) and I think I'm better off buying a new muffler as successfully welding to this thin metal is going to be tough and look awful. Once that part comes in I'll get the sheet metal back on and start on the rigger pins and the two pins in the hoe bucket will go pretty quick. Then tape it off, spray some JD yellow on it, put in some new light bulbs and for sale.

That's the rough plan anyway... I usually like to turn a machine around in 2 months or less working nights and a little during the weekend. Plus I get to play with a bunch of different machines along the way and do any small projects around the house for "free" instead of renting equipment or owning a dedicated machine. My plan isnt for everyone, but it works for me.

Dave
 

Clubbs

Active Member
Joined
Sep 21, 2014
Messages
28
Location
NC
Haven't done much to the backhoe lately but I had a few hours this weekend to wrench... I pulled the exhuast manifold off, replaced the number 1 injector line that was leaking at the injector, I had to reform some of the bends so that it wasn't in a bind againsts the # 2 line and so that it aligned better with the injector. I think this misalignment may have been the cause of the initial leak as it wore out the aluminum "ferrel" on the end of the old line. There are no o-rings on these injector lines. I cleaned up the old gasket off the head and the manifold cut the old muffler off and wire wheeled the pilot on the muffler side of the manifold. Put a little gasket tack on the new gaskets and bolted the manifold back on. The new muffler fit perfect and what a huge difference in the sound of the machine. It sounds much smoother now that its now puffing out all the cracks in the old muffler. Next I put the fuel filter bracket back on since it had a cracked that needed some welding. Filled the fuel filter and it cranked right up. No more leaks on the motor at all. I'll change the oil, filter, air filters and fuel filter then put the sheet metal back on next week (I'm waiting to buy all the filters at NAPA next week at 50% off).

I received all four of the hydraulic cylinder seal kits that I ordered and need to put those in this week. I need to to the two pins and bushings on the bucket, and then the outrigger pins.

Dave
 

Clubbs

Active Member
Joined
Sep 21, 2014
Messages
28
Location
NC
I ordered all new filters from NAPA during their filter sale last week... that's a pretty good deal at 60% off. I decided to rebuild the one loader boom cylinder that was leaking and the tilt cylinder that was leaking this weekend with the help of my 7 year old. Getting the rod guide out was quick and easy, but I broke a rachet and my 3/4" breaker bar trying to get the nut off the end of the rod. I turned the pressure in my air compressor up to 120psi and tried my 3/4" impact and that didn't work either. So I gave in and took the rods with the piston and rod guide still on them to my local BOBCAT dealer along with the seal kits I ordered to have them put the seals in... The folks over at White's Bobcat where great to deal with and incredibly fast (fast = less labor cost) with my Bobcat rebuild. I'll probably end up doing the same thing with the stabilizer cylinders this weekend. I noticed the bucket cylinder is wet to so I ordered that kit this morning as well.

I've gotten some comments about my excessive seal replacement strategy and I'm told the only backhoe that doesn't leak is one that is out of oil. I'm sure that after another 100 hours of heavy use something else will seep here or there, but if the cylinder is just sitting there with no load on it I don't think it should leak. Truth of the matter is that this machine is 9 years old and the seals I'm replacing are probably original. The previous owner said he had several cylinders rebuilt last year so once I finish these 5 cylidners they'll all be in good condition. Wish that Hytran wasn't so expensive...

Dave
 

Deeretracks

Senior Member
Joined
Feb 17, 2014
Messages
568
Location
Western Washington
Occupation
Shop Foreman
Did you mean 19yrs old? They stopped making the D-series in '96.

I have always managed to reseal the loader cylinders in the field w/o any special tools. They use the crap out of red plastigasket at the factory so you usually need to heat the nut up to get them to loosen w/o a cylinder bench.
 

Clubbs

Active Member
Joined
Sep 21, 2014
Messages
28
Location
NC
Did you mean 19yrs old? They stopped making the D-series in '96.

I have always managed to reseal the loader cylinders in the field w/o any special tools. They use the crap out of red plastigasket at the factory so you usually need to heat the nut up to get them to loosen w/o a cylinder bench.

right 19 years old. I thought about heat but I didn't want to melt the nylon lock ring out of the nut... Maybe I'll try some heat on the stabilizer cylinders this weekend.

Dave
 

Deeretracks

Senior Member
Joined
Feb 17, 2014
Messages
568
Location
Western Washington
Occupation
Shop Foreman
Well technically nylock nuts are not reuseable anyway so you need to use loctite on reassembly anyway if you don't replace the nut.
 

Clubbs

Active Member
Joined
Sep 21, 2014
Messages
28
Location
NC
I took the four rods to my friendly Bobcat dealer and he kindly spun the nuts off for me no charge. We still had quite a struggle even with his 1" impact and 180psi shop air. I put the seal kits in Saturday morning while the family attended the farmer's market. The kits I ordered didn't have the o-ring and back-up ring in them so I ordered those from my deere dealer only to find out my order wasn't complete and I was missing the o-ring and backup ring for one of the stabilizer cylinders... Those should be here Wednesday and it gives me time to press in the new bushing anyway. All the other seal kits went in easy and the cylinders are now dry.

I started working on the electrical issues and got the light circuits fixed and free from chafed wires to loose grounds to corroded connections. The systems monitor showed signs of life late Sunday afternoon in that the stop light, warning light, and alarm now function. I suspect the 6 indicator lights for various sensors will also work once I replace the bulbs. I usually dread the electrical troubleshooting on machines because its so misunderstood by most of us and is hence usually rigged beyond repair by the previous owner(s), but this one is still all in tact with the exception of some spliced in fan connections, and mostly just needs terminal cleaning, light bulbs, and probably a sensor or two replaced. Deere seems to have done a nice job on this albiet simple electrical system. Hopefully I can get all the bugs worked out this week.

Dave
 

Clubbs

Active Member
Joined
Sep 21, 2014
Messages
28
Location
NC
Im getting closer to finished and am stuck on the fuel gauge. Wires are good from tank to sender, and there is about 60 ohm accross the sender with the tank 3/4 full. The gauge just reads empty. Anyone know what the resistance is supposed to be accross the sender?
 

Delmer

Senior Member
Joined
Jan 3, 2013
Messages
8,913
Location
WI
That's right in there. If you ground the wire and then disconnect it, it should show full and empty, or else the gauge or wiring is the problem.
 

Clubbs

Active Member
Joined
Sep 21, 2014
Messages
28
Location
NC
Any updates?

Well this machine turned out to be in pretty good shape and I didn't run into anything extordinary to really post about. I rebuilt some more of the cylinders since my last post and made a couple new pins on the lathe, but haven't really been "inside" anything other than the electrical stuff, which was mostly cleaning up connections. I spent a good deal of time wire wheeling the heavily chipped paint off around the buckets and scraping old decals off. Plan is to paint it this weekend depending on temp and humidity. Its been sitting on the riggers and the front bucket without tires on it for a couple weeks now while I prep for paint. I must say that this probably the most complicated paint job I will have done... lots of stuff you don't want paint on and lots of stuff that's hidden but needs paint...

Dave
 

Arizona Coast

Member
Joined
Jan 4, 2015
Messages
18
Location
Arizona
Can you go into more detail on the paint regarding it being complicated? I'm looking at a hoe that might need paint and would like to know what I'm up against.
 

Clubbs

Active Member
Joined
Sep 21, 2014
Messages
28
Location
NC
Its just time consuming to do it right. The prep work makes the paint job and the prep work on the other things I've painted has been less time consuming. The factory paint has proved to be pretty durable but as seen in the top post pics its missing and chipped in the usual places. Painting over chipped paint looks good from 20 feet maybe but it really needs to be taken down to bare metal to look right. There's so many places on hoes that are only accessible with the boom in certain positions so it seems that your working in one spot and then move the boom and find more work. This is also a problem while painting because the cylinder rods will obivously be taped up so moving the boom while painting isn't really an option unless you plan to stop painting, remove tape, move the boom, then re-tape. Also there seems to be an endless supply of earth tucked away underneath. I don't like to sand blast anywhere near suscetible points like pivots, bearings, and these areas are usually surrounded in tightly cast parts that are hard to get at with a wire wheel. So short of taking the whole thing apart you may as well just accept the fact that despite your efforts it will never look new again... a realization I'm not used to accepting. If your painting to preserve the machine and prevent rust then there's really not too much to it: tape up the rods and hoses, blast it with a pressure washer for several hours, hoses it off with degreaser, then presure wash some more then repeat 4 or 5 times, and squirt it yellow. Obviously once pressure washed there isn't any grease anywhere so using the machine is out of the question until its re-greased. Also obvious but sometimes overlooked don't pressure what towards a grease point because you'll be washing grit into the joint.

Dave
 

Deon

Senior Member
Joined
Jul 25, 2010
Messages
768
Location
Nova Scotia, Canada
Yes Chubbs and Arizona Coast,
Painting a hoe it quite an experience. I was an auto body man for 13 years and my 310D was the longest paint job of my life. I did it for myself but don't ask me to do another. I covered the rods with rubber discharge hose (2" water pump type) and sand blasted all the rust and sanded and feathered all the remaining paint. And yes all the dirt and grease cleaning after a complete pressure wash. But after about $1,200 worth of epoxy primer, polyurethane paint and new decals, it does look like new, actually probably better with a the shinnier paint. The cab I had replaced all of the bad metal and repainted the year before.
 

Attachments

  • image.jpg
    image.jpg
    36 KB · Views: 407
  • image.jpg
    image.jpg
    42.8 KB · Views: 409
  • image.jpg
    image.jpg
    51.3 KB · Views: 399
  • image.jpg
    image.jpg
    50.3 KB · Views: 402
  • image.jpg
    image.jpg
    48.4 KB · Views: 396
Last edited:

Deon

Senior Member
Joined
Jul 25, 2010
Messages
768
Location
Nova Scotia, Canada
One more photo and one more comment. Don't paint the wheel hub and wheel surface where they fit together. Just brush on some anti-seez to prevent rust when bolting together. Paint will cause the wheels to loosen. The tractor is under the tarp in this photo.
 

Attachments

  • image.jpg
    image.jpg
    46.1 KB · Views: 391

Clubbs

Active Member
Joined
Sep 21, 2014
Messages
28
Location
NC
Deon I've read through most of your post pretaining to your 310d, and must say you have done an excellent job throughout the restoration. Sadly for my machine I've decided it will never look new again... I'd be afraid to use it if it looked as nice as yours. Oh and you missed a spot on the bucket :)

Dave
 
Top