• Thank you for visiting HeavyEquipmentForums.com! Our objective is to provide industry professionals a place to gather to exchange questions, answers and ideas. We welcome you to register using the "Register" icon at the top of the page. We'd appreciate any help you can offer in spreading the word of our new site. The more members that join, the bigger resource for all to enjoy. Thank you!

need some help from the bucket repair experts... tomV, ect?

justafarmer

Well-Known Member
Joined
Dec 19, 2011
Messages
61
Location
Canada
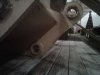
Got a good deal on a rake, problem is its for a CAT330 and im hoping to use it on a Hitachi 230 which is 90 mm with a pin grabber q/c. The top pin of the rake is 90 mm so that is fine but the bottom pin is 80 mm. The other problem is that the Cat distance between the pins is about 21" and the Hitachi is 18.7". I know this is sounding pretty bush league to many of you, but it is for farm use maybe a week or two a year. Any tips or advice would be appreciated. Attached is the picture of the rake with the CAT set-up. My initial thoughts are to cut out the 80 mm bushing and then cut the new 90 mm hole where its supposed to be then weld in a new bushing. Looks like the new pin will go towards the top of the existing 80 mm hole. Thanks.
 

Attachments

  • IMG00278-20120309-2047.jpg
    IMG00278-20120309-2047.jpg
    27.4 KB · Views: 874
  • IMG00278-20120309-2047-2.jpg
    IMG00278-20120309-2047-2.jpg
    42.7 KB · Views: 881

JDOFMEMI

Senior Member
Joined
Jan 3, 2007
Messages
3,074
Location
SoCal
I'm not the bucket expert TomV is, but I see nothing wrong with what you are suggesting. I have adapted many buckets to fit something other than what they were intended to fit.

When you weld the new bushings in, be sure to keep a pin handy to keep the alignment correct. Alternate where you weld, to keep from overheating and warping the bushing. If you weld one side full, when it cools it will pull far enough over that the pin won't go through. By alternating sides, you can prevent this.

Be sure to fill in the old bushing hole for strength.

Another option, if you are only using it occasionally, is to simply bore the 80mm hole out to 90mm, and unpin the coupler. The link will then fit, just with slightly different geometry, but will work fine.
 

RayF

Senior Member
Joined
Jul 8, 2011
Messages
640
Location
Perth Western australia
Occupation
lineborer/welder
Face dimension for a 330 is 386 mm from memory. It should be easy enough to cut a piece out of the bucket with the hole in it and replace it with a bit of plate with the hole in the right place. Good enough for what you want to do with it.:)
 

justafarmer

Well-Known Member
Joined
Dec 19, 2011
Messages
61
Location
Canada
I'm not the bucket expert TomV is, but I see nothing wrong with what you are suggesting. I have adapted many buckets to fit something other than what they were intended to fit.

When you weld the new bushings in, be sure to keep a pin handy to keep the alignment correct. Alternate where you weld, to keep from overheating and warping the bushing. If you weld one side full, when it cools it will pull far enough over that the pin won't go through. By alternating sides, you can prevent this.

Be sure to fill in the old bushing hole for strength.

Another option, if you are only using it occasionally, is to simply bore the 80mm hole out to 90mm, and unpin the coupler. The link will then fit, just with slightly different geometry, but will work fine.

Thanks Jerry for the reassurance! Good to know the idea wasnt too wacky. Good advice to alternate welding sides to cut down on the warping. Yeah I thought about un-pinning the q/c but when we do use it we will be switching back and forth lots so it would be nice to keep that part of it.

Thanks
 

justafarmer

Well-Known Member
Joined
Dec 19, 2011
Messages
61
Location
Canada
You may need to check the width between the mounts ,also

Yeah distance between the ears will be fine, There are bushings that i may need to trim down to make the q/c fit inside, was thinking a portable bandsaw would work for that.
 

don 300D

New Member
Joined
Jan 1, 2012
Messages
3
Location
stratford CT
Occupation
welder
u can make bushing for the 80mm hole`s . cut the rear pin boss out move then up to the c to c spacing &weld in place
 

TOM V

Senior Member
Joined
Mar 11, 2011
Messages
673
Location
CONNECTICUT
Occupation
Mechanic, Welder, Office work ect.
To do this I would cut out existing pin bosses, weld plate in the holes, relocate holes and weld in new pin bosses. If you are not line boring pay close attention to alignment and weld distortion.
Good luck. TOM V
 

DGODGR

Senior Member
Joined
Dec 18, 2009
Messages
1,065
Location
S/W CO
What type of coupler do you have? Since you are trying to re-locate the pin bosses, and thus retain pin usage, I assume you have a pin grabber coupler. My pin grabber coupler employs a wedge engagement design for the rear pin. The pin opening is elongated so that it can mate to buckets that have varying center to center pin spacing. It also can adapt to varying diameters too. Of course there are limitations but, if your coupler has similar features, it may work without bucket/rake modification.
 

justafarmer

Well-Known Member
Joined
Dec 19, 2011
Messages
61
Location
Canada
yes, its a pingrabber, but the jaw dosnt open far enough to grab it.

The other though I had was getting "ears" cut to weld onto the bracket then weld bushings into them. It will change the geometry a bit but not enough to cause problems. You see alot of rakes that have the mount on top almost 90degrees so that would curl even more than this. Here's my scribbles of what I was thinking. Let me know if the link doesn't work... new to this

http://i1072.photobucket.com/albums/w366/nevinstobbe/0a6b108d.jpg
 

DGODGR

Senior Member
Joined
Dec 18, 2009
Messages
1,065
Location
S/W CO
I bet that would work fine too. I suggest making the "ears" longer to give it more welding surface. It was mentioned earlier but I wanted to be sure you are aware that you should check the spread (side to side) between the (2) brackets/pin bosses. Make sure your dipper, and link, will fit between them.
 

JDOFMEMI

Senior Member
Joined
Jan 3, 2007
Messages
3,074
Location
SoCal
Farmer

Your sketch looks like it will work as well, and it keeps the original, so if you ever sell it for some reason, it would have a wider market. You could also modify your idea some and set the new bushing down into the original plate a little, keeping the geometry a little closer to original.
 

justafarmer

Well-Known Member
Joined
Dec 19, 2011
Messages
61
Location
Canada
here's a picture of the template I made with a bushing I had on hand cut into the cardboard. It should allow plenty of clearance for the pin grabber. Plus like you guys say it allows you to still hook onto with a cat machine. I have a neighbor down the road that had a CNC laser cutter so Im hoping he has a bit of 1 1/4" steel and can cut me out my pattern.


5f9191d5.jpg
 

justafarmer

Well-Known Member
Joined
Dec 19, 2011
Messages
61
Location
Canada
Farmer

Your sketch looks like it will work as well, and it keeps the original, so if you ever sell it for some reason, it would have a wider market. You could also modify your idea some and set the new bushing down into the original plate a little, keeping the geometry a little closer to original.


Yeah I thought about notching it into the original plates but where the bushing sits in my last picture gives me just enough clearance for the pin grabber to clear the cat bushing from the backside. I also was concerned that you would be giving up welded surface area because of having the bushing halfway through the 2 pieces.
 
Top