• Thank you for visiting HeavyEquipmentForums.com! Our objective is to provide industry professionals a place to gather to exchange questions, answers and ideas. We welcome you to register using the "Register" icon at the top of the page. We'd appreciate any help you can offer in spreading the word of our new site. The more members that join, the bigger resource for all to enjoy. Thank you!

Precombustion chamber temperature???

Truck Shop

Senior Member
Joined
Dec 7, 2015
Messages
17,098
Location
WWW.
That engine has the Thermo-start heater plug in the inlet manifold, they do fail allowing raw fuel into the cylinders, number 3 would get a good thump of it, take the valve out and reconnect to the fuel pipe then start up the engine and see if it leaks put the wire on as well, on the block being full of crap just knock out the core plugs they are only low cost and easy to tackle, the engine has to have a regulator in the cooling system to work correctly, we used to put Wellseal on the head joint its brown gravy looking stuff, I think it might be called Permatex possibly in other locations, the engine parts are for buttons in the U.K. with engine rebuild kits to be found from many suppliers, the heads, blocks and cranks are also for just a few coins brand new, its possibly the most common engine ever built and with the highest reputation.
Where were you yesterday---could have saved allot of typing cut this thread down to one reply.
 

Pony

Senior Member
Joined
Apr 18, 2014
Messages
370
Location
SE Queensland
Thanks for your reply Tony.
Unfortunately for your theory the thermo-start system is no longer fitted.
At some stage the pipe from the small holding tank on the main fuel tank to the intake manifold must have broken and one of my ancestors redneck repaired it by squeezing the broken ends of the pipe closed with a pair of fencing pliers and called it fixed.
I figured that it had survived for so many years without it, I might as well delete it properly.
So I inserted a bung in the feed from the tank and also removed the ignitor assembly from the intake manifold.
You're not to far out with prices of parts, although I think they may be a bit more expensive here. My closest place wanted $700 for the new head, I got it a few sheckles cheaper somewhere else.
Individually the prices are good, it's just that I'm having to replace almost everything.
Thanks again
 

Truck Shop

Senior Member
Joined
Dec 7, 2015
Messages
17,098
Location
WWW.
Unfortunately for your theory the thermo-start system is no longer fitted.
At some stage the pipe from the small holding tank on the main fuel tank to the intake manifold must have broken and one of my ancestors redneck repaired it by squeezing the broken ends of the pipe closed with a pair of fencing pliers and called it fixed.
That's good--takes care of one angle.
 

56wrench

Senior Member
Joined
Dec 4, 2016
Messages
2,138
Location
alberta
If the sealer used had been copper coat, here it is an antiseize and less of a sealer. As tctractors says the caramel Permatex on copper head gaskets may be used. In the real old days shellac was used on copper head gaskets. I don’t know if you can buy that type anymore
 

Pony

Senior Member
Joined
Apr 18, 2014
Messages
370
Location
SE Queensland
The stuff I had been using is a sealer, according to the blurb designed for what I was using it for.
As stated upon advice this time its in dry, figured I had nothing to lose trying it that way.
Also agree with Tony re thermostat, it's only out now to allow circulation of Evaporust. And also to confirm operation of new waterpump as thermostat doesn't get hot enough to open to allow circulation when fitted.
 

chidog

Senior Member
Joined
Jun 21, 2021
Messages
807
Location
kent, wa
Only area to use sealer is around the coolant openings, never in the 1/4 inch plus fire area.
I'd like to see what the deck and head look like as far as clean before you put it together. You said deck was straight, how about the head? Is copper the factory head gasket?
What diameter are the studs?
 

Pony

Senior Member
Joined
Apr 18, 2014
Messages
370
Location
SE Queensland
Thanks for the reply chidog, came back a bit early from the properties a bit early to try and sort this out.
Deck and head surface both lightly wire brushed with a crimped wire brush on angle grinder, then cleaned with acetone prior to copper head gasket being put on dry, this time only. Both surfaces as clean and decreased as I can get them.
Deck doesn't look pristine as you would probably expect being 60+ yr old, but not terrible. Head does look as you'd expect being new.
7/16 UNC head studs, copper gasket is factory and service manual does call for sealant.
Head is new, previous photo shows condition of old head. Again, probably showing my inexperience, I have never checked the new head for flatness. Rookie mistake, if the head has to come off again, I will next time.
Thanks
 

Pony

Senior Member
Joined
Apr 18, 2014
Messages
370
Location
SE Queensland
Rightoh, got back and did a bit more.
Gave it a run down and up the hill, still getting roughly the same temp difference between front and back precomp covers.
One thing i did notice that didn’t seem to make sense as nothing has been changed on the fuel side was that there was no big puff of smoke upon start up. I also sat and looked closely at the exhaust, there is definitely a slight miss, it corresponds with a slight puff of white smoke seems to go away or at least i can't really notice it at higher revs.
At 1000rpm can't notice miss, cracking an injector line at these revs introduces a massive and even miss across all cylinders when individually tested.
It is also starting to slobber again out the exhaust.
Pre rebuilding the injectors, i was running it without the exhaust manifold so could easily see the slobber, mainly from the front exhaust port, this is a combination of #1 & #2 cylinders.
Now the exhaust manifold is back on, but i can see a bit of wet carbon looking leaking from where the manifold meets the exhaust proper.

Evaporust is black so is working, drained and got a bit more small sand size rust from system. Flushed very well, till system running clean, block coolant drain seems to drain better than before, I am in no way saying coolant galleries in block are rust free, but it's definitely better than it was.
I haven't pulled a core plug ( we call them welsh plugs), because I can't do know parts availability til tomorrow and want to keep it able to be run on case I need to do something.
 

Pony

Senior Member
Joined
Apr 18, 2014
Messages
370
Location
SE Queensland
Checked valve clearances, spec is 12 thou cold which is what I set them to (I thought) upon re-torqueing head approx 2hrs running time ago.
Now
#1 in 12 thou
#1 ex 9 thou
#2 in 11 thou
#2 ex 11 thou
#3 in 13 thou
#3 ex 15 thou
Don't know if I did a shite job of setting them or they have moved a bit (uneven head heating???)
Did a compression test, left valve settings as read above.

#1 first stroke 190psi
#1 end reading 380
#2 first stroke 175
#2 end reading 360
#3 first stroke 240
#3 end reading 400

These haven't really changed since previous test, #2 was worst then, refer to previous old head photo will show why.

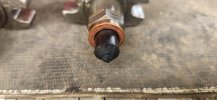
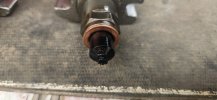
Injectors all seem to have excessive amounts of carbon for running time, maybe and hour or two.
I wiped them off with a carby cleaner when I installed them last head gasket replacement.

So I'm a bit lost.
It has a miss that seems to away, but #1 is running miles colder.
#1 has acceptable compression and is getting some fuel, it has carbon deposits s it must be firing????
Can the injector pump be not injecting enough fuel to that cylinder???
It is a C.A.V. Distributor type DPA.3232038 with mechanical governor.
That come from the manual, I know nothing about injector pumps.
 

Attachments

  • 20240225_140442.jpg
    20240225_140442.jpg
    1.8 MB · Views: 8
  • 20240225_140612.jpg
    20240225_140612.jpg
    1.5 MB · Views: 8
  • 20240225_140729.jpg
    20240225_140729.jpg
    1.6 MB · Views: 8

Pony

Senior Member
Joined
Apr 18, 2014
Messages
370
Location
SE Queensland
Just to be thorough, also removed injector lines from pump and run carby cleaner and compressed air through them, all seem to flow OK.
No kinks or other abnormalities noticed.
 

Pony

Senior Member
Joined
Apr 18, 2014
Messages
370
Location
SE Queensland
Oops, noticed a typo and thought I'd better correct it.
Head studs are 7/16 UNF not UNC as incorrectly said above.
I also installed new nuts, and replaced a few of the studs that looked a bit second-hand.
Also chased a tap into the threads into the block.

I think now I've established the differing temps across the precomps, that the head gasket has been letting go due to excessive temps in #2 & #3 rather than any difficecies in how it has been installed or mating surfaces.

However I'm only a beginner, so maybe my dodgy install etc is creating a weak point which the higher temps are exploiting?

I'm here asking for help, so hit me with whatever you got.
Thanks
 

Cliffy

Well-Known Member
Joined
Oct 14, 2023
Messages
59
Location
Qld
From your photos, the old girl looks like it’s been through hell and back. Water has sat in number 2 cylinder, pistons and injectors are black from possible over fueling. There is no cross hatching and marks on pistons.
If it has sentimental value, pull her down, acid bath and deck block, full rebuild and rebuild injection pump.
 

Cliffy

Well-Known Member
Joined
Oct 14, 2023
Messages
59
Location
Qld
just another thought. Is the hydraulics dead headed causing load on engine?Rear linkage all the way up or remotes on might cause load and over fueling but i still thinking your flogging a dead horse.
And compression tests can be misleading if liquid is in cylinders. It gives a higher reading then a dry cylinder.
 
Last edited:

thepumpguysc

Senior Member
Joined
Mar 18, 2010
Messages
7,553
Location
Sunny South Carolina
Occupation
Master Inj.Pump rebuilder
If I may butt in..
Are your injectors rebuilt.?
The third pic shows a very wet nozzle/tip.. & I can’t tell because of the buildup but the very tip looks smashed down.??
At the very least, get them pop tested..
As far as the pump putting to much or not enough fuel to a cylinder, I’m not gonna say impossible, but it’s highly unlikely seeing it’s a distributor type pump.. there’s 1 rotating element that feeds all the cylinders..
If there were a problem in fuel delivery, it would be less fuel, not more.
I hope this helped.
 

Pony

Senior Member
Joined
Apr 18, 2014
Messages
370
Location
SE Queensland
From your photos, the old girl looks like it’s been through hell and back. Water has sat in number 2 cylinder, pistons and injectors are black from possible over fueling. There is no cross hatching and marks on pistons.
If it has sentimental value, pull her down, acid bath and deck block, full rebuild and rebuild injection pump.
Thanks Cliffy.
Unfortunately you only know half the story, as with the motor, the rest of the tractor is the same. At first inspection you find some issues, but it doesn't seem to bad, but as you fix those issues more and more keep being exposed.
Maybe I'm being cheap, but I have really been trying to avoid simply rebuilding everything, if I don’t have to.
Yes, hydraulic lever is up with 3PL arms right up. Didn't know this deadheaded the system, it's how I've run every tractor I've run, not that it makes it right.
But still wouldn't this simply load the entire system, not one cylinder?
Yes with the wet compression test, if it's slobbering out the exhaust, then yes it could be reading a bit higher than actually is.
I'd love to do a compression leak down test but don't have the gauges.
Thanks
 

Pony

Senior Member
Joined
Apr 18, 2014
Messages
370
Location
SE Queensland
If I may butt in..
Are your injectors rebuilt.?
The third pic shows a very wet nozzle/tip.. & I can’t tell because of the buildup but the very tip looks smashed down.??
At the very least, get them pop tested..
As far as the pump putting to much or not enough fuel to a cylinder, I’m not gonna say impossible, but it’s highly unlikely seeing it’s a distributor type pump.. there’s 1 rotating element that feeds all the cylinders..
If there were a problem in fuel delivery, it would be less fuel, not more.
I hope this helped.
Hey mate, I was hoping you'd chime in.
I installed new nozzles and then had a shop set the pop-off pressure.
I didn't notice a damaged tip, but I didn't really look, the point of the photo was to show what I thought was excessive carbon build up after 2 hrs running.
I will have a better look tomorrow for any damage and give them a tidy up.
So now I'm really confused.
When I cracked each injector line at 1000rpm, each line seemed to "squirt" the same and now your saying that the pump should be providing the same fuel to each injector.
Injectors "should" be good, pop-off set by a specialist diesel injector shop.
Compression acceptable, #2 down but within 10%ish.
What else can be wrong?
Thanks
 

56wrench

Senior Member
Joined
Dec 4, 2016
Messages
2,138
Location
alberta
Just a comment-never use a wire brush or wire wheel on a head gasket contact surface or any gasket surface for that matter. It may make it too smooth or may leave grooves which will allow the gasket to leak. To a certain extent, the factory machining marks allow the gasket to seat and grip the surface without leaking under normal circumstances. A better method is to use some fine emery cloth stapled (on the ends)to a flat piece of wood approximately 25mm square and about 10” long and wet sand using solvent. Wipe off the surface periodically so the solvent doesn’t run down into the cylinders. Cleaning around the studs and liners can be done with a small piece of wet emery cloth and the end of your finger or thumb .Be careful not to sand too much in one place so as to not leave any grooves. You just want to clean the surface, not to remove any metal. I’ve been using this method for 40 years. Good preparation is essential for any gasket to seal properly-especially head gaskets
 

terex herder

Senior Member
Joined
Nov 10, 2017
Messages
1,816
Location
Kansas
Copper head gaskets are prone to leakage. They are much less able to tolerate non-flat heads and blocks. The head gaskets can be reused if not damaged. Clean them well and anneal in an oven at maximum temperature.
 
Top