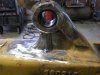
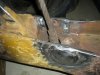
spent the day arcing off those patches, they were harder than i expected. looks like they were odd shaped pieces and they just filled in all the openings with weld. so there was no telling what kept them holding on for dear life. i had to arc them into squars then melt them off with my torch. I also got the cracks v'ed out and ready to weld. then i have to figure out where the cheapest place to get cyl rebuild kits is. i need to rebuild all the hydraulid cyls.

-
Thank you for visiting HeavyEquipmentForums.com! Our objective is to provide industry professionals a place to gather to exchange questions, answers and ideas. We welcome you to register using the "Register" icon at the top of the page. We'd appreciate any help you can offer in spreading the word of our new site. The more members that join, the bigger resource for all to enjoy. Thank you!
You are using an out of date browser. It may not display this or other websites correctly.
You should upgrade or use an alternative browser.
You should upgrade or use an alternative browser.
welding cat 426 backhoe boom
- Thread starter gusbratz
- Start date
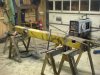
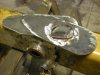
had the day off and have been makeing some progress. the more i work and look at it the more cracks i find and grind out. the project is growing
Attachments


Mike.580ck
Well-Known Member
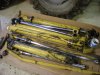
looks pretty good Gusbratz, i am liking the plates to strengthen it , i also am looking to rebuild all the cylinders on my machine and i have been looking i found on Ebay a whole machine cylinder re pack kit for under 300 dollars so that might be the way to go
bowen
Senior Member
I have ordered all my seal kits from Coleman Equipment
http://www.colemanequip.com/
There are several others like Broken Tractor or Eldridge that sell Case parts online.
Coleman seems to have most in stock and cheaper than any local dealer.
They will be genuine Case OEM kits.
On mine all the cylinder part numbers are stamped on the ends on the cylinder. You need this number to select the kits
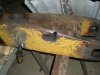
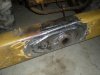
Finished welding it up yesterday. I welded the round pieces I cut out of the reinforcement plates for the pin bosses over the cracks on the bottom. Did one pass of 1/8” 7018 then one cover pass of 3/16” 7018 on most parts. Hopefully it all holds up. May start rebuilding cyl's tomorrow.
Attachments

norite
Senior Member
Looking good, don't forget to paint it.
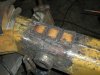
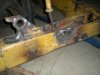
I finished up welding the boom and got it installed. repacked the boom, swing stabilizer and dipper cyl and have moved on to looking at the stick. I pulled the collar and removed the stick to find more cracks in the end of the dipper. Look at the weld on the inside corner. I don’t understand why anyone would even attempt to repair cracks on a backhoe if that is as good as their welding skills were.
Attachments


Nige
Senior Member
Kudos for the job you're doing. It must be a bit daunting removing all those patches never quite sure what you're going to find underneath them. Liking the look of the repairs you've done so far and it was really good to see the pre-heat on the areas you were planning to weld.