• Thank you for visiting HeavyEquipmentForums.com! Our objective is to provide industry professionals a place to gather to exchange questions, answers and ideas. We welcome you to register using the "Register" icon at the top of the page. We'd appreciate any help you can offer in spreading the word of our new site. The more members that join, the bigger resource for all to enjoy. Thank you!

Cat 951-C in my sights

Nitelite

Senior Member
Joined
Jul 5, 2013
Messages
905
Location
Ashland City TN.
Occupation
Retired
Back at it!

We got a little bit of cooler weather, but not much. I was able to put in about five hours between an early morning session and a late evening session.
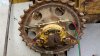
The cut line marked
951 sprockets 1 1157.jpg

I removed the cap to be able to access the dimple in the end of the shaft to center up and draw the cut lines using soap stone in a fabricated set of dividers.
951 sprockets 1 1159.jpg

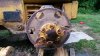
I used the gas ax to make the cut. I ran out of oxygen just as I finished the cut.
951 sprockets 1 1160.jpg

I need to trim off about 1/4" all the way around and then do some V grinding. I will have to pick up more oxygen before any more progress can be made.
951 sprockets 1 1162.jpg
 

workshoprat92

Senior Member
Joined
Dec 15, 2014
Messages
817
Location
Bois D Arc Missouri
Hey Nitelite you say the pads were sheared? where they actually sheared or were they cut by some other means? Just wondering cause I just bought a set of 963 pads to go on my 955L. They are 22" pads and stock is 17". I need to cut 2.5" off of one side of the shoes and make offset shoes like you have done. I was figuring on cutting mine in a large metal cutting band saw I have. I took an old pad and cut on it a bit and it cuts remarkably easy for what I figured would have been harder than a whores hart. I cant see how a shear could shear one of these with the grouser and all. maybe it can i just don't know.
 

kshansen

Senior Member
Joined
Mar 11, 2012
Messages
11,270
Location
Central New York, USA
Occupation
Retired Mechanic in Stone Quarry
Hey Nitelite you say the pads were sheared? where they actually sheared or were they cut by some other means? Just wondering cause I just bought a set of 963 pads to go on my 955L. They are 22" pads and stock is 17". I need to cut 2.5" off of one side of the shoes and make offset shoes like you have done. I was figuring on cutting mine in a large metal cutting band saw I have. I took an old pad and cut on it a bit and it cuts remarkably easy for what I figured would have been harder than a whores hart. I cant see how a shear could shear one of these with the grouser and all. maybe it can i just don't know.

I was at the Cat factory back in the 1970's and was surprised when they showed us the shear in the track shop. The pads come in in something like 15' or 20' lengths and they just snip them off to the size they need. It's been over 40 years but memory seems to be the machine would have fit in a pick-up truck box, might have been too heavy but was not a big monster. Don't recall but there must have been another press that punched the holes there too.
 

Nitelite

Senior Member
Joined
Jul 5, 2013
Messages
905
Location
Ashland City TN.
Occupation
Retired
My pads were sheared by a third party so I don't actually know weather they were sheared or sawed. The previous owner said that they were sheared but to look at the end of the shoe it looks to like kerf marks.

I would think that an easy way to cut the shoes would be to make a jig or fixture for the shoes to load upside down and use a traveling plasma cutter.

I too have seen large metal shears. A shear to cut through a track shoe, I would think, would have to be a dedicated machine. I can say that once the offset shoes are installed, they work perfectly.

How is retired life treating you Kshansen?
 

kshansen

Senior Member
Joined
Mar 11, 2012
Messages
11,270
Location
Central New York, USA
Occupation
Retired Mechanic in Stone Quarry
My pads were sheared by a third party so I don't actually know weather they were sheared or sawed. The previous owner said that they were sheared but to look at the end of the shoe it looks to like kerf marks.

I would think that an easy way to cut the shoes would be to make a jig or fixture for the shoes to load upside down and use a traveling plasma cutter.

I too have seen large metal shears. A shear to cut through a track shoe, I would think, would have to be a dedicated machine. I can say that once the offset shoes are installed, they work perfectly.

How is retired life treating you Kshansen?

Going good for now just seems to take all my spare time! Next Sunday after noon we are taking off for a week up in New England with the bikes. And if anyone reads this and is thinking about robbing the house while we're gone next door neighbor is watching the house and he spends lots of time at the rife range!
 

Nitelite

Senior Member
Joined
Jul 5, 2013
Messages
905
Location
Ashland City TN.
Occupation
Retired
Just make sure that you put the cheese in the safe before you leave, just in case the neighbor is a cheese lover too. (inside private joke) Have a wonderful trip and a safe trip. The wife and I used to travel up to six hundred miles a day on our Gold Wing. I sold it in 1997 after the second heart attack and my reflexes became diminished. We owned and rode the Gold Wing fourteen years. We never put a scratch on it and it never put a scratch on us.
 

workshoprat92

Senior Member
Joined
Dec 15, 2014
Messages
817
Location
Bois D Arc Missouri
That's real interesting on the shearing. I would think the sheer dies would need to match the pad profile. I just do not see how a straight blade sheer could do it.

Looking at some of the pics you posted of your pads it looks to me like they were cut with some sort of saw. Its hard to tell with pictures though. I think all in all I am going to try and band saw mine. I have large industrial grade metal cutting bandsaw and I can set up a stop to make things easy
 

Nitelite

Senior Member
Joined
Jul 5, 2013
Messages
905
Location
Ashland City TN.
Occupation
Retired
Like I said, I suspect that it would have been a dedicated shear. The previous owner made the deal with the person who actually cut the pads down. He dropped them off to have them cut down, picked them up and delivered them to me along with the drops. I paid $200.00 extra for the 951 to include the re sizing of the pads, delivered. Looking at the end of the pads it does look like they were sawed. There were more than ninety new pads that came with the machine. The previous owner tried to torch ten of them but he did a poor job with the torch.

Cut one pad with your band saw and time it. Multiply that first cut by the number of pads and let us know how long it will take. How many can you expect to cut with one new blade? Generally, you come out better to use what you have and improvise for what you don't have. I sold the drops to the scrap yard to recover some of the cost.

I have never used a plasma cutter but just watching videos on the internet, it looks like it would be the way to go. Name brand plasma cutters that are capable of cutting 3/4 material are expensive but I have considered buying one. I just bought gas for the torch today, that was expensive too. I also picked up ten pounds of 7018 x 1/8 welding rods, grinding wheels, etc.
 

workshoprat92

Senior Member
Joined
Dec 15, 2014
Messages
817
Location
Bois D Arc Missouri
I think if I can saw cut them they will come out way cleaner than any other method. Plus flame cutting you run the risk of softening any hardened material. or hardening it to where it is brittle. Not to mention all the grinding. I know it will take some time but I have more time than money so I am good there. I will need to mark the pads and make sure I am cutting 35 left and 35 right. Since they will be offset it will make left and rights. I figure at 4 pads per 1 beer. I should be into it for at least 18 beers LOL. Of course this figure varies for temperature and dryness.
 

Nitelite

Senior Member
Joined
Jul 5, 2013
Messages
905
Location
Ashland City TN.
Occupation
Retired
And then it rained. That halted the progress for the day.

It was cloudy and a little cooler today so I took advantage and got a little bit more done on the 951. I worked on the left side. I cut the sprocket rim off. It ended up about 1/4 under size, 1/8 gap all the way around. I am not a welder but I think it will weld up ok. Maybe some of the welders on this forum might have some pointers for a good technique for dealing with my 1/8 gap. I will be using a Lincoln Ranger 8 and 7018 rods. I am no stranger to welding as thirty years ago I took 360 hours of welding class on my GI Bill. I do some mig welding now and then. I haven't fired up my old Lincoln 225 tomb stone welder in years. It don't have enough duty cycle for this job.

Ready to cut in the first picture. In the last picture the rim is fitted on the sprocket. The rim is being held on and the gap maintained using wooden wedges. for sure, I will need to spend removing paint and some time making sure it is running square, true, and plumb before welding. Right now the plan is to use the Mig welder to tack several spots @ 120 degrees apart and then stick weld solid.
 

Attachments

  • 951 sprocket 007.jpg
    951 sprocket 007.jpg
    139.4 KB · Views: 314
  • 951 sprocket 008.jpg
    951 sprocket 008.jpg
    132.5 KB · Views: 312
  • 951 sprocket 009.jpg
    951 sprocket 009.jpg
    124.6 KB · Views: 315

Cmark

Senior Member
Joined
Jan 2, 2009
Messages
3,188
Location
Australia
I think you will be fine with an 1/8" gap. It will let you get penetration all the way through the joint. Your end result will be directly proportional to the effort you put into your preparation though. Grind away all the dross and paint down to bare metal. Put in a root pass and then build up the runs from both sides. Slag off and wire brush after you've finished each rod.

With patience and attention to detail, this should be a great looking repair. Good luck.
 
Last edited:

Nige

Senior Member
Joined
Jun 22, 2011
Messages
30,211
Location
G..G..G..Granville.........!! Fetch your cloth.
And don't forget the needle peening gun to stress-relieve the welds. IIRC you bought one for this job a while ago.

Try to balance the welds on the inside and outside to avoid too much in the way of stresses and don't be frightened to grind out over 50% of the first pass on the outside when you come to weld on the inside just to get the crud out of the inside root. In fact don't be frightened to grind out op to 50% of any weld pass to get to good metal before welding the next pass.
 

norite

Senior Member
Joined
Jul 31, 2010
Messages
483
Location
Sudbury, Ontario, Canada
7018 is a medium penetration rod so v out the weld before welding. Cat probably has a welding procedure for this and may recommend 8018 or higher, it would be worth checking. You may need to pre-heat the joint, maintain an inter-pass temperature or post-heat/slow cool. You will have to grind out the back of the weld and put a finish pass there. Stagger your initial welds around the joint until filled.
 

Nige

Senior Member
Joined
Jun 22, 2011
Messages
30,211
Location
G..G..G..Granville.........!! Fetch your cloth.
There is a procedure for welding a sprocket rim on non-segmented final drives and it calls for the use of 7018. It's so old that it doesn't even have a spec for wire ......

Nitelite, if you want a copy drop me a PM with your email address.
 

tctractors

Senior Member
Joined
Oct 9, 2007
Messages
2,428
Location
Worc U.K.
Wow, some ones been brave with the torch, I measure the distance of both rims from the frame and note it, then cut 1 rim off and weld on the new 1 with 7016 rods with the welds spaced around the rim needing 3 x 3 spaced welds to do 1 face, all the welds to start /go either clockwise or anti clock using 3.2mm rods, my pal welds 2 strips of angle across the front face of the sprocket, then clamps the rim to the hub using spacer packing to get the correct set of the rim, but I know my effort often runs sweeter because I take more care.
tctractors
 

Nitelite

Senior Member
Joined
Jul 5, 2013
Messages
905
Location
Ashland City TN.
Occupation
Retired
Thanks for the offer Nige, but I think I already have a copy of the welding procedure, most probably I got it from one of your prior post and it does call for 7018 rods. I had to go to Nashville today to get more oxygen for the torch and two new Deka batteries for the F 250 Diesel. Those chores burned up the day so I got nothing done on the machine.

No tc, I am not so brave with the torch, it was scary as he!!. I was so afraid that I would ruin the sprocket. This pilgrim has come too far to screw up now, but all is well so far and I am almost ready to start welding the new rims on. I'll be really glad to get the track frames bolted back on to the machine.
 

tctractors

Senior Member
Joined
Oct 9, 2007
Messages
2,428
Location
Worc U.K.
Nitelite, I use a brand of welding rod that I am very comfortable with that are the best for any position welding (D.C. Low Hi 7016) in the U.K. its sort of a requirement to dry the rods for some time pre use, for those that don't know much about Welding stuff, Low Hydrogen (spelling??) rods are Basic Coated rods, lets call it Sand as its along those lines, the Hydrogen Gas gets into the weld making the joint weak so the drier the rods the better the weld and lower P.P.M. gas inclusion to the weld joint, the Sand coating on the rod turns to Glass over the top of the weld form keeping the weld protected from the air around us, 3 P.P.M. (parts per million) is a good area to be in with pre dry rods, this style of rod comes with a carbon tip easy start end to aid starting strike up, the important thing in the rim welding task is to Tack things in place good and true first, then once you start welding to continue until the finish weld, 951 rims are only small items its not D9 stuff so over welding is not a good thing, sometimes on a rim change the cut line only leaves the spoke section so its 6 weld joints not a 360 full lap, I myself stick to the 7016 rods as they are cheap and good plus I have them on the shelf.
good luck with the welding tctractors
 
Top