• Thank you for visiting HeavyEquipmentForums.com! Our objective is to provide industry professionals a place to gather to exchange questions, answers and ideas. We welcome you to register using the "Register" icon at the top of the page. We'd appreciate any help you can offer in spreading the word of our new site. The more members that join, the bigger resource for all to enjoy. Thank you!

D6n parking brake won't release

Nige

Senior Member
Joined
Jun 22, 2011
Messages
29,401
Location
G..G..G..Granville.........!! Fetch your cloth.
What is a blanking plate? How do you go about closing off the oil supply?
The glib answer is that if you have to ask that question there is a possibility that you could be in over your head.
Blanking plates are often used in diagnosis of leaks in systems containing oil under pressure to temporarily close off a part or parts of the system in order to help identify where it is leaking.
Generally blanking plates have to be manufactured because usually they do not figure in most manufacturer's service manuals.
Yes, Cat man tested the pressure. It was around 380 and fell to 40 when we cycled the parking brake.
This indicates that pressure is being lost in the high-pressure circuit to release the parking brake.

Right now I can think of four possibilities: -
1. The service brake side of the brake control valve permanently dumping to tank.
2. LH brake piston seal failure.
3. RH brake piston seal failure.
4. A crack in one of the steel tubes that are inside the rear case that carry oil from the parking brake valve to the brake assemblies on the LH & RH sides of the machine. This is an uncommon failure but it does crop up from time to time.
 

Nige

Senior Member
Joined
Jun 22, 2011
Messages
29,401
Location
G..G..G..Granville.........!! Fetch your cloth.
Cat technician recommended replacing the main wiring harness as it showed signs of corroding. Replaced it and three solenoids on valves.
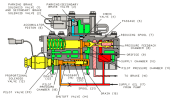
Can you indicate on the illustration below which solenoids you replaced.? I assume two on top (1 & 2) and one down below (12).?
On the service brake proportional solenoid valve #12 did you simply replace the solenoid.?
Did you remove #12 completely for cleaning.?

1678805312214.png


I don't know what anyone else thinks (and TBH I'm not 100% comfortable suggesting loading the parts cannon again when you are already in a $12k hole with no solution in sight) but before going any deeper into the brakes I would try a complete new valve assembly in #12 (174-4909 Solenoid Valve Gp). There is no guarantee that will fix the problem but it is the cheapest option that I can see at the present time.
 

Nige

Senior Member
Joined
Jun 22, 2011
Messages
29,401
Location
G..G..G..Granville.........!! Fetch your cloth.
I note from your photo of the hourmeter that the tractor has almost 13K hours on it. This would be around the time when the brakes would be due for overhaul.

If a new service brake proportional valve didn't fix the problem maybe something to consider would be to bite the bullet and overhaul the brakes on both sides as a next step.? Again I'd like to hear other opinions.
 

Nige

Senior Member
Joined
Jun 22, 2011
Messages
29,401
Location
G..G..G..Granville.........!! Fetch your cloth.
Canvassing for other opinions on how to confirm whether or not the source of the pressure loss is a failed brake piston seal this idea was suggested by another HEF member, and I think it has a very good chance of success.

It will require all three axle shafts to be removed from the machine so that it will be possible to see right through the rear end from one side to the other. With a light shining in from one side start the engine, release the parking brake, and look through the axle shaft tunnel from the opposite side of the tractor. If a brake piston seal has failed then there should be oil flooding down either close to where you're looking from or further away. If necessary move the light to the opposite side and repeat the test.
This would identify which side piston seal had failed, or if indeed that is the problem.

The procedure to R&I the axle shafts is attached. You will have to make a tool to do this but the instructions of how to do it are there.
 

Attachments

  • Axle Shaft R&I.pdf
    817.5 KB · Views: 12

Pushing forward

Well-Known Member
Joined
Mar 13, 2023
Messages
48
Location
Missouri
Replaced all solenoids, and replaced the entire assembly on 12, as solenoid was stuck to and damaged it removing it. Honestly I was in over my head in October, $4500.00 worth of parts and after three days of Cat on site working on it and the wiring harness wasn't out yet, realized this was getting out of hand. Between other contractual obligations and health issues, am just now getting back to work on it. Thank you Nige for your help, I will remove the shafts soon and report back.
 

Nige

Senior Member
Joined
Jun 22, 2011
Messages
29,401
Location
G..G..G..Granville.........!! Fetch your cloth.
I will remove the shafts soon and report back.
Any time there is an intention to remove the shafts the recommendation is always to coast the machine to a stop without using the brakes, then apply the parking brake. This gives you a fighting chance that the axle shafts will have no load on them and will slide out easily. You don't have that luxury so you may have to somehow nudge the machine back and forth to take the weight off the shafts if they will not slide out using the extractor tool.

CAUTION: With the axle shafts removed the machine will have no brakes at all. Take all necessary precautions to prevent the machine from rolling once the shafts are removed.

in response to a previous question regarding difficulty in interpreting the drawing of how to manufacture the axle removal tool I knocked up these instructions.

There are 3 pieces to the tool; a piece of 1.5" diameter round bar x 3.6" long, a 130mm-long M16 bolt, and a 4-foot length of 1.5" bore Sched 40 pipe.

1. Drill a 16.5mm through hole down the length of the round bar.
2. Slide the M16 bolt through the hole in the bar and weld the head of the bolt to the bar using a 1/4" fillet weld all round.
3. On the pipe measure back 2-3/4" from one end and drill a 1/2" hole right through it. I'd also drill a hole right through somewhere around 2-3" from the other end (for a cheater bar if necessary).
4. Slide the adapter into the pipe leaving a hair under 1/4" of the round bar sticking out of the end. Weld the adapter into the pipe using a 1/8" fillet around the end and a 5/32" plug weld in each of the two 1/2" holes that you drilled through it in Step 3.
 
Last edited:

Nige

Senior Member
Joined
Jun 22, 2011
Messages
29,401
Location
G..G..G..Granville.........!! Fetch your cloth.
Nige, your a hell of a good man!
I'm not so sure. The question was does it pi$$ oil every time the park brake switch is moved to the OFF position.? The response was that it's pouring oil all the time whether the brake control is on or off. That doesn't sound right to me but the OP has already started disassembling and any more testing is impossible at this point. So we'll have to cross our fingers and hope that he finds something obvious when it's all pulled apart.
 

Nige

Senior Member
Joined
Jun 22, 2011
Messages
29,401
Location
G..G..G..Granville.........!! Fetch your cloth.
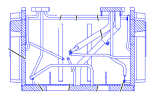
I'm going to suggest something to look at while the final drive is out of the machine. Get inside the hole with a flashlight and inspect the condition of the steel tubes that carry brake/steering/whatever oil around in the back end of the frame. The illustration below is typical and the arrangement of tubes in your rear case will be different. There will still be a rat's nest of tubes in there though. I can't get away from a nagging feeling that there might be a split tube in there.

See if you can spot a split in any of them, at the same time grab each tube and check if it is firmly in place where it enters the case. You shouldn't be able to move the tubes at all.

1681484094315.png
 

Mobiltech

Senior Member
Joined
Jan 14, 2014
Messages
1,697
Location
Sask.
Occupation
Self employed Heavy duty mechanic
I was going to say when the tech tested the pressure what was he testing and when did it drop too low. Very vague description. If the brake pressure drops when the brake is cycled to on that is normal.
 

Mobiltech

Senior Member
Joined
Jan 14, 2014
Messages
1,697
Location
Sask.
Occupation
Self employed Heavy duty mechanic
If he was checking park brake pressure it drops right off when the brake comes on. It’s spring applied and oil released. That’s why I was afraid he might be misleading you.
Sometimes I find we assume the poster has some working knowledge of the system when he tears into it but that can lead us all down the wrong path.
 

Pushing forward

Well-Known Member
Joined
Mar 13, 2023
Messages
48
Location
Missouri
Over the weekend we pulled the brake and planetary assembly and the brake and differential assembly out. Started machine and cycled parking brake off and on. No changes of oil flow. Found no splits in any tubes. No warning lights ever came on, possibly it is due to no shafts or other resistance. Could it be in the brake assembly?
 
Top