• Thank you for visiting HeavyEquipmentForums.com! Our objective is to provide industry professionals a place to gather to exchange questions, answers and ideas. We welcome you to register using the "Register" icon at the top of the page. We'd appreciate any help you can offer in spreading the word of our new site. The more members that join, the bigger resource for all to enjoy. Thank you!

How much to charge for this repair?

Dave101

Member
Joined
Oct 28, 2024
Messages
13
Location
Canada
So I'm fairly new to the mobile / on-site repairs and have mostly done smaller repairs in the shop. I know it's easy to say add xx amount to your hourly rate but I'm also looking for some estimates on how long this should have took to guage myself on efficiency.

So, you experts submit your quotes on how many hours this would take you, and how much would you charge for this mobile repair in the Seattle area.

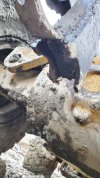
The repair: 6 inch x 2 inch beam on a front loader bucket linkage. There was a bunch of garbage weld repair with side plates that was previously done that didn't hold, needed to be arc gouged out. Arc gouging bad weld (and new weld build up) extended onto the pin boss.
(Yes I did grind it down to nearly an open root before welding).
Pics
 

Attachments

  • 20250226_164902.jpg
    20250226_164902.jpg
    1.4 MB · Views: 111
  • 20250226_164905.jpg
    20250226_164905.jpg
    1.4 MB · Views: 104
  • Screenshot_20250305-164947_Gallery.jpg
    Screenshot_20250305-164947_Gallery.jpg
    247.7 KB · Views: 113
  • 20250227_144023.jpg
    20250227_144023.jpg
    1.7 MB · Views: 111

Welder Dave

Senior Member
Joined
Oct 11, 2014
Messages
17,925
Location
Canada
What ever time it takes but that's a mess. Your prep. in the 4th pic. is not sufficient and will fail. Not sure if that's what you referred to nearly an open root? One thing that you absolutely need to do is bevel the thick pieces so you get 100% penetration. Actually weld one side then back gouge and/or grind into back of that weld. If the piece is 2" thick you need 2" plus thickness of weld. Any internal area no matter how small without fusion is just a weak spot for a crack to start. Also need preheat with peening and slow cooling. That said, I think it would be better/best to just replace the bucket linkage. The link could have so much metal fatigue from the previous mess that there's nothing you could do to make a lasting repair.
 
Last edited:

Shimmy1

Senior Member
Joined
Aug 14, 2014
Messages
5,556
Location
North Dakota
His repair looks one hell of a lot better than the scrap the previous guy glued on that he had to cut off. A little more discoloration would have been nice to see, I'd agree it may not have had enough heat poured into it.

I will also say this, if they were able to break the original, even a new replacement will be subject to failure. I'm going to guess you spent about 3-4 hours prepping, and a few hours welding?
 

chidog

Senior Member
Joined
Jun 21, 2021
Messages
1,492
Location
wa
I agree with Dave about just replacing it. But sometimes can always be done.
I would not have tried to weld it insitu, and the Vee on the side is not wide enough.
If I had the welder I used in the day, I'd probably use after some tacks then 1/4 rod and the amps would be very high, I always went for penetration, and why I could not weld that out of position, it would have to be a flat horizontal weld.
For all that I would want to do with it, I'm guessing almost 2 days. Any sort of mechanics and machine work has never been a race to me. I'm proud to be dead slow at it.
I've welded much thicker stuff back when I was doing that kinda work, welds never broke.

I'm guessing a new link would be 4k plus these days, just buying the steel to make one would likely be 500 now maybe more. I'd like to know? Gee with prices now I bet the weld rod is almost 200 ???
 

Simon C

Senior Member
Joined
Jul 1, 2015
Messages
2,990
Location
Rocky Mountain House , AB., Canada
Occupation
Heavy Equipment Mechanic
Second job looked better than the first. The V should of been deeper and wider as stated. Using some rod like ArcTec 223 that has higher elongation put in stringer beads and peened with preheat first.
Be lloking for a good used one if any out there.
Simon C
 

Welder Dave

Senior Member
Joined
Oct 11, 2014
Messages
17,925
Location
Canada
Arctec 223 is basically higher cost 8018 (C3) with 1% nickel. 8018 is used to repair crane booms. Using smaller rods and more passes gives a finer grain structure but peening would definitely help. I agree with looking for a good used link because in all honesty I can't see the repaired link lasting for very long.
 

Shimmy1

Senior Member
Joined
Aug 14, 2014
Messages
5,556
Location
North Dakota
I've seen a lot worse looking weld hold a lot more than that link is exposed to. Now, if it was a member that would be subjected to twisting or otherwise flexing stressors, then I would agree. I would like to see it ground smooth to expose any porosity (if there is any) and that would also get rid of any stress risers that the surface promotes. On something that big, and being out of position to boot, I don't think it looks as bad as you want to believe.
 

1466IH

Senior Member
Joined
Feb 4, 2014
Messages
813
Location
prairie du rocher, il
I am not there to see it in person so it is hard for me to give a hard figure but I would have put a few heavy tacks on it and remove the link from the machine and bring back to the shop. It would actually save time in the long run. In the field I would guess 24-28 hours to do it properly with pre and post heat and prep work. Shop would probably be 16-18 hrs including removal and installation. In the shop I would have pressed out the bushing in that eye and clamped everything into place on my big fixture beam prepped it and welded it out with 1/16" Hobart Fabco777 running 100% CO2
 

Dave101

Member
Joined
Oct 28, 2024
Messages
13
Location
Canada
What ever time it takes but that's a mess. Your prep. in the 4th pic. is not sufficient and will fail. Not sure if that's what you referred to nearly an open root? One thing that you absolutely need to do is bevel the thick pieces so you get 100% penetration. Actually weld one side then back gouge and/or grind into back of that weld. If the piece is 2" thick you need 2" plus thickness of weld. Any internal area no matter how small without fusion is just a weak spot for a crack to start. Also need preheat with peening and slow cooling. That said, I think it would be better/best to just replace the bucket linkage. The link could have so much metal fatigue from the previous mess that there's nothing you could do to make a lasting repair.

I cant edit the post now, but that was just initial fit up to see where im at. I did cut it out to an almost open root all the way down.
That beam is really heavy I had to get it in position while I had help before the last guys left the jobsite. Once it was in position I tack welded the bottom (you can see bottom is gouged out much deeper) and continued gouging and cutting out the upper section.

All the gouging and grinding gave it plenty of preheat, the grease was cookin out of there. and yes I paid attention to interpass temps. Needle scaler for peening.

Yes I agree its got alot of fatigue and new is always better, but new parts wait time and cost did not justify it for the owner of this older machine.

Plan is to go back and add in some plates on the sides for added strength.
 

Dave101

Member
Joined
Oct 28, 2024
Messages
13
Location
Canada
His repair looks one hell of a lot better than the scrap the previous guy glued on that he had to cut off. A little more discoloration would have been nice to see, I'd agree it may not have had enough heat poured into it.

I will also say this, if they were able to break the original, even a new replacement will be subject to failure. I'm going to guess you spent about 3-4 hours prepping, and a few hours welding?

I wire wheel really good after each pass, so thats probably why your not seeing more discoloring. Also paying attention to interpass temps so its not too hot.

about 6-7 hours prepping. And around 6 hours welding. Its a rather tight area in there and not a whole lot of room for movement, out of position for all of the welding except the top cap.
 

Dave101

Member
Joined
Oct 28, 2024
Messages
13
Location
Canada
I agree with Dave about just replacing it. But sometimes can always be done.
I would not have tried to weld it insitu, and the Vee on the side is not wide enough.
I cant edit the post now- but that was just initial fit up to see where im at. I did cut it out to an almost open root all the way down.
That beam is really heavy I had to get it in position while I had help before the last guys left the jobsite. Once it was in position I tack welded the bottom (you can see bottom is gouged out much deeper) and continued gouging and cutting out the upper section.


If I had the welder I used in the day, I'd probably use after some tacks then 1/4 rod and the amps would be very high, I always went for penetration, and why I could not weld that out of position, it would have to be a flat horizontal weld.
For all that I would want to do with it, I'm guessing almost 2 days. Any sort of mechanics and machine work has never been a race to me. I'm proud to be dead slow at it.
Looking back at it, and analyzing that I was in a rush to just do it on site instead of trying to remove it (would have required at least 2 people) and doing it in the shop, I can see how much better and easier it would have been to just remove it and take it to the shop.
It pretty much took me 2 days to do it on site. Probably would have taken just as long with removing and re-installing it.
 

Dave101

Member
Joined
Oct 28, 2024
Messages
13
Location
Canada
I am not there to see it in person so it is hard for me to give a hard figure but I would have put a few heavy tacks on it and remove the link from the machine and bring back to the shop. It would actually save time in the long run. In the field I would guess 24-28 hours to do it properly with pre and post heat and prep work. Shop would probably be 16-18 hrs including removal and installation. In the shop I would have pressed out the bushing in that eye and clamped everything into place on my big fixture beam prepped it and welded it out with 1/16" Hobart Fabco777 running 100% CO2

Looking back I totally agree I should have removed it and took it to the shop!
The other concern I had with removing it is the welding pulling the eye out of alignment and then I would never be able to get the pin back in!
Yes I know to clamp it (weld in support bars to hold it in place) but even with clamping it will have internal stresses after welding that will pull it a bit once the clamps are removed. Yes post heat will help alot with that, but ive had it where the pins get out of alignment and then it 2 guys working half a day with sledge hammers trying to get that pin back in....

Can you please send some pics of your fixture beam? I imagine it has to be something that you can rotate to weld both sides evenly??
 

chidog

Senior Member
Joined
Jun 21, 2021
Messages
1,492
Location
wa
Back in the day I didn't have access to a mill, so if the hole was out of alignment I'd have to work with what I had to work with. I'd spot the areas that needed to be removed and use a die grinder. Done right and using say 320 wet dry to polish it, it would work just fine.
It depends on many things how to go about certain jobs, and what you have to work with.
I never used big hammers to force any pins. Now if it was distorted real bad then heat it and use a heavy machine or a press to straighten it. A big dozer blade is a great press, or large excavator.
 

CM1995

Administrator
Joined
Jan 21, 2007
Messages
15,952
Location
Alabama
Occupation
Running what I brung and taking what I win
I think it would be better/best to just replace the bucket linkage.

First thing I thought. What is the cost difference between a new linkage and OP's time to repair it? Figuring in downtime it cannot be cheaper to repair it unless a new linkage is not available.

Also moved this over to the wheel loader section.
 

Welder Dave

Senior Member
Joined
Oct 11, 2014
Messages
17,925
Location
Canada
If it's basically a flat plate with bushings on the ends could have a steel supplier cut a new one and then weld bushings on. Could have made it a little thicker but the looks of it too. Simple to cut and simple to make new bushings. The hardened internal bushings are wear items and should be readily available either OEM or aftermarket.

I have doubts about the repair but hopefully it lasts a little while anyway. I wouldn't stand near a loaded bucket. There could be a lot of liability there if it broke again. Even the slightest weld flaw or lack of penetration could lead to a crack and failure. If it was completely unobtanium and repairing was the only option, I at least would have got some help and removed it to weld on a bench. I had to weld the top swing mount back on my backhoe after it ripped off. I didn't have a choice but could make it stronger because it wasn't a full penetration weld. The bushing basically ripped out of the plate. Undercut around the factory weld didn't help. I V'd the plate on both sides so I could get deeper penetration welding the bushing back on. I had a 4 pass v-groove/fillet weld vs the factory single pass fillet weld (with undercut).
 

chorty55

Member
Joined
Mar 22, 2025
Messages
21
Location
Usa
I've broken a few myself.

heavy bevel so you can easily root from both sides, TIG and filler on the first few passes. Then stick it hot, crown a bit, and still add fish plates on both sides if possible.

Only thing that broke was my ears because i got home late every night.
 

Welder Dave

Senior Member
Joined
Oct 11, 2014
Messages
17,925
Location
Canada
Don't know if Tig root would be necessary or add any more strength if there was 100% penetration with one side welded and the other ground into that weld.
 

Georgia Iron

Senior Member
Joined
May 6, 2012
Messages
1,312
Location
USA - Georgia
Occupation
Concrete building slab and grading contractor
Looks like a good repair to me. You could add some more fresh plate or bar to the area for some more strength. I would be curious to know how long the repair will last.

I would be happy with your work.

$2000 Would not be out of line if that machine was mission critical. I'll do what ever it takes to get back to work. If 30 sticks get it back to size I just add 5 or 10 more pounds and my welds have never broken. 7018 always seem to work for me

I have never had any training. I read plenty of books but I learned how to weld by figuring out how to weld up rifle reactive shooting plates. 556 and 308 will tell the tale. When your plate bends all the way around the weld and the welds hold you got it right. Fastest sledge hammer there is.
 
Last edited:
Top