• Thank you for visiting HeavyEquipmentForums.com! Our objective is to provide industry professionals a place to gather to exchange questions, answers and ideas. We welcome you to register using the "Register" icon at the top of the page. We'd appreciate any help you can offer in spreading the word of our new site. The more members that join, the bigger resource for all to enjoy. Thank you!

Boom down randomly becomes weak when warmed up - John Deere 490e excavator

joelx777

Well-Known Member
Joined
Apr 1, 2022
Messages
167
Location
Washington State
Okay, I went out and ran the machine today. Sure enough, once it was warm the boom down pressure would not build beyond 2000, it should go up to 5200.

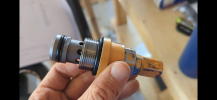
I took off the cover on the boom down circuit pressure relief valve, and turned the adjustment screw the equivalent of 3200 PSI up. Once the machine warmed up again, it would not go above 2,000 PSI like before. I'm trying to remove the pressure relief valve, but it's on there super tight and I can't get any leverage. Here's what it looks like -
https://photos.app.goo.gl/RJ6ZPdRcYwSDUzvJ7

My intention once I get it off is to take it apart, inspect it for damage and if there's not any, replace the o-rings and try again. If there is damage, I will buy a new one.
 

fastline

Senior Member
Joined
Aug 8, 2011
Messages
1,110
Location
OK
Make damn sure you return your adjustments back to where they were! People get to turning stuff and it can get all screwed up.

Springs can lose force over time but that is too large of an error IMO. Likely to be something broke or more obvious I would think. A simple Oring leaking would not pass that much oil to get pressure that low. Maybe missing entirely? Don't know but keep us updated.
 

joelx777

Well-Known Member
Joined
Apr 1, 2022
Messages
167
Location
Washington State
Make damn sure you return your adjustments back to where they were! People get to turning stuff and it can get all screwed up.

Springs can lose force over time but that is too large of an error IMO. Likely to be something broke or more obvious I would think. A simple Oring leaking would not pass that much oil to get pressure that low. Maybe missing entirely? Don't know but keep us updated.
Things just went extremely badly for me. I used the air gun to break loose the circuit relief valve. When it came out I was ready with a plug, but my plug has a long tapered point and it was too long to fit in the hole. My main control valve just dumped hydraulic fluid all over me and all over the ground. I had no knife to cut off the end and no buckets to catch the fluid. I drove up to my diesel tank storage area and got a couple buckets from by the diesel tank, then put that bucket under there and then drove up to the house and got a knife to cut the plug end off. When I tried to stick the plug end on, I hurt my shoulder I was pushing so hard. At least now the plug is in and it's not leaking anymore and I have a bucket under it. I kind of feel like just saying f**k it all and move to Las Vegas and stay in hotel room and play small time poker for the rest of my life haha.

Now I have to figure out what to do with my sweatshirt soaked in hydraulic oil. I have to figure out how to take apart the relief valve and decide whether it's still good or not. The problem might not even be this relief valve it could be the variable pressure compensating valve or something else

And since I needed to use the air gun, I did it near the pump house where I have power. Now all that hydraulic oil is about 30 ft away from our well. Fortunately the well is 190 ft deep. Once I get this back on there, I will light a fire on that spot and see if I can burn some of it off the surface maybe or something. Then I will dig up the rest and carry it off somewhere.
 

joelx777

Well-Known Member
Joined
Apr 1, 2022
Messages
167
Location
Washington State
I partially took apart the relief valve.

I got stuck trying to remove the stop ring here... No idea how to do it.
1000004942.png

I tried unthreading the valve body and it didn't budge. See here where I tried to put wrenches on it:
1000004943.png
I am guessing it won't unthread because the stop ring has to be removed first?

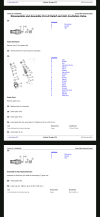
Below is the manual's instructions -
1000004941.png
Note the disassembly instructions say step 1:"Remove cap and gasket" step 2: "Remove parts C-U".... aka take everything else apart without further instructions haha.

Any ideas?
 

fastline

Senior Member
Joined
Aug 8, 2011
Messages
1,110
Location
OK
Sounds like a good mess! I hope you have some confidence in your direction. It might have been good to verify other functions such as full pump stroke and full spool movement via pilot pressure to the spool, etc. But its apart now so see what you can find in that valve but take it apart very carefully or consider complete replacement of that valve.

Remember what I said about a regeneration valve, which is just a short circuit between rod and piston end.
 

joelx777

Well-Known Member
Joined
Apr 1, 2022
Messages
167
Location
Washington State
Sounds like a good mess! I hope you have some confidence in your direction. It might have been good to verify other functions such as full pump stroke and full spool movement via pilot pressure to the spool, etc. But its apart now so see what you can find in that valve but take it apart very carefully or consider complete replacement of that valve.

Remember what I said about a regeneration valve, which is just a short circuit between rod and piston end.
I don't have much confidence in my direction, but I am committed / stuck at the moment!

I did manage to get the snap ring off, it was a pain.

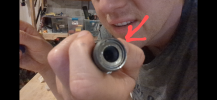
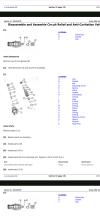
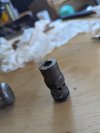
Now I'm a little stumped as to how to get the seat off so I can inspect the inside. The part is letter J in the attached diagram and I attached a picture of it too.

1000004969.png

1000004970.jpg

I used a piece of flat metal to try unthreading it. It does twist around and around and came up a tiny bit... But when pressure is applied it goes back in. So I don't think it is threaded, maybe just friction fit or something? I tried screwing it quite a bit, so I don't think it's threaded. I tried pulling it out with pliers and prying it with a screwdriver, but no luck as the gap is tiny. I tried pushing it from the inside but there is just a valve with a spring and it doesn't push out.

I definitely have to get it apart as I accidentally dropped it in the sand while removing it and I found a few bits of sand, or possibly damaged metal or plastic while disassembling it so far. I want to be sure it is all okay and cleaned out.

I am pretty nervous about getting it back together as I called Pape to see what a replacement goes for... $600! I am worried about buying a Chinese replacement as I tried that for the ignition and the ignition part failed right months later and cost me a lot of money in mechanic fees tracing it back.

And I am under a fairly urgent timeline... I installed 800' of water pipe and then decided to pull this thing off to work on it thinking it would be quick and easy! Now the first freeze is approaching and I have to get the trench filled beforehand... Oops.
 

fastline

Senior Member
Joined
Aug 8, 2011
Messages
1,110
Location
OK
Just work methodically. Do it in haste and you risk damage. Those are finely machined parts so one bit of sand can cause binding. Could try diesel and compressed air to rinse. Per the instructions, it should not be a big issue but that could also be the source of your problems. Just not sure!
 

joelx777

Well-Known Member
Joined
Apr 1, 2022
Messages
167
Location
Washington State
Just work methodically. Do it in haste and you risk damage. Those are finely machined parts so one bit of sand can cause binding. Could try diesel and compressed air to rinse. Per the instructions, it should not be a big issue but that could also be the source of your problems. Just not sure!
Thank you, using the air works in combination with a metal ground stake worked to pop it out!

Everything looked fine to me in there. I replaced a couple of o-rings, but I'm going to leave all the plastic ones in the pre-built gaskets alone.

My plan is to go out and pull one more pressure relief valve off and put this one in its place and put the other one where this one was.

I did not measure the length of the adjustment screw prior to taking it off, so I have it all the way backed off to start with. I will adjust it inwards till the new function is at the correct pressure.
 

Diesel Dave

Senior Member
Joined
Sep 29, 2022
Messages
1,109
Location
Ontario Canada
I noticed most of the cycle times you posted are on the slow side.
Have you checked the pump angle sensor voltage setting. It is adjustable .
It could be a solution to the weak boom down issue.
The procedure and the spec is in the manual. It should be adjusted to the high end of spec.
 
Last edited:

joelx777

Well-Known Member
Joined
Apr 1, 2022
Messages
167
Location
Washington State
Ok, so I swapped the bucket dump relief valve to the boom down relief valve spot. I moved the boom down relief valve that I disassembled and reassembled to the now vacant spot for bucket dump.

I tested the machine and all of its functions except for propel and nothing leaked or failed. I did see that bucket dump now maxed out at 2000 PSI. I had left the adjustment screw pretty open is I couldn't remember what level it was at. I just went under the machine and tighten that screw by at least a turn and a half which should be roughly 3,000 PSI. I'm going to try and operate it again now and if bucket dump still maxes out at 2,000 PSI even when pushing against the stop and then I guess that that pressure relief valve I assembled and disassembled has failed in some way that I could not see.

Well I am now getting 2900 psi from bucket dump. Doesn't guarantee that the relief valve is now good because the issue only occurred once the machine was fully warmed up.

The manual wants me to have bucket dump at 5475 psi, higher than any other function. That boggles my mind... Why have the smallest function have the highest psi? Anyways, I will try to further adjust it upwards.

Ok, I adjusted the bucket dump pressure relief valve (the one that I disassembled and reassembled from the boom down spot). I am now getting 5400 psi against the stop.

Now I am going to test run it and get the machine good and hot.

Looks like I ran out of daylight to test the machine, I'll try to test it tomorrow probably.
 

fastline

Senior Member
Joined
Aug 8, 2011
Messages
1,110
Location
OK
That's what you want to see! A good baseline test, then see if that holds. Honestly wondering if you have some cracks in some springs or possibly the spring has lost some temper due to heating.

Seems like you are on the hunt for now. A relief should not change hot or cold. I mean it would 'technically', but would be minor. Not several ksi.
 

joelx777

Well-Known Member
Joined
Apr 1, 2022
Messages
167
Location
Washington State
Sooo.... I was using the excavator to fill in the trench and everything was going well. I drove around a sand pile and heard really loud clanking sounds coming from the tracks. I got out and looked around and everything looked fine. So I drove a little further and did a full check. Behind me, I saw a huge bolt with a washer on it... 1" wide and 10.5" long. I looked around and eventually figured out that it went to my counterweight. Both bolts on one side of the counterweight have fallen off and the counterweight started to slide off a bit on that side. You can see it here:

https://photos.app.goo.gl/MxJBdULtfai8J2467

The counterweight weights 5,200 pounds and each of the 4 giant bolts holding it on are supposed to be torqued to 800 ft lbs...

The strange thing is that I haven't hit anything with the counterweight as far as I am aware. The bolt appears to be fully intact, it just worked its way loose and fell out.

I have a little tractor, but that won't come remotely close to helping with the counterweight. I could use my f450 to try to push it back on somehow maybe. I have a friends stepdad with a crane truck who used to be a heavy equipment mechanic, but he hasn't had time to help lately.

Not sure what to do, but I still have to get this trench backfilled before the first freeze here...

At least the relief valves seem okay. I didn't have much driving time though, so we'll see once I get the counterweight figured out.
 

joelx777

Well-Known Member
Joined
Apr 1, 2022
Messages
167
Location
Washington State
I went on a wild goose chase in Tacoma WA yesterday looking for these bolts (M27 hex head 250 mm long 3.0). Tacoma screw didn't have it, nor did the six others I called. I will order it online probably. My friends dad who was a heavy equipment mechanic, now retired, very generously lent me his $3,000 1" 6' long snap on torque wrench that goes up to 1,000 ft lbs.

As I still have two bolts left on one side, I am thinking of backing the weight into a tree to get it back in position, then take one bolt off and put it on the other side. Then just operate it real gently until the new ones come in a few days. The risk is that if something went wrong or a bolt sheared, the counterweight could swing out or shear a second one too. Not likely to happen...
 

joelx777

Well-Known Member
Joined
Apr 1, 2022
Messages
167
Location
Washington State
Ok, so big updates and questions:

Weak boom issue: The boom now remains strong when the machine is fully heated up. I had swapped the circuit relief valves between the boom down function and the bucket dump function. Now the bucket dump function is weak. Buying a new one from Pape will cost $600. I have already disassembled and assembled it and it's not see anything broken, so I am guessing this may be due to a weak spring? I also saw a spot that may be missing an o ring or something when I was putting it together. Any advice here? Should I buy a cheap Chinese relief valve? Try to buy replacement springs- does anyone know how to find the original manufacturer of this valve to get data and spec and parts?
Here is a photo of the spot that looked like it had a strangely large gap next to an o ring and a white plastic ring:
1000005063.png
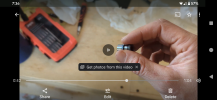
Video of operation:
https://photos.app.goo.gl/CdKqkVziJQAYntXW6

Counterweight issue: my best friend's heavy equipment stepfather was super generous and lent me his $3,000 1" snap on torque wrench, so I was able to move one of the two remaining bolts from the right to the left side and properly torque both to 800 foot pounds. I ordered four new bolts and will replace all four when they arrive. Video:
https://photos.app.goo.gl/NMe2oNsf3AcN2r8r5

Overheating: shortly after my demonstration of the bucket dump relieve valve issue now, I measured temperatures at the pump of 170 F and quite hot temps elsewhere. Is this likely just the failed pressure valve or should I be looking at other areas?
Video: https://photos.app.goo.gl/XT9X3G4gYfN9U2di8

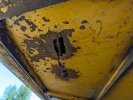
Rusted through metal plate under the battery: check out this ugly rusted through plate under the batteries. I don't have any welding equipment and don't know how to weld yet. I do want to learn but space is low currently for me in my garage. What should I do for a quick but effective fix here?
1000005042.jpg
 

joelx777

Well-Known Member
Joined
Apr 1, 2022
Messages
167
Location
Washington State
I ran the machine for a couple of hours tonight filling in my trench. I really don't like that the control valve temperature reached 175.

I just bought this Chinese valve, hopefully it works okay. It arrives Tuesday.

https://a.co/d/0Luarkq
 

joelx777

Well-Known Member
Joined
Apr 1, 2022
Messages
167
Location
Washington State
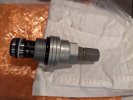
I ordered a replacement valve on Amazon but it looks slightly different than the one I had. See the two attached photos, the yellow one is the original, the grey is the new one. It looks like the circles / holes are lower on the new one, but it could be because the original failed?

1000005129.jpg

1000005128.png
 

joelx777

Well-Known Member
Joined
Apr 1, 2022
Messages
167
Location
Washington State
Good news! Ebay refused to refund my payment to the scammy Dr Ex seller who never delivered, but Paypal did refund the payment!

Screenshot 2023-10-16 8.37.19 AM.png
 

fastline

Senior Member
Joined
Aug 8, 2011
Messages
1,110
Location
OK
What did I miss? Did you test that valve? Valve was junk? If you don't feel good with a part like that, do NOT use it! The consequences are huge! I think I might have fought harder to repair the old valve. Maybe someone does that? Springs have spring rates. They are progressive and very easy to test and determine. I've seen many springs with micro cracks, like valve springs. When a spring test is run, they fail it.

Anywho,
 
Top