• Thank you for visiting HeavyEquipmentForums.com! Our objective is to provide industry professionals a place to gather to exchange questions, answers and ideas. We welcome you to register using the "Register" icon at the top of the page. We'd appreciate any help you can offer in spreading the word of our new site. The more members that join, the bigger resource for all to enjoy. Thank you!

Hydraulic fluid flush on a Case 480ck

Abseim

Well-Known Member
Joined
Apr 20, 2023
Messages
62
Location
New York
It is most likely a defective voltage regulator.
Rather than spending any money on that outdated generator and regulator I would recommend that you convert to a one wire alternator.
It has been discussed many,many times on HEF.
Do a search for one wire alternator.
That's extremely helpful! I have a pretty extensive experience with all sorts of electronics and electrical engineering in many aspects besides vehicles/engines and I've always been perplexed why alternators had so many wires, but the one wire alternator makes so much sense! Thanks for sending me down that rabbit hole this morning!

Dale at ebackhoeparts says he's out of voltage regulators, and doesn't sell one wire alternators, but plenty are available on Amazon. Hopefully it won't be too hard to rig up a mounting bracket.

Now I want to get another 1 wire alternator to stick on my little garden tractor with an unused snowblower pto pulley to use as a mobile battery charger. Right now I have to drag my propane powered generator over to the tractor to charge the battery whenever it dies... Which is like once or twice every day I use the tractor, haha. It's like it will only start on a totally full battery and I only get one shot to crank it. So any issues with the carb, or vapor lock, or loose wires that keep it from starting in the first 2-3 seconds mean I have to give it a boost

I'm thinking my next area to dive into is the ignition system. The spark plug wires are really old and I can feel a shock if I touch them. I also can't get the tractor to idle below about 1200rpm no matter how I adjust the carb, so I'm thinking that's telling me I need to look at the coil or distributor?

All said though, this backhoe project has felt like a college course in engine repair, hydraulics, earthmoving, and cursing, haha! It's been a really great experience so far, and it's been a fun change of pace from doing carpentry and tree work.


It's been 7 weekends since I bought this backhoe and I feel like I know every last piece of this machine now. I reached a point last weekend where I was using the backhoe and I realized how comfortable I was using the controls and didn't even have to look down at my hands, it's like I could just watch the bucket and think where I wanted it to go and it went there!

Here's a pic of the clearing progress, before and after the backhoe. About 1/2 acre cleared. This was after a few weeks of clearing fallen trees and saplings... hopefully just one or two more weekend with the backhoe and I can start laying out the footings for my shop!

IMG_6209.jpeg

IMG_0166.jpeg


IMG_1574.jpeg

And giant pile of stumps!

IMG_1473.jpeg
 
Last edited:

Tinkerer

Senior Member
Joined
May 21, 2009
Messages
9,376
Location
The shore of the illinois river USA
If it won't idle below 1200 rpms something is preventing the throttle plate in the carburetor from closing down to where it should be.
If it isn't the idle set screw remove the carburetor and see what the problem is.
 

Abseim

Well-Known Member
Joined
Apr 20, 2023
Messages
62
Location
New York
If it won't idle below 1200 rpms something is preventing the throttle plate in the carburetor from closing down to where it should be.
If it isn't the idle set screw remove the carburetor and see what the problem is.
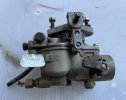
I've totally disassembled and cleaned the carb, and even have the zenith service manual for my specific model. I've adjusted the idle set screw and idle jet, I've taken the carb apart 4 times now tweeking the float valve. I've gone through the entire throttle and governor linkage... It just doesn't want to run below a certain rpm. It doesn't even try... It just sorta cuts out when I start backing down the idle set screw below about 1000-1200 rpm.

Is there truly no mechanism for this idle issue to be related to the ignition system? It's why I think the engine is so hard to start as well, it only starts with a full battery spinning the starter at full speed, with enough voltage going to ignition coil. Anything less, no start. I don't even waste time attempting to start after the 2nd or 3rd try now cause it will just take longer to recharge. I just trudge over and drag the generator over to boost the battery wherever the engine decided to die this time...

Edit: I hope you took all that the right way, I'm not trying to be difficult! I'm just trying to wrap my head around the issue... I'm totally willing to have another go at the carb if you think that's where you believe the problem is.
 
Last edited:

Tinkerer

Senior Member
Joined
May 21, 2009
Messages
9,376
Location
The shore of the illinois river USA
Zenith ? OR a Zenith style ?
It should be a Marvel- Schebler. With or without a solenoid on it.
What you describe is a problem with the idle jet.
It may be damaged from having the set screw turned in too far/ hard. IMHO
Have you tried screwing the idle mixture screw out to make run richer ?
If it is set too lean it will cut out the slower you try to set the idle speed.
Provided the float is adjusted and working properly.
 

Abseim

Well-Known Member
Joined
Apr 20, 2023
Messages
62
Location
New York
I don't think it's original? Everything in my manuals shows a marvel schlebler...

I've tried turning out the idle mix screw, i think it's supposed to be just two turns from closed. I tried backing it out a ways more but it didn't seem to help.

The float is finally adjusted properly, it took several tries but I finally got it to run continuous at full throttle as well as not drip fuel when turned off.

If I disassemble again, what should I look for? Is there a way to bench test the idle jets? I'm pretty fast at taking it apart and putting it back at this point.

Oh, and PO said he tossed the air filter cause mice kept nesting in it... So who knows how long it ran without one... I found a cub cadet filter at the local ACE that fits over the intake perfectly for now...

IMG_1233.jpegIMG_1484.jpeg
 

edgephoto

Senior Member
Joined
Aug 13, 2019
Messages
734
Location
Stafford, CT
Your alternator symptoms sound like a bad voltage regulator. If it is sparking visibly you may have some internal issue like a bad bearing, damaged slip rings, worn brushes, etc. Your machine is old enough that you probably have a mechanical voltage regulator. The contacts could be corroded or it is out of adjustment.

As was mentioned a single wire alternator is the simplest solution but you won't have any indicator light to tell you when it is not working. There are several frame size GM alternators that are made into single wire models. A simple voltage gauge wired up would tell you if your alternator is working.
 

Tinkerer

Senior Member
Joined
May 21, 2009
Messages
9,376
Location
The shore of the illinois river USA
There is an outside chance you have a vacuum leak due to a leaking intake manifold gasket.
Or somewhere else.
I would prolly separate the exhaust and intake manifolds and look for a problem where they are joined together.
A GM alternator can be converted to a simple three wire configuration.
The indicator light and an ammeter will be fully functional.
It is my preferred method.
 

Abseim

Well-Known Member
Joined
Apr 20, 2023
Messages
62
Location
New York
When I say it sparks, I mean just the regular sparks you see on any brushed motor... It doesn't seem too excessive, and is a quick way to tell if it's working or not, especially since I have the hood off cause I'm tired of taking it off again and again, haha.

I only have the one "GEN" light right now, no other guages or lights work, and I'd rather a voltage guage anyways.

As far as the vacuum leak, are you saying that there could be a leak in the gasket between the intake and exhaust which is causing exhaust to go into the intake instead of the air fuel mix from the carb? Which would cause a lack of suction on the carb intake? Even if the old gasket was fine, I would need a new gasket on hand when I go to reassemble, correct?

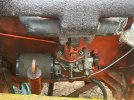
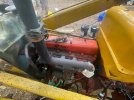
I do need to replace the exhaust manifold at some point. It's currently cracked clean through on the section that connects to the end cylinder. One of the very first repairs I did to this machine was to wrap that area with exhaust patch cause it was blowing hot soot at the gas tank and was noisy.


IMG_1483.jpeg
 

Tinkerer

Senior Member
Joined
May 21, 2009
Messages
9,376
Location
The shore of the illinois river USA
It is normal for a generator's brushes to create sparks when it is charging.
A volt or ammeter can be added to the charging circuit.
Take the manifolds off and look for vacuum leaks everywhere. Hopefully it is a gasket.
If you feel creative make some plates to seal the intake manifold ports and the carb flange.
Drill a hole on one of them so it can be pressurized with compressed air.
If it has leaks they will be quite obvious.
Manifolds for your gas 188 should be available in salvage yards.
Exhaust manifolds can be repaired with a spray welding process.
 

stinky64

Senior Member
Joined
Feb 25, 2017
Messages
900
Location
java center ny
Occupation
big truck wrench/fixer of things
If you suspect intake or carb leaks you can use a can of ether or brake cleaner or carb cleaner and spray the intake manifold/ carb assy while your machine is running at idle and listen for the engine to speed up. That should tell ya if you're sucking air somewhere.
 

melben

Senior Member
Joined
Jan 14, 2008
Messages
1,029
Location
Williamsport, Pa
Occupation
Retired 50 Yrs with Case dealership
There is no interior suction system or filter on the suction side. If you fill the reservoirs properly by removing the pipe plugs (1/4 ) up on the loader frames at the radiator shell and keep bleeding the air out up front as you fill and then when all the air is out filling it to level you will have done it properly. Be careful your choice of oil, in my career I have seen many with crumbly V cups and I think poor oils are to blame for some of that.

The white plastic cap with the spring clamp up in the 4 speed area is there to seal a tube that goes up into the shuttle housing, that same transmission case was used in ag tractors of that era and a hose was attached in ag applications to return Draft Control piston leakage to the front so as to not contaminate the 90 wt with the Hytran used in the front shuttle box in case of draft control piston seal failure. Occasionally they are missing in backhoe and can cause oil transfer.
 

Abseim

Well-Known Member
Joined
Apr 20, 2023
Messages
62
Location
New York
That's really helpful, thanks!

So you are saying there is no suction tube inside the loader frame reservoir that goes further below the fitting on the frame that connects to the pump input?
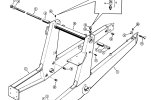
IMG_1585.jpeg

Also, there is only a 1/4" plug on the front right side frame by the radiator, not on the left, which doesn't make any sense to me. Is there always a giant air cavity on the front of the left side frame? The left side frame only has the two hydraulic line connections, the top 1/4" vent, and the bottom 3/4" drain plug that is actually a few inches up from the bottom creating a nearly impossible to clean area.


After the flush when I refilled, I put a 1/4 npt to 3/8 hose barb adapter in place of that plug and put a 5' length of clear hose clamped up to the muffler so I could see the air bleed out as I filled. When I filled a third time after rebuilding some cylinders, I realized could just back the plug out til I could hear the air hiss out, and then close when oil starts to flow. It's pretty messy trying to remove the hose barb and replace the plug I learned. :rolleyes:

I've been refilling with traveller iso 46 oil, it's affordable and availabile at the red farmer walmart nearest to me. The oil in the system finally cleared up, between a blown hose, rebuilding cylinders, and all the little leaks, I've added almost 10 more gallons since the flush.

Questions about the shuttle...
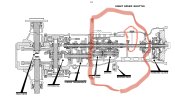
IMG_1584.jpeg

What is the level the oil should be in the shuttle reservoir? Manual shows a dipstick on the cap on the torque tube, but I just have a cap only. Also, this is just a fully mechanical gearbox right? Just the shuttle and the high/low range box. No clutches or torque converters. No hydraulics. Why can't I put any machine oil here? Right now its a reddish fluid, and the only oil on this machine that wasn't milky, even though the shuttle cover plate had no gasket and leaked all around, so I'm sure there's water in there. This is also the last reservoir on the machine that I haven't flushed, and based on the terrifying globs that came out of every other reservoir I know it's gonna be ugly...

My thinking is, this is a 55 year old machine that has clearly been through the ringer, and it's been neglected for years... Somehow it's still ripping out stumps and piling them up... I really don't have any reason to drive this around out here in the woods in anything other than low 1st or high 1st. The gears make a bit of noise in low. Why not just throw some 90w gear oil in there? I can't imagine using this in the winter up here in the mountains. How is this gearbox any different than the one right next to it with the 4 speed?
 

Abseim

Well-Known Member
Joined
Apr 20, 2023
Messages
62
Location
New York
If it has leaks they will be quite obvious.
Manifolds for your gas 188 should be available in salvage yards.


I have a 480ck with a 148b engine. I think the 580ck has the 188?

I found a manual for the 580 and other that having a lot more options for shuttle and torque converters, they are almost identical in construction, just mine is slightly smaller.
 

Tinkerer

Senior Member
Joined
May 21, 2009
Messages
9,376
Location
The shore of the illinois river USA
I have a 480ck with a 148b engine. I think the 580ck has the 188?

I found a manual for the 580 and other that having a lot more options for shuttle and torque converters, they are almost identical in construction, just mine is slightly smaller.
The 480CK was was produced with either the 148B gas or 188 diesel engine.
 

melben

Senior Member
Joined
Jan 14, 2008
Messages
1,029
Location
Williamsport, Pa
Occupation
Retired 50 Yrs with Case dealership
I would not put heavy oil in the front box. Heavy oil will not flow as quickly as the light Hytran oil, all those ears run at engine speed and heavy oil may not flow back as quickly. there are gears that run on sleeves with no bearings at all. I would stay with the light viscosity oils.
 

Abseim

Well-Known Member
Joined
Apr 20, 2023
Messages
62
Location
New York
The 480CK was was produced with either the 148B gas or 188 diesel engine.

Sorry, yes, you are correct, I was thinking of the 159g engine I read about in the manual for the 580.

I was looking for a new dipper cylinder, so I went to a salvage yard nearby who said they had a whole row of case backhoes, but all were diesel, and none were a 480ck or 580ck...
 

Abseim

Well-Known Member
Joined
Apr 20, 2023
Messages
62
Location
New York
I would not put heavy oil in the front box. Heavy oil will not flow as quickly as the light Hytran oil, all those ears run at engine speed and heavy oil may not flow back as quickly. there are gears that run on sleeves with no bearings at all. I would stay with the light viscosity oils.
That makes sense, thanks for explaining!

Any idea about the fill level? Looking at the cross section above, it shows the dipstick just sticking below the main shaft, and I don't believe I've ever seen a dipstick where the full line wasn't an inch or so up from the end of the stick. Safe to assume "full" is where the oil level is just covering the main shaft?

Also that cross section is a bit confusing at first until you realize the final drive on the left is shown as a horizontal section, and the 4sp and shuttle are shown in a vertical section...
 

Abseim

Well-Known Member
Joined
Apr 20, 2023
Messages
62
Location
New York
IMG_0262.jpegIMG_1693.jpegIMG_1637.jpegIMG_1663.jpeg


Ripped out a giant stump from a 100' white pine that was unfortunately located. Took about 3hrs of machine time.

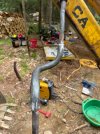
Not sure when it happened, but the steel line to the bucket cylinder got snagged and kinked. Noticed that bucket only moved at half speed.

Tried to heat and hammer back, but it was too much. So I spliced in a random scrap of 3/4 black pipe that I carefully bent up with a vise and the oxy acetylene torch. I finally got to put my ornamental iron work skills to work on this beast!
 
Top