
-
Thank you for visiting HeavyEquipmentForums.com! Our objective is to provide industry professionals a place to gather to exchange questions, answers and ideas. We welcome you to register using the "Register" icon at the top of the page. We'd appreciate any help you can offer in spreading the word of our new site. The more members that join, the bigger resource for all to enjoy. Thank you!
You are using an out of date browser. It may not display this or other websites correctly.
You should upgrade or use an alternative browser.
You should upgrade or use an alternative browser.
Hydraulic fluid flush on a Case 480ck
- Thread starter Abseim
- Start date


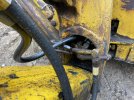
I also flushed the torque tube reservoir. About a pint of water came out first. Anyone have any idea what this red fluid is?
I replaced it with 5 gallons of straight 30 conventional motor oil that I had picked up awhile ago at a clearance price.
Also, the shuttle cover is missing the breather assembly. This is the only place I have found where the service manual shows something I can't find in the parts manual. My parts manual shows a few other covers, but nothing like this one.


rumblecloud
Senior Member
Unreal. The work you're doing is way outta my league. Nice .
Hard to imagine that little Case is managing those loads.
Hard to imagine that little Case is managing those loads.
Update on the carburator:Zenith ? OR a Zenith style ?
It should be a Marvel- Schebler. With or without a solenoid on it.
What you describe is a problem with the idle jet.
It may be damaged from having the set screw turned in too far/ hard. IMHO
Have you tried screwing the idle mixture screw out to make run richer ?
If it is set too lean it will cut out the slower you try to set the idle speed.
Provided the float is adjusted and working properly.
It's definitely something up with the idle jets, thanks for pointing me in that direction!
I had to turn the idle screw out 5 turns to even start to make a difference, but the screw wants to fall out around 6-7 turns.
Called carbdoc.com and asked about a rebuild kit. He said the Zenith I have is the listed replacement for the Marvel Schlebler. A rebuild kit was $34 and is now sitting on my shelf to install next weekend.
I looked over the intake manifold and it seems to be in good shape. I didn't want to pull it to check the gasket till I have the replacement parts on hand, but I'm pretty sure it's just the carb that needs work for now.
Thanks again for the helpful advice!
1968 Case 480CKIf you post the tractor serial number it would help (maybe) find that breather assembly.
SN: 8363251
I suppose what I really need to figure out is the thread size, and I could bend up a pipe elbow and put a little NPT breather at the end.
stinky64
Senior Member
- Joined
- Feb 25, 2017
- Messages
- 1,669
- Location
- java center ny
- Occupation
- big truck wrench/fixer of things
Atta boy, just make it work.
stinky64
Senior Member
- Joined
- Feb 25, 2017
- Messages
- 1,669
- Location
- java center ny
- Occupation
- big truck wrench/fixer of things
Looks like ATF milkshake, stick yur finger in and taste it, you'll know, or you could do the finger tip feel and smell test.View attachment 287653
I also flushed the torque tube reservoir. About a pint of water came out first. Anyone have any idea what this red fluid is?
I replaced it with 5 gallons of straight 30 conventional motor oil that I had picked up awhile ago at a clearance price.
Also, the shuttle cover is missing the breather assembly. This is the only place I have found where the service manual shows something I can't find in the parts manual. My parts manual shows a few other covers, but nothing like this one.View attachment 287655
View attachment 287654
That looks like a common hydraulic breather from that era, I've seen them in 3/4" but they could come in 1" too? It has a filter of sorts inside, more of a honeycomb of some material to keep the bigger bugs out. The top screw is typically not water tight anymore and will leak rainwater, I'd Jbweld the screw to the cover, then you turn the cover and the screw comes out with it. Remove cover and filter and it acts like a filler, can fit a small funnel, or it holds a siphon tube.
That looks like a common hydraulic breather from that era, I've seen them in 3/4" but they could come in 1" too? It has a filter of sorts inside, more of a honeycomb of some material to keep the bigger bugs out. The top screw is typically not water tight anymore and will leak rainwater, I'd Jbweld the screw to the cover, then you turn the cover and the screw comes out with it. Remove cover and filter and it acts like a filler, can fit a small funnel, or it holds a siphon tube.
I've been using these breathers as replacements for the ones on top of the loader frame, they seem really high quality (link)
I guess what I need more is the nut and 90deg tube shown in the illustration, or at least an adapter for the cover to npt threads and I can take it from there.
I guess I'll pull out my thread gauge and caliper next time I'm there and see if I can determine what type of fitting it is.
Gotcha, I misunderstood the parts. That part diagram and those threads don't look NPT. I could guess at the thread type, but I'd probably just use a PVC conduit elbow and stick it in with silicone, or heat it and expand then thread it in and seal with a bead of silicone. A threaded adapter and breather filter and it will be better than it was new.
That would work for sure, but I really don't want to pull that cover back off if I can help it. That's the cover that requires hoisting up the gas tank and steering column to remove, and it's really tricky to put back because the shuttle and range selector forks both have to align with the collars, and it's all by feel with no way to see inside with all the stuff in the way...Another option is to get a NPT tap and retread it.
And I already sealed it with permatex and bolted it tight to stop it from leaking fluid around the perimeter of the cover whenever I drive it.
I think the reason it is a tube with a swivel nut is so the tube can stay stationary while the nut is tightened because this all fits in a tight spot between the loader frame and under the clutch pedal.
 Ok
OkI'm working on resealing the final 4 cylinders on this machine, leaving one stabilizer as is because somehow it's the only cylinder that hasn't leaked a drop yet. This pic is from last weekend when I took them apart. The two lift cylinder seals were both intact, but oozing, every other seal breaks apart like candle wax.

Using a boring bar on my lathe in the city to clean out the recess for the gland seal. It originally had paper gasket shims behind the the main seal. They trap water and then rust. Some cylinders are really bad and I can't clean out the recess with a pick.
I'm using the boring bar as a scraper, just turning the chuck by hand and carefully adjusting the cutter so it just scrapes the surface and takes off a very tiny layer of metal. I don't have the sort of internal measuring tools to do this with any precision. Also this gland nut material is such a weird metal. It seems so soft and easily marred, and it machines like butter. Anyone know they alloy? I don't have much machining experience, but I know this feels different than regular steel.
Update!
Cleaning out glands with the lathe made all the difference! I've rebuilt all the cylinders on this machine now, but I have to go back and redo the boom cylinder, I did that one first and it's still leaking, I assume around the backside of main gland seal. I'll have to take that one off and run it on the lathe. This backhoe boom cylinder is such a bad design. There is no boom lock, and all the weight of the hoe is on the boom gland seal. You'd think they would have had the boom cylinder below the boom so it pushes to lift, instead of pulling to lift. Right now I have to reach back and pull it up every 5 min or so.
Also need to do some work on the swing tower manifold, it's a mangled mess and one hose just bypasses it but is a bit too short, so I can't extend boom all the way...
But I got it all put back together and got about 6 hours of work out of it! It was so much work being my own ground guy, constantly jumping out to hook chains or toss rocks in the bucket... So I taught my 9yo son how to operate and understand hand signals. He picked it up quick and ended up running it for about 3 hours following me around moving rocks
Attachments
If it won't idle below 1200 rpms something is preventing the throttle plate in the carburetor from closing down to where it should be.
If it isn't the idle set screw remove the carburetor and see what the problem is.
I finally fixed the idle issue. It was a combination of the carburator, spark plugs, and timing.
I rebuilt the carb, I only ended up using 20% of the kit contents. mainly just a few gaskets and a new float valve. Lots of extra parts that didn't apply unfortunately... The old idle screw was way nicer and a better fit than the new replacement, and it didn't come with a new idle jet. I'm not sure if I actually fixed anything?
The old spark plugs were in decent shape, but all four were only finger tight!!! I put in 4 new ones with the correct gap and torqued to 35ftlbs.
I checked timing with a timing light, it was running at about 40deg btdc! Moved it back to 25deg. Also put a new distributor cap on, old wires are missing boots and lots of corrosion on top sockets of old cap. Had a set of new wires, but the wrong sizes were sent and some were too short so I brushed the ends of the old wires and reinstalled.
Now I can turn the idle screw and the idle jet and the engine responds immediately to my adjustments, I can idle the engine down to just a few hundred rpm now and it will stay running.
There is an outside chance you have a vacuum leak due to a leaking intake manifold gasket.
Or somewhere else.
I would prolly separate the exhaust and intake manifolds and look for a problem where they are joined together.
A GM alternator can be converted to a simple three wire configuration.
The indicator light and an ammeter will be fully functional.
It is my preferred method
I was putting it off as long as possible, but eventually I couldn't rev fast enough to kick the generator on, so I replaced with an alternator. Napa only had 3 wire alternators in stock.

Had to make custom brackets out in the woods, unfortunately forgot to take a pic of lower bracket.


Also put in a voltage guage to see when it's charging. I only hooked it up as a two wire right now, I couldn't find a diode for the exite wire. But I can see the alternator kick on a few seconds after starting and it seems to stay running even when idling, so maybe I won't need the excite wire?
Last week I also noticed when rebuilding stabilizer cylinders that the stabilizer bushings were extremely worn. One worn clear through! I realized how little they actually worked to hold the machine still while digging, the loader was doing all the work to resist the backhoe force.
I ordered new bushings from Dale at e-backhoeparts.com. He was able to find substitute bushings for $18 each instead of $100+ each.
I used a torch to cut out all the old bushings and welded in the bushing that hard worn through.
Got it all out back together and it's so much nicer using the hoe now, it feels so solid! No more sliding back and forth constantly.
So after getting all the above fixed, I ran the machine hard for about 6 hours yesterday leveling out the ground for my shop foundation. I started to notice I was leaving lots of oil drops on the ground, way more than normal.
I looked underneath, and I could see a steady drip from my right brake housing... Had about an hour before we had to pack up and head home for the week, so I quickly tore into it so I could get parts coming.
It ended up being the seal on shaft between the differential and the brakes.
Unfortunately, I see now that I may have been able to replace that seal without pulling the whole housing. I mangled up the shims and when I pulled the housing I lost almost all the new gear oil I had added after flushing just 2-3 weeks ago.

Question 1: I had used 85-140 gear oil instead of 80-90, figuring I'm not using this in high gear or in the winter, and the thicker oil would be better for the old gears. It is possible that's what blew out the seal?
Question 2: the brake pads got soaked in gear oil. Can I just soak in solvent and burn off with a torch? My ground is pretty flat, I'm not taking this in high gear on the road. I only use the brakes for turning sharp or when it wants to roll slightly when I push the clutch to shift. What can go wrong?
My makeshift shop in the woods is really getting out of hand, so I spent some time organizing tools on pallets. I'm new to all this mechanic stuff, I'm used to using saws and drills and carpentry tools, not wrenches and sockets, etc.

I looked underneath, and I could see a steady drip from my right brake housing... Had about an hour before we had to pack up and head home for the week, so I quickly tore into it so I could get parts coming.
It ended up being the seal on shaft between the differential and the brakes.
Unfortunately, I see now that I may have been able to replace that seal without pulling the whole housing. I mangled up the shims and when I pulled the housing I lost almost all the new gear oil I had added after flushing just 2-3 weeks ago.
Question 1: I had used 85-140 gear oil instead of 80-90, figuring I'm not using this in high gear or in the winter, and the thicker oil would be better for the old gears. It is possible that's what blew out the seal?
Question 2: the brake pads got soaked in gear oil. Can I just soak in solvent and burn off with a torch? My ground is pretty flat, I'm not taking this in high gear on the road. I only use the brakes for turning sharp or when it wants to roll slightly when I push the clutch to shift. What can go wrong?
My makeshift shop in the woods is really getting out of hand, so I spent some time organizing tools on pallets. I'm new to all this mechanic stuff, I'm used to using saws and drills and carpentry tools, not wrenches and sockets, etc.
Last edited:
rumblecloud
Senior Member
The pic with your son in the saddle is priceless.