• Thank you for visiting HeavyEquipmentForums.com! Our objective is to provide industry professionals a place to gather to exchange questions, answers and ideas. We welcome you to register using the "Register" icon at the top of the page. We'd appreciate any help you can offer in spreading the word of our new site. The more members that join, the bigger resource for all to enjoy. Thank you!

Section for komatsu d20,21 and similar grey market dozers

Krackerjack9

Well-Known Member
Joined
Dec 3, 2007
Messages
184
Location
working at Camp Anaconda,Iraq
Occupation
working in Iraq right now
in the photo I was doing that but with a piece of pipe and I had the chain and binder pulling on it, yep got the zert out and that big bolt that it screws in to backed almost all the way out
 

Krackerjack9

Well-Known Member
Joined
Dec 3, 2007
Messages
184
Location
working at Camp Anaconda,Iraq
Occupation
working in Iraq right now
put 2 chains and 2 ratchet binders on it and ended up breaking a 3/8 chain so looks like this dozer will be heading to the scrap yard. not going to spend 4k to put new track adjusters on it, if anyone needs some brand new grouser track let me know
 

g_man

Senior Member
Joined
Apr 21, 2011
Messages
321
Location
Northeastern VT
Occupation
Retired
That "big Nut" the zerk goes into is probably the check valve. I would take it right out so you have an open hole that the crusty old grease can flow through. Do it careful - there might be a ball and spring that can fall out. When you put it back together after you clean it out. Before you put it back on the machine. Put the zerk back in and pump some grease in telll the cylinder extends a couple inches. then take out the zerk and check valve and push the cylinder back until no more air comes out the hole. That removes the air pocket you will get if you just start pumping grease in. The air pocket will make it spongy. After you get the air out put the valve and zerk back in and put it in the machine.

gg
 
Last edited:

Krackerjack9

Well-Known Member
Joined
Dec 3, 2007
Messages
184
Location
working at Camp Anaconda,Iraq
Occupation
working in Iraq right now
Great news grinded off that tab between the nuts and got a 27mm socket on it and 5ft cheater pipe and been soaking it in penatrating oil the past couple of days, well started pulling and at first it was just starting to twist off the nut then it barely moved and small crack appeared reset the socket and pounded till it was grabing the other side and started pulling again about a 1/8 of turn at a time, took for ever to get it all the way out then slowly the snake of grease started to comin out the outer part was like a hard shell but inside it was just grease reset my chain and binders and tightend and grease keep coming out and the yoke started going in till it was all the way in, pulled the yoke back out and inside the tube it was just like polished chrome so looks like the seals are still pretty good after all these years, put it back in and the 27mm nut and zert started pumping and ran it almost to the end where it was and then used the same procedure to get the grease out so im pretty sure its going to be good to go now to the other side that one the nut just needed a nudge with the cheater pipe and after that just the 1/2in rachet got it moving.IMG_1434.JPG IMG_1433.JPG IMG_1431.JPG
 

Krackerjack9

Well-Known Member
Joined
Dec 3, 2007
Messages
184
Location
working at Camp Anaconda,Iraq
Occupation
working in Iraq right now
Seems like im never going to get these tracks on, so im planning on vacation and schedule the Komatsu service truck to be here on Monday morning, they come out set up their trucks and guess what their track press can not even get one pin to move at all. So they tell me their going to take the tracks to the shop and use the press there to due the job, Ok fine figure they be back here on Tuesday by noon, well get a call still the same thing they cant get the pins to budge, so im told they are going to take them to a competitors shop Wednesday morning get a call saying no luck so im pretty bumbed out due to I had a good job lined up for the dozer on Friday and it looked like it wasn't going to happen. So they tell me their going to make some calls to some service guys and see if they this one portable track press no luck. So the next call is that their sending them to a shop in Dallas to get them done. No im wondering how their going to press the pin in here at the house once they get them to the right length im guess their going to make the pin skinner. heck I don't care if they get one that just slides in one can always put a well across it and if needed you can always grind it off. So now the word is they will be back in Corpus on Monday so maybe Monday afternoon or Tuesday morning they might be on.
 

Krackerjack9

Well-Known Member
Joined
Dec 3, 2007
Messages
184
Location
working at Camp Anaconda,Iraq
Occupation
working in Iraq right now
Its been a long time but the tracks are on, ran it for about 2hrs and every thing is working good except for the altenator, the warning light is on and one of the Komatsu techs who was putting on the tracks said it looked like I was missing the exciter wire?? it goes from the one post to the ignition he said. so I figured it must have just came off but I looked and looked and cant seem to find it so does anyone have a photo of their altenator and where the wire needs to go go thanks Geo
 

Krackerjack9

Well-Known Member
Joined
Dec 3, 2007
Messages
184
Location
working at Camp Anaconda,Iraq
Occupation
working in Iraq right now
I think you can register with Kubota and once your in then you can access the parts for your machine, so far I havnt heard back from Komatsu but I talked to them about it here locally and that's what is supposed to happen
 

Don Shilling

Well-Known Member
Joined
Aug 10, 2019
Messages
147
Location
Texarkana, Texas
Occupation
Retired, multi occupation
I think you can register with Kubota and once your in then you can access the parts for your machine, so far I havnt heard back from Komatsu but I talked to them about it here locally and that's what is supposed to happen
I tried that a while back. Now, it won't let me in saying my email has already been used.
 

Krackerjack9

Well-Known Member
Joined
Dec 3, 2007
Messages
184
Location
working at Camp Anaconda,Iraq
Occupation
working in Iraq right now
anyone have a photo of the altenator the wire that comes from the one terminal opposite from the plug was told its supposed to go to the starter switch but I don't know where, also my clutch pedal is not coming back up, was working great the past couple of days now it just stays depressed I can pull it up with my foot but not sure where to go, put a stronger spring or is there some sort of adjustment
 

Krackerjack9

Well-Known Member
Joined
Dec 3, 2007
Messages
184
Location
working at Camp Anaconda,Iraq
Occupation
working in Iraq right now
D20A-6 Lift Cylinders

...Has anyone information or video for rebuilding the lift cylinders. I have heard, but can't find the source, that it is difficult to remove the pistons...Mine is leaking bad and needs to be repaired...I live in a busy oil field area (Eagleford Shale) and the repair shops do not want any business from casual users...and the prices are incomprehensible. I was quoted over $400 and 3 month wait. Obviously they don't want my business. Thanks for help
the front seals can be found at hose of texas in corpus Christi,tx for $23.00 its real easy, get a good size pipe wrench unless you can find that spanner wrench its a odd one, any way use pipe wrench and just slowly apply pressure might have to take a hammer but hit down by jaws it will start to move, also make sure you disconceted the oil lines, once you got the head loosedned then unbolt the two bolts take out keeper then knock the pins out, lift up rod and pull out the whole thing should come out then put the road and pin back in thise way you can use it to hold the road to take off nut, now I would take a good photo of both pieces there is a white plastic inner band that a o-ring is next to and you want to make sure you get it on the correct side once you put it back together, the top metal seal is a pain to get out and a good pick set will get out the seal that is inserted on the inside below the metal seal. put new seals in and line the inside of cyclinder with grease once you drained out all the oil, don't be surprised if it has some water in it shouldn't be much just a table spoon or so. then put back together, its easier than it sounds
 

Krackerjack9

Well-Known Member
Joined
Dec 3, 2007
Messages
184
Location
working at Camp Anaconda,Iraq
Occupation
working in Iraq right now
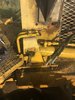
ok the top cylinders I thought were going to be a pain but turned out to be one of the easiest to due
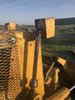
1 loosen up the collar first with a pipe wrench or the correct spanner wrench if you can find one,
2 then loosen up the key that holds the pin in place, you only need to take the one out by the cab the other one is to hard to deal with,
3 loosen the hoses and take off
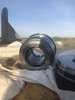
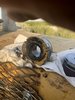
4 knock the pin out you don't have to knock all the way thur just enough to get the cylinder out, now finish taking off the head or that collar slide it back and take a photo of it there is one
plastic ring in there with a oring, 99% of the time these do not need to be changed out but you just got check most likely their fine due to know one has changed them anyway
5 pull the cylinder to the front of tractor then raise up to clear the brace or rops depending on your unit.
6 now a lot of oil is going to come out once you start pulling the cylinder up so be ready get a large old hose and slide over and have it going to a bucket or some other catch device.
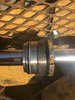
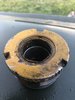
7 once you got cylinder clear you will see the outer orings and seals on the back head those should be fine unless their torn up or scored really bad then you have to change em out
8 the front head the inner seal is easy to get out with a pick, the front seal towards the front of the head is metal and its a pain, I took a pair of dykes and cut a good 1/4 of the top part of the
seal out then use a small flathead screw driver or chisel but be careful the head is aluminum and scores easily. before that there is a metal keeper on top a pick can get it out after a few minutes of prying then start on the metal seal
9 once you get it out then clean real good break cleaner or your favorite stuff. the inner seal is easy to pop in the flat side goes in first the crown of the seal will be facing your , the metal seal
that one I used a 1 1/2 in socket and fliped it over and placed on top of the seal, flat side down the crown will be up, put socket over and grease it up and tap it in, then put in metal ring or keeper and that's it.
10 put a fair amount of grease on the rod and outer heads and seals, put back on road and tighten nut up I forgot to mention that should be around step 8 or so.
11. even though you got oil in the cylinder still put some grease in there so the seals will pick it up plus the it will hold the O rings in place once you start tighting up the head to the cylinder
12 that last o right could give you problems once there is only 2 or 3 thread left and the oring put some more grease there so you don't compress the oring it needs to slide under the cylinder as you tighten it and that's it
 

Attachments

  • IMG_1525.JPG
    IMG_1525.JPG
    2.3 MB · Views: 31
  • IMG_1526.JPG
    IMG_1526.JPG
    2 MB · Views: 25
  • IMG_1527.JPG
    IMG_1527.JPG
    1.6 MB · Views: 28
  • IMG_1528.JPG
    IMG_1528.JPG
    1.7 MB · Views: 28

Krackerjack9

Well-Known Member
Joined
Dec 3, 2007
Messages
184
Location
working at Camp Anaconda,Iraq
Occupation
working in Iraq right now
here are the rest of photos of head and seals you can see how there just gone but they were leaking but not anywhere as bad as the lower ones so should be good for another 10-or 15yrs
 

Attachments

  • IMG_1529.JPG
    IMG_1529.JPG
    905.4 KB · Views: 18
  • IMG_1530.JPG
    IMG_1530.JPG
    1 MB · Views: 18
  • IMG_1531.JPG
    IMG_1531.JPG
    1.5 MB · Views: 19
  • IMG_1532.JPG
    IMG_1532.JPG
    1.2 MB · Views: 18

Krackerjack9

Well-Known Member
Joined
Dec 3, 2007
Messages
184
Location
working at Camp Anaconda,Iraq
Occupation
working in Iraq right now
Well I junked the old rops and kept the arms but rebuilt the whole thing I feel a bunch safer sitting in there just need to add a screen on the back I put a Oh Sh-t bar on the bottom side of the roof something to grab on to. New seals, new clutch disk and drums, new tracks and sprockets, just waiting on a new track seal grease valve and this baby will be good to go to make me some $$$ I got 18 people on a list waiting, im charging $50hr 4hr minimum and anything over 25 miles adding $25 fuel charge over 50 miles adding $50 got several customers ove 100 miles away adding $125 fuel and 8hr-10hr minimum. My job in the oil field sank so this has been a true blessing
 

Attachments

  • IMG_1552.JPG
    IMG_1552.JPG
    1.3 MB · Views: 33
Top