Grader4me
Senior Member
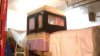
I have not made up my mind weather to change out the back window and make it non opening or try to make something work to keep it as an opening window. It does not get very hot here and the motor does put out a little noise so I am leaning to a solid window in the back.
I would just make it a solid window. A rear window that opens would help cirulate the air better, but also it would make it louder in the cab. Also more chance of picking up exhaust fumes.
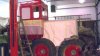
So what type of plowing will you be doing with your grader...parking lots etc?


") ).
).